
My last post about this jacket was over 4 months ago as I was busy with
family things and making the outfits for the murder mystery weekend (with of
course the exception of David’s Franciscan monk’s outfit that he made entirely
by himself), posted earlier. However, I hadn’t completely forgotten about the
jacket.

This post has been part written on each of several days. Today I just wanted to get it posted (I'm still feeling rather unwell). The quality of the photos could be better (understatement!)

After my last post, I removed the sleeves, reduced the size of the seam
allowance in order to give a bit more space for my biceps and re-attached to
the armscye. Previously, my pattern matching was absolutely perfect but for
some reason I couldn’t get it perfect this time - strange as the sleeve
attachment previously was very wonky as I discovered when I was removing - the
seam width changed a few times and in places I had double or even triple
stitched as I was having issues inserting the sleeves originally. I had to
consider how many times it was appropriate to redo and took advice from Rory
and Dan (Gillian's classes were finished) - their advice was that the sleeves
hung beautifully and the pattern matching was fine so to leave. I took their
advice. I also had to take into account that while this jacket will work for
me, the sleeves are too short and although the fringe will hopefully disguise
that, I’m not really a fringe person!! So this could be a really fancy wearable
toile! No, not a toile as I will consider it a finished jacket but it will
highlight any future changes required.
The next step was to create the fringe. As suggested by both Mary
(Cloning Couture) in comment on my last blog post and Kate at my weekend sewing
trip, I did try cutting the fabric strips on the bias and compared this to
straight stitching. However, I preferred the appearance of the straight fabric
strips. In addition, I had originally auditioned two fabric strips on top of
the lining but found I preferred only one as it was less full - as I said
above, I’m not really a fringe/frilly person and I found the two layers to be a
bit ‘too much’. Anyway, I told myself, Chanel actually used the selvedge from
the fabric (I considered that too) and one layer appeared closer to that. I used
the lining fabric cut on the bias to allow it to go around corners more
readily. Some people have asked me about this and how I did it. I'll have a
look to see if I have any photos - I think I do but my computer is in intensive
care and I've bought a new one which I haven't got set up as yet. I might have
some on my phone. I'll post if I can - or perhaps post at a later date. I can't check at the moment.
I created the fringe strips in my sewing bee with Rory. Sorry Rory for
the incredible mess this made (glad I wasn’t doing it at home!!). I couldn’t
believe how many threads and the amount of lint from my fabric strips! I did
have to trim the strips afterwards as they were a little too wide. Even more
mess. I attached the strips to the bias cut lining and was ready to go.
I had already marked my jacket just inside the seam allowance with
machine stitching, which would also act as stay stitching. Gillian had said to
put tape around the neckline but as I was adding two layers of lining
underneath into the neckline turnover, I decided, rightly or wrongly, that I
didn’t need to do this.
I attached the lining part of the strips to the jacket fronts and
neckline, just like you do with piping, carefully ensuring that the junction
between the lining and the fabric lay along the stitching line. This was more
difficult than it sounds as I could scarcely see my staystitching. Maybe I
should have used a contrast colour of thread. I pinned and then tacked. I quite
enjoy the process of tacking (basting) by hand and feel that it made it more
likely for the horizontal patterns on the fringe and the jacket to match. I
then machine stitched the fringe to the right side of the fabric. I did this at
my last class of the year with Lyn, who helped me with the corners. I found it
very difficult to sew with the bulk of the fabric on my right as was required
for one of the corners. I didn't add fringing to the bottom hem. Despite my
care, the pattern between jacket fronts and fringe doesn't exactly match but
I’ve decided to leave it as I don’t want to carry the jacket unfinished over to
2018!
Ha! It's now 2018. Don't say you're surprised that I didn't get the
jacket finished! In December, I started and completed the long-promised red
silk dress for Helen, made a few Christmas presents and finished my knitted
waistcoat. I did a little on the jacket but I'm unfortunately not someone who
can watch TV while working and I usually watch with David in the latter part of
the evening. If I'm really pushed, I'll sew right up to bedtime but I prefer
not to do that.
Next step was to turn up the jacket hem and stitch it in place. I placed
curtain chain weight in the hem fold and secured that at seam lines and the
ends. This was the process if there is no fringing - I'm not completely sure
how I would have done this with fringing. Just a minor modification to the
process, I feel.

I said I didn't like the double fringing but the single seems a bit
scrappy. I think maybe I'm just not a fringing person. I decided I'd continue,
though. Next time I'd go for braiding - I would've done with this one if the
sleeves had been long enough. I bought a choice of braid and of buttons but
haven't used either.
Next, the lining seams. Sleeves first. The under layer of lining is
smoothed across the seam and pinned in place down the seam line. It's then cut
level with the fabric edge (forgot to say seam allowances were trimmed). Then
the other side is smoothed across and folded under level with the seam line and
the first pin taken out and transferred to keep the two lining areas in place.
In some cases, I had stitched my quilting lines too close to the seam lines - I
needed more side than I had anticipated. So I had to unpick a fair bit of my
quilting and re-tie my threads. This is an ongoing task. Next time, I would be
aware of just how far away from the edges I need to stay and this would save
quite a bit of time.

It isn't too difficult - but, boy, is it tedious! I do hope it will be
strong enough! I'd hate my lining to start falling apart.

I continued in this vein, a little bit each day. Things did move on and
the hand sewing was often a relief from the day. Today (Thursday 25 January), I
had just the sleeve lining/jacket lining armscye junction to do. I took it to
class with Lyn - I haven't been well, not yet recovered and wanted a simple
almost mindless task. Lyn advised folding the jacket seam allowances towards
the sleeve rather than opening them out as elsewhere. She felt this would give
a nice shape. I did this, then smoothed the under layer of lining over, pinned
then tacked them in place, identifying the stitching line. Here Lyn offered an
important piece of advice - the need to ensure the lining is not pulled too
tight. I had been pulling too tight so adjusted that. After I pinned the over
lining over, I tacked and removed the pins so I could try the jacket on. I
think it looks pretty good. When I tried on, the tacking stitch was under
pressure in one area so I added a little extra there.
I finished stitching one sleeve in place and managed to get the other
stitched in place tonight.
I'm not putting pockets - or mock pockets, as you no doubt guessed.
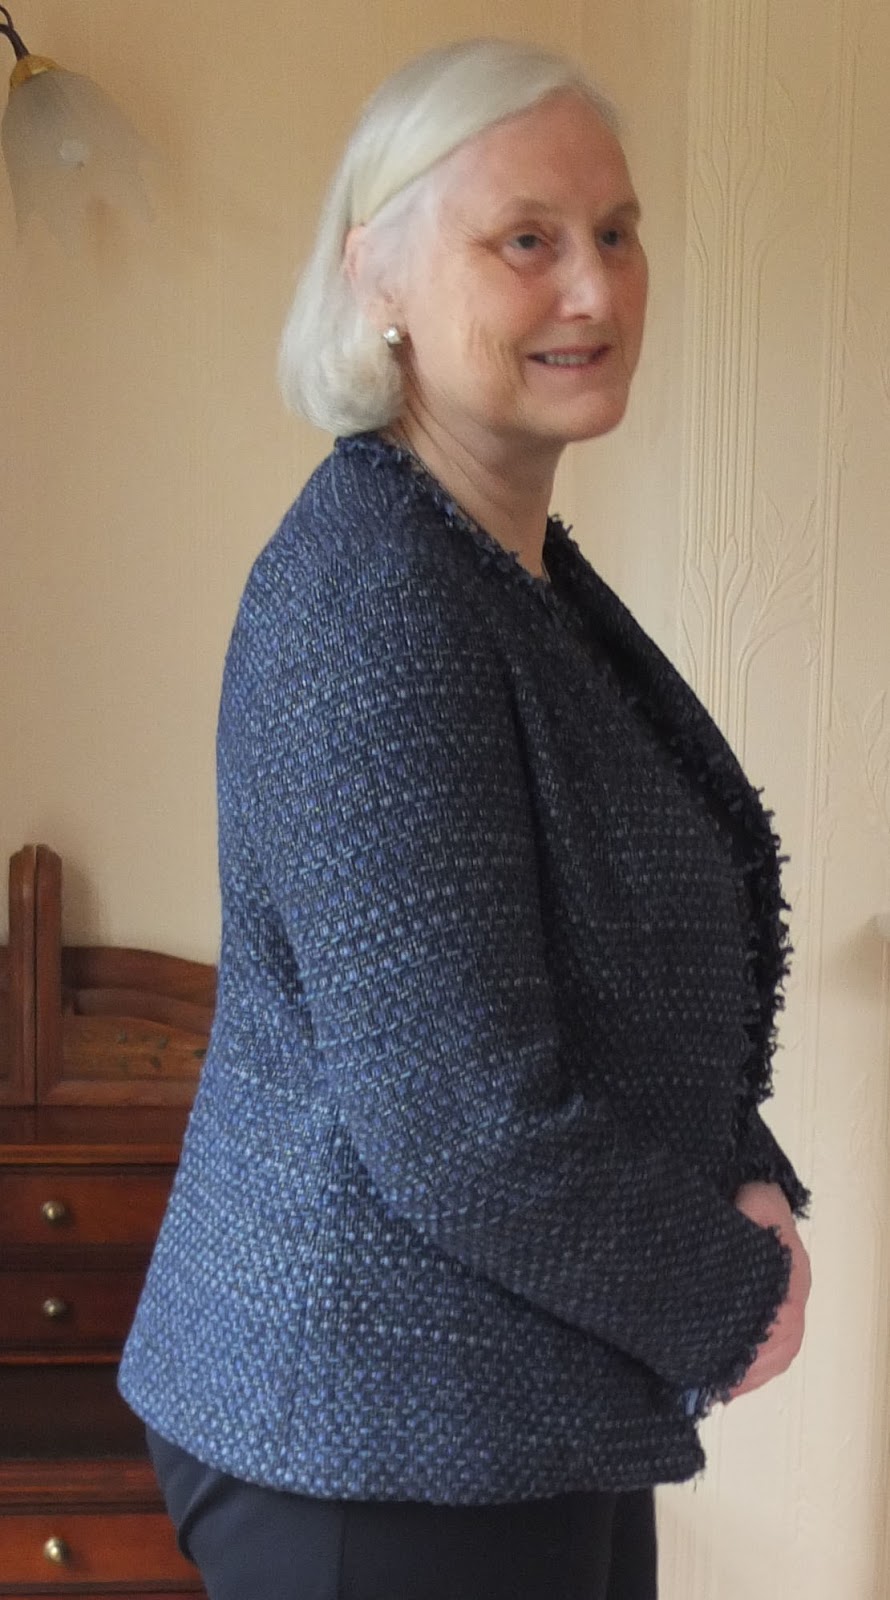
So that's it finished!
I'm quite excited now that I see it finished!
It's rather crushed so I'll hang on Madame and steam tomorrow. David
liked it when I tried it on and said he'll take some photos tomorrow.
I didn't steam before I took the photos as I was worried about losing
what little light there was available. I also realised just now as I was finishing
this post, that I didn't put the chain on around the lining/hem junction -
after all that searching for suitable chain!! I'll probably leave it off.
Summary of resources used:
Chanel jacket class by Gillian Hargreaves - 2 days. I attended with
Margaret (The Crafty Creek), who has blogged about the course. I'm not sure if
she has finished the jacket as there has been no further blog post.
The Iconic Tweed Jacket by Lorna Knight (Craftsy class) I bought this a
while ago and hadn't watched. I found it a great class and enjoyed the
instructor but her methods were slightly different from those I was following
from Gillian.
Books by Claire Schaefer
Assistance in class from Rory (Centre Front Studios) and from Lyn (WEA)
as mentioned in body of text.
Then on to other projects!


