Showing posts with label Repairs. Show all posts

Thursday, 29 January 2015

Jeans class 2 - pockets; DD's dress repair update

I posted my first jeans' class a bit too early; I meant to save and put in some more photos before publishing. Never mind.

Here are photos to end of stage 4. Plus how I think stage 5 is going to go.  I didn't' even know my phone could do that trick with the small insert and I couldn't work out how to switch it off. I eventually managed by switching off whole phone - there must be an easier way, though.

 I've seen a few posts on jeans sew-a-longs e.g. for the Ginger jeans. It strikes me that I might find it useful to read those. I don't have a jeans' pattern and I'm not sure what I would go for. I have seen reviews of Jalie jeans, Jamie jeans, Ginger jeans and possibly some others.  Any recommendations?  I do not want skinny jeans and would prefer a high rise. Another option is self drafting using the Sure Fit Designs system and modifying for jeans. I'm slightly concerned that they would look too grannyish as I don't have the necessary style knowledge - I am a grandmother and I'm not a fan of high fashion (on me that is) but I do like to give a nod to the current century! They would certainly fit better. Maybe skinny jeans that actually fitted my not-skinny legs would look okay; when I've tried on RTW, they look awful.

It might still be better to get trousers to fit well then go on to jeans later. I do have fabric for trousers but not jeans; I'm not sure if the best fabric to go for - should there be some stretch in it?

The weather held up and I got to the class last night. Since then, it has deteriorated. Unfortunately, as have I! Normally, I go to my weekly sewing class today but the combination of the roads, a nasty cough and the lack of a specific project made me decide to stay at home. I'll do this post and finish the waistband lining on the grey wool skirt I needed to modify - that's what I would have been doing in class. I had already deconstructed the skirt to take in the yoke, yoke lining, skirt and lining and last week I stitched them all up again but L, my tutor, suggested that handstitching the lining down would give a better finish than the stitch-in-the-ditch I did the first time around. I also have a couple of pairs of trousers to add faux hems to in order to lengthen. Hopefully, next week I'll start a specific project - though it's been very useful in January to catch up with some repairs.


I didn't take finished pictures of the green dress I was mending for my daughter. It was quite a puzzle.


In this picture, you can't quite see that the rear of the other strap is wide

This loop allowed the thin strap to be lengthened; the torn area was repaired with a patch from the flap. It really disintegrated when the stitching was unpicked.

This rear flap was completely removed

There's no change from the front.
 However, I deconstructed the dress and removed the extraneous and unwanted flap. There was quite a bit of unpicking as the whole area had been understitched too. Where the strap had previously been attached had disintegrated so I had to patch in a piece of fabric on the inside of the yoke, pulling in the remaining fabric to the correct size. - the flap supplied the fabric. Inside the layers, there was clear elastic but I decided not to replace this; I sewed it by machine to the inside layer.  I added to the length of the thin strap using the redundant loop. I decided to leave the strap external rather than sewing it into the yoke in case it needed adjusted. Most of the dress then had to be put together using hand sewing as I couldn't have stitches showing on the correct side only in my repaired part. Where I had stitched the elastic mimicked the understitching in the original. I then skip stitched the tattoo layers together. It was slightly tricky and when I was finished I was glad to post it off to my daughter post haste, which is why I don't have photos. She has told me she's very pleased with the dress; she likes it much better without the flap and says the strap fits perfectly. Job well done!


Anyway, last night's jeans class. A fellow student, Linda, and I were the only two to have completed to stage 4. We had both looked at the next stage and interpreted it differently. We were able to work out that I was correct in pinning wrong side of the pocket to wrong side - she had done right sides - but she was correct in the amount of fabric to be pinned. I had thought it was the whole pocket. She realised the front was taken up in the fly and the side in the side seam. The tutor, D, was busy with other students but was able to confirm our conclusions. It's quite satisfactory when you work something out yourself.

After that, it was fairly straightforward. Seamed wrong sides together, turned, pressed and seamed right sides together to make a French seam. Then the layers were stay stitched together.
1st stitch line


Preparing to stich 2nd stitch line

Layers pinned together ready for stay stitching

View of front before basting together

Then onto the back pockets. D showed us how to make a cardboard template of a pocket so that our two pockets would be identical. I chose a straightforward shape and used the tutor's sizes. We then drew onto calico, adding a 1cm seam allowance all around except at the top of the pocket where it was 2 cms. After cutting the pocket out, we pressed using the template for accuracy. We had a choice for the top of the pocket. The top would be turned over twice and stitched down. However, the choice was in what to do with the side seam. Linda and I both chose to turn in the side seams first so that our top hems would look smooth from the top.

Edges were folded and pressed over template
We were going to have to wait for the rest of the class to catch up. This gave Linda and me a chance to try some decorative stitching on the pocket. I don't like what I did. Fortunately it's just a practice piece. I couldn't see the mark of my white dressmaker pencil and hadn't wanted to risk a darker colour so kept it ultra simple. Linda found a pencil worked well and she could rub out the marks. We were both using regular thread. I know that the pocket stitching and topstitching will be done in thicker thread. I need to give some thought to the eventual design - I like the look of two parallel curvy scrolls. I don't have smartphone photos from class of my pocket stitching - will take photos next week when it's time to sew on to the jeans.

That's where the class ended. Our sample jeans had not been marked with pocket position. So next week, we will start with D showing us how to position the pockets.

It's already evening and I didn't get the skirt yoke started. That's the danger of staying at home - other things always seem to take priority, even when you're not feeling well!

Tuesday, 30 December 2014

Pie Crust Promises and Plans

Well, I reached the end of 2014 with many semi-promised makes unmade. I won't go into these in detail - but there were way too many. DH feels I need to focus on making things for myself, though he's not averse to the jacket I'm planning to make him using the lovely thick Burberry wool I bought when we were in Harrogate. I need to find a suitable pattern as I'm not up to drafting one for myself, though maybe I’ll have to as I haven't found a suitable gents' patterns on my searching (and of course DH has to approve, possibly the most difficult part!). There don’t seem to be many around. Anyone any ideas? I took a photo on my phone of a jacket that was fairly near the idea but it is so out of focus that I can't use it.

The other promises, those that I intend to honour, are New look 6048, a Project Runway summer dress with fairly full skirt, for DD2:


a tweed mini skirt for DD3 using a basic McCall’s 3830
 
 
or Style pattern (1961 or 1987 - both pretty old patterns and not on any database I found) and possibly a further, modified, New Look 6047 blouse for DD1.
 
 
I'm afraid my daughter was ill when she took this photo.


DD1 likes the blouse as she likes simple cuts. She finds it a touch low, by the sound of it, but said that she could fit a camisole underneath, so it sounds as if there is too much ease. I had done a FBA so perhaps I need to keep this but make a smaller size. She would also like it a little longer.  Our plans to visit after Christmas have also fallen through because of illness so I haven't seen the blouse on my daughter as yet and she hasn't been up to taking any different views.
 
I re-start my sewing and pattern cutting classes in mid January and have one more sewing bee next week. In the college sewing class, we're going to be looking at trouser skills and then make a pair of trousers, to fit. Making a well-fitting pair of trousers is something I have aimed towards. I started fitting using the Sure Fit Designs system even before I started on my current path. I made some pretty acceptable but not perfect muslins but I was actively losing weight at the time and as a result, the fit was off every time I tried it. I'm afraid I've put most of that weight back on - but not for long. I do plan to get rid of it again. In a previous class I attended, I started to make a pair of pants from a Palmer Pletsch pattern McCall's 6901, but the summer break then life events stopped me continuing - and the fit was horrendous, even after tissue fitting, so I've had no desire to pick it up again, but pick it up I will do and  either finish or jettison in the next few weeks.  I also need to finish the skirt I started making using the same McCall's 3830 pattern I'm considering for my daughter's skirt, above. Until I finish these two and finish the alterations and repairs for DD3, I'm best not to start anything else. However, I do plan to better document both my stash and my makes.
 
McCall's 6901. This looks slim fit - mine were most definitely not!!

 
My youngest daughter has long wanted a mini skirt made from our family tartan. This is not a tartan in current production (I don’t know if it ever was - certainly not in the years we tried to find it) but a few years ago my husband sourced a 'pattern' for the two tartan variants, the dress (rusty orange red) and the hunting (moss green) and a mill in the borders of Scotland willing to weave it. It cost a pretty penny as there was a minimum quantity required and each yard was pricey anyway. DH ordered the minimum quantity of double width heavy weight hunting tartan. When it was on the loom, he was called to see it and took a bottle of malt (whisky - Dalwhinnie in this case) with him to toast the tartan with the weavers. He got a kilt made from some of the tartan (there's 8 yards of tartan in a kilt) but there's a fair bit left over.
 
You can just see the kilt (hunting tartan) in this photo,
though the tartan itself is clearer - there's some double imaging here. I wish I had a better view.
The ghillie shirt was one of my first ever makes last year. I entered it in a Pattern Review competition for men's wear. It has never been worn since! Now that I have a modern sewing machine, I could have completed the neckline closure, which I couldn't do at the time. And the fabric would be more suitable next time around.

The tartan is really a bit heavy for a skirt for my daughter - and I have quite liked the idea of a long straightish skirt perhaps in tartan but more likely a complementary colour. Women aren't supposed to wear tartan and a tartan skirt alongside the kilt would be too much in any case. So we need to get more tartan woven in a lighter weight.  I'm not sure whether we'll choose the hunting or the dress. We haven't checked to see whether the mill is still in business but need to do so soon. It’s not really worth ordering just for a mini skirt, though, but perhaps we need to do it anyway.

I have been looking in the after Christmas sales and have bought nothing. Not a stitch of clothing. I nearly bought a pair of bargain Jaeger trousers but they were a little large in the waist, so I decided not to - I’m at my maximum weight at the moment. There was also a lovely brown leather jacket which was almost perfect - but the shoulders were a little wide for me.  The smaller size didn't accommodate my hips. I tried on and rejected quite a few other items.

This led me to realise

1.   It's not a bargain if it doesn't fit well, so I end up not wearing it

2.   Cost should not be the prime motivation in purchasing

3.   I need to consider colour more carefully

4.   I need to be sure that any new garment would fit into my wardrobe (literally as well as metaphorically!)

5.   Any garment needs also to fit into my lifestyle.

6.   I'm becoming much fussier, thinking 'I could do better than this' or asking why I should buy something imperfect to alter or tolerate

7.   I have too many clothes already.

8.   Like many, a small percentage of my clothes are worn repeatedly.

9.   I need to discard clothes before I can have more - there is literally no room for more!

Oh, and I have nothing to wear!


Decisions

1.   I am going to spend on average 1 hour per day for the next month going through and culling my clothes. I am going to be ruthless.

2.   I am going to follow a plan - not sure which one yet - to identify a series of outfits I can wear with the clothes I have. I'm reading some blogs for ideas and already have a number of books including Colour Me Beautiful (I was considered a summer years ago but sometimes wonder if I've moved more to winter with my silver grey hair. I might try to get retested)

3.   I am going to identify any gaps in my wardrobe and construct a reasonable plan and timetable to fill those gaps.

4.   I'm going to bite the bullet in more ways than one and I'm going to sign up for the RTW Fast. Am I mad? I'm so slow. I'm not very proficient. Etc.  However,  I have lots of clothes so I shouldn't often be in the position of having a serious deadline (although I have always responded quite well to deadlines!). And it's not as if I can just go out and buy clothes anyway. My skills would hopefully improve dramatically over the course of the next year. I'm assuming of course that I can wear the RTW I have, can modify that which I already have to fit and can continue to purchase footwear, lingerie esp bras and jewellery. I'll check out the rules, though.

5.   I have downloaded an app to help me with the wardrobe planning

6.   Tidy and rearrange ‘sewing room’ aka dining room. A lot of my stuff was moved out for Christmas to allow full use of the dining room. Today we started to rearrange the room with a view to making the layout more sensible and I started to cull my books and magazines. There's already quite a difference. Tomorrow we'll start to move my sewing stuff back in but we plan to keep the big boxes of stash fabric elsewhere (though not sure where that is!) and I might get to start to sew early in the New Year.

Saturday, 25 October 2014

Repairs, alterations and things I should have done in the first place


This post is prompted by Sarah Liz talking about doing alterations, and not liking that very much. How I agree!

When my youngest daughter came home last time, just as she was moving from one flat to another and so had gone through her things, she brought several garments for me to alter. Both her old and new flats have extremely limited wardrobe space.

She did apologise later!

One was a dress I had made her (Cynthia Rowley Simplicity 2250), but the fastenings didn't work properly so okay. I needed to change this as my original wasn't satisfactory in use. The straps were slightly too long and I've shortened them. She didn't want the original 'ears' used to tie the back as they wouldn't fit under a jacket without a bump. I wish now I had just gone with them because the style of the back with elasticated edges makes it difficult to get it to meet. So I had put a piece of fabric underneath and used 4 regular small poppets between the elasticated edge and the cloth underlay (after seeking advice from others). These poppets just didn't hold in wearing. I decided to try much stronger poppets (one of the other garments she brought me to repair had giant poppets so this alerted me to the availability of different sizes). Other options are trouser hooks and bars. My sewing teacher has suggested it's probably worth trying the poppets as the next step, if this is not successful, is making a buttonhole in the strap and attaching a button inside the dress but I fear that would be uncomfortable against the skin for my daughter. I think the result is acceptable but it remains to be seen whether it holds in wearing.


New large poppets and showing addition of fabric strap


Final result, back view; straps are shortened by 2"

No change to front view
 
Call me crazy but I'm going to offer to deconstruct two which are irreparable - one is an expensive lined dress, the other a top with sentimental attachments.

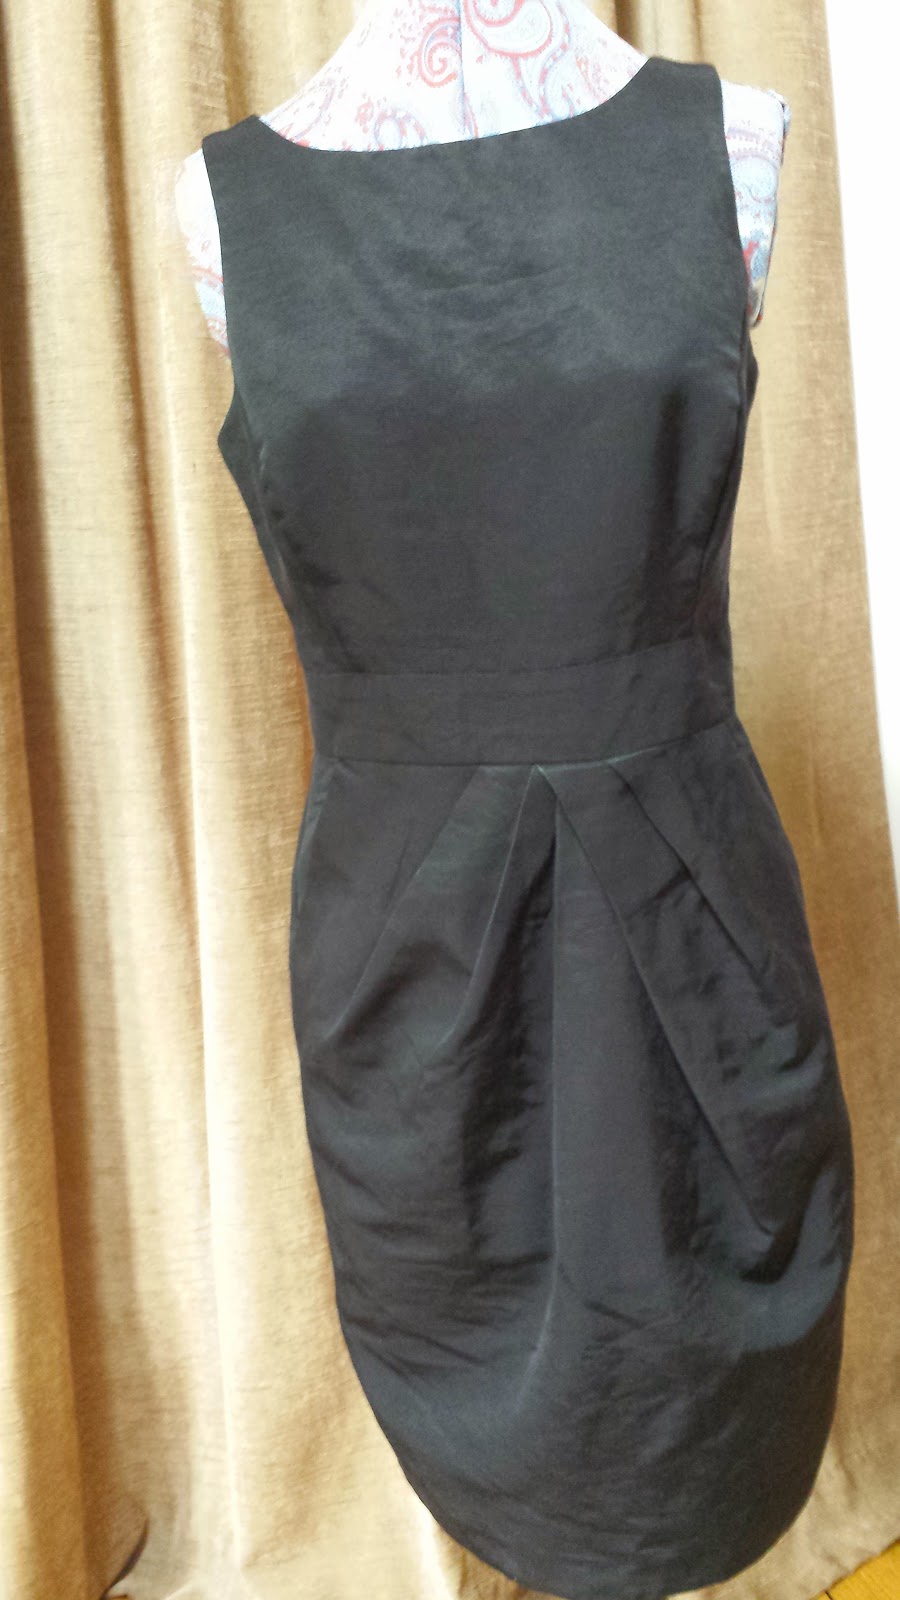
The dress shows evidence that perhaps my daughter has had the dress too long - the lining is in shreds and the seams have not just separated but clearly show evidence of strain: there is damage to the fabric.
This is back vent after repair, turned up to show shredded lining
She is slim but perhaps she is less slim than she was when she got this dress, which is a very closely fitting sheath dress with a pleated front, vented back skirt and an interesting back detail. I managed to stitch up the back seam, below the invisible zip. However, I think that this has never been stitched properly, judging by the pattern of damage. It looks like the fabric had been pulled too far over at the vent area. Someone suggested putting a bow over the damaged area - that might work but the lining is in shreds, too. The top half of the dress is fine. I like the look of the dress and would love to deconstruct and remake it - as long as the dress as is fits! I'm going to visit my daughter next week so will see what she thinks. I don't have a suitable bow to use. I don't intend to do anything other than add a bow - that is, I'm not going to try to replace the lining. I think it would be easier to remake a similar if not identical dress. I have a Burda pattern with a similar skirt. The back detail on the bodice is a problem, though

 
The dress has a lovely classic overall shape

I really like the detail on the bodice back

Repaired back seam. Dry clean only dress in need of cleaning and pressing!
 
 
After repair to back seam; shows damage to fabric where I think stitching was incorrect in first place
 One dress was no problem - it was essentially just stitching on a fancy fastener - a giant poppet.. At least, then I found some of the other fasteners were loose too. As this dress has a full back exposed zip, I'm not too sure why it needs the giant poppets!
 
Overall view of the dress. DD has slim hips so can afford to wear this style.

Close up of top poppet fastening
 
Rear exposed zip

Close up of outside of front, over poppets; some interesting embroidery in cruciate shape
There is another top (dress?) and to be honest I haven't a clue how it works and so can't work out how to fix it! A strap has come off, but I'm not clear where it fastens to re-sew it. There is an area of damage, which I reinforced with some fusible interfacing but this one needs to wait until I see my daughter.
 
Front view


It's a strange floppy bit - does it go up like I have pinned? Does strap fix to it?
Area under floppy bit with loop and damaged bit (see next photo).
Can just see other strap - much thicker - and no floppy bit!

Not sure if strap joins here; evidence of previous repair
 
One of the other tops has a double layer - a fine fabric over a stretch fabric and the fine fabric had frayed on one side of the back seam, coming free from the seam. I've unpicked the seam and reattached slightly narrower to take in good fabric. I hope this top wasn't too small as it's slightly smaller now! However, I think it is quite a loose fitting style. The end result looks acceptable so I can just hope it will work in practice. When I put it on the model, I realised it is a dress not a top!


Seam has been repaired - just about to repair hem (while watching TV)

Fine printed light grey fabric over a darker grey stretch base


That brings me to the other top my daughter wanted repaired. It is a black relatively fine cotton cheesecloth type cloth with a heavily embroidered yoke, which she absolutely loves. The fabric in this case is irretrievably damaged. There are two options (other than abandoning the top altogether that is!) - one is to take the top to pieces and use the sections as pattern for a new top, re-inserting the original embroidered yoke; the other is to make up a completely new but similar top using a pattern that I have already but it would be more difficult to get the yoke to fit. It's also going to be difficult to get the black fabric. There is just no way, I believe, to repair this, unfortunately.


Daughter tried to repair with large stitches - fabric coming away

The tear is under arm from front to back


Overall back of top

Back of top showing yoke with embroidery

Overall view of top


I took the garments to my sewing class for some advice. One of my fellow students commented that my daughter's style was quite adventurous (I can't actually remember the word she used). When I was ironing and photographing the repairs (on my smartphone - it was handy and just easier - and I hadn't realised until now I can upload straight from my phone - so much quicker, though no editing of them), I realised that was the case. I also saw that the black dress was very much more difficult to get onto the model, perhaps another reason it got so damaged.

Hopefully my daughter will appreciate the repairs I've done - but not too much as I'd prefer not to have to do any more!  I think she should perhaps invest in some new items. I'm not sure whether her garments show evidence of having been loved - or abused. But I'm sure I can't restore them to their former glory.


How Do You Read Blogs?

It's a while since I've posted a blog,  lots of reasons. I'm thinking of starting again. However,  I used to read the blogs I fo...