Sunday, 28 September 2014

Thoughts on Stretch and size

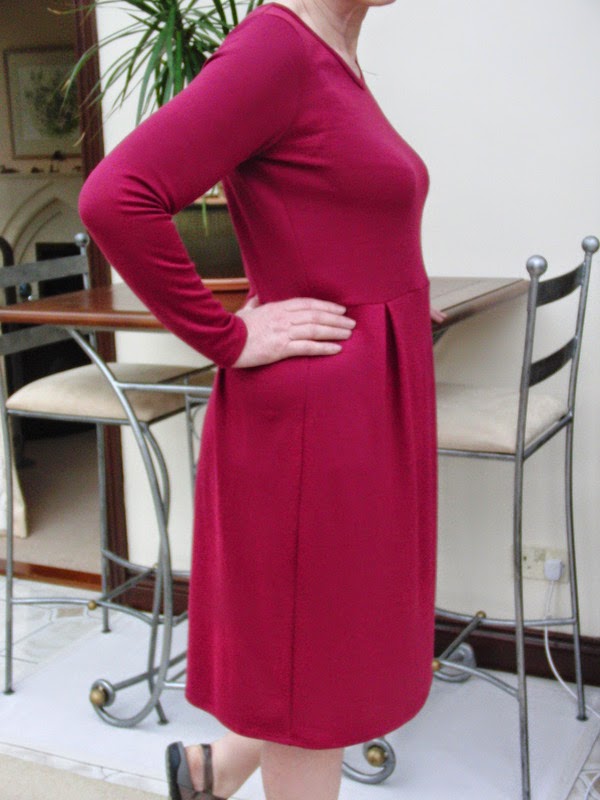
A while back, I made Pattern Review's Winter Street Dress.  I adjusted the pattern to account for my long front bodice, in particular; however, when I made the dress the bodice was still too short (I should say that on looking at these photos the length of bodice being too long in my opinion at that time is less obvious). This, by the way, was my first real experience of a stretch fabric.

Next, I further altered the pattern - bodice length needed to be greater to bring the waist into line with my waist. I like any waistline to be at my natural waist - in this dress, I felt the original pattern as modelled  had a waist almost like an empire line. This was not a feature I liked. I made up this dress in a fabric very similar to the first, both plain coloured fabrics with some but not much stretch. I felt the final dress I made from this fabric was a good fit. Since then, I have worn the dress a few times and washed it a few times and it's possible it has shrunk a little. I'm not sure - in the same time scale, I was putting on weight, regrettably!


So, I thought I had a pattern adjusted perfectly to my body (I hoped I had one of those TNTs that people talk about!) and went ahead and made another dress with a floral stretch fabric. This fabric was much more difficult to work with. It was thinner, stretchier and altogether 'flimsier' than the previous fabric. I had difficulty sewing on the neckband and was unable to do it the same way I had in the previous dress, where I stitched in the ditch to make the stitching invisible; this time, I had to end up with stitches that showed; I also had 3 tries at the neckband before I was successful. However, I was pleased with the final version, and wore it a couple of times.
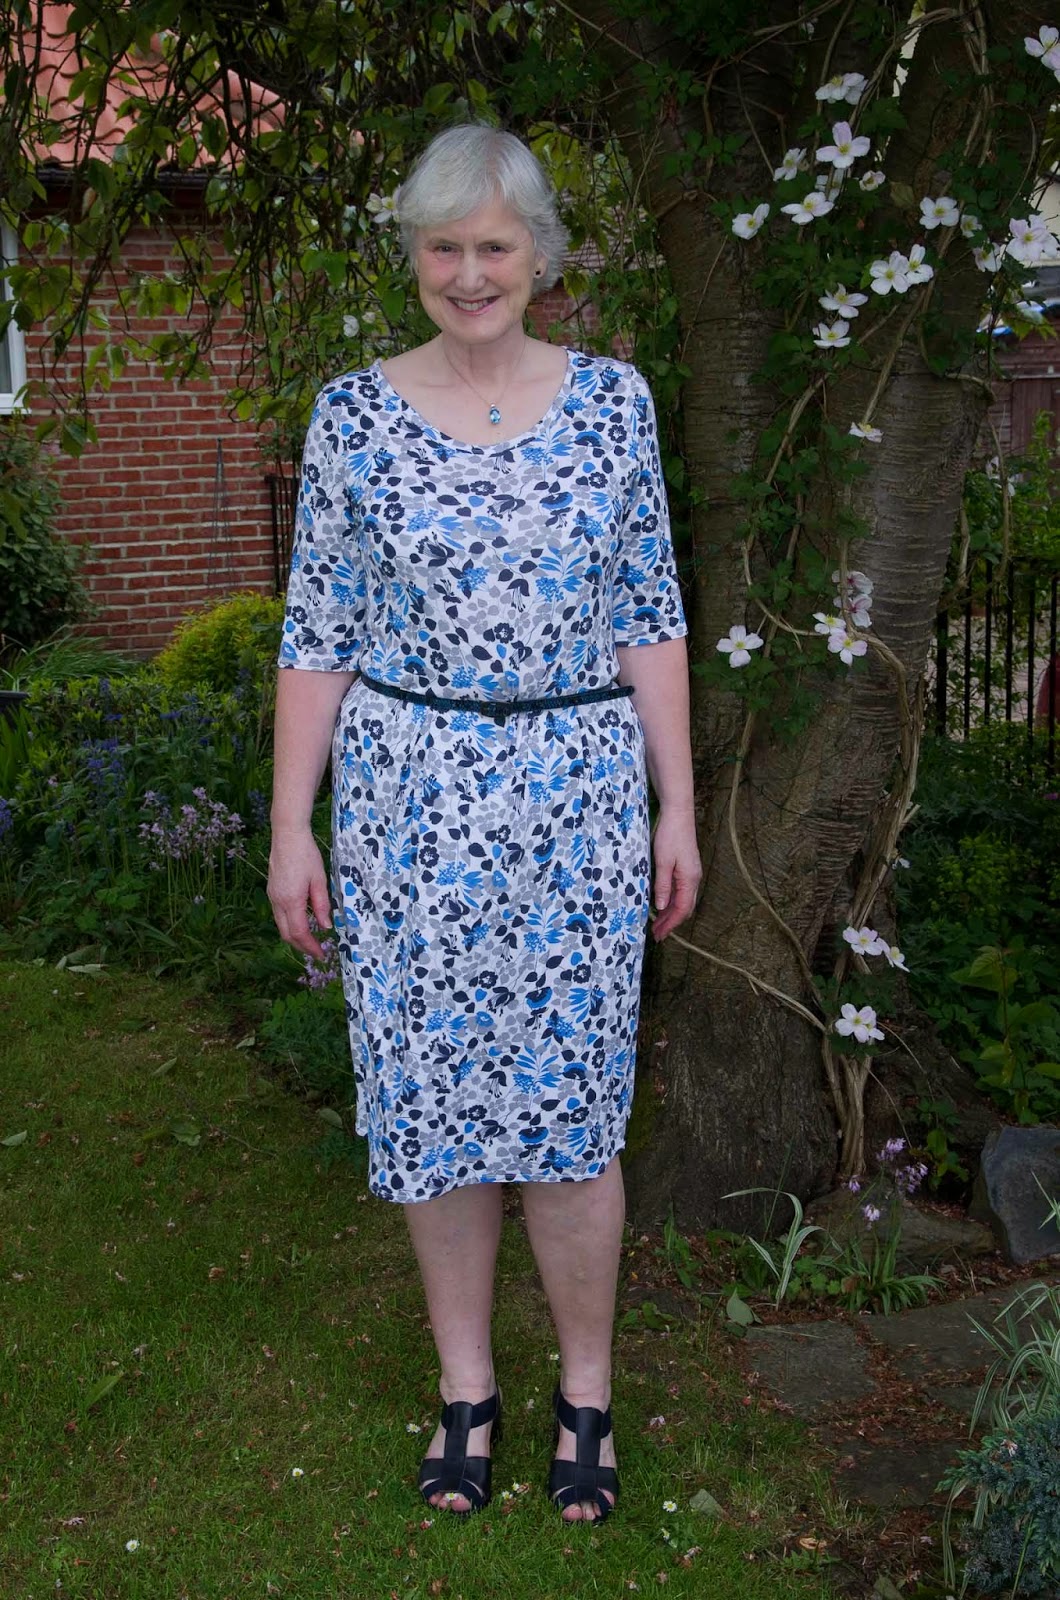

For me to wear any of my makes was quite remarkable - these were the first two I ever wore outside the house.

Then, a couple of weeks ago, I went to put on both dresses, on different days. The teal blue dress felt tight but not overly so and I was happy to wear it. I felt pretty good in it. Then, a few days later, I went to put on the floral dress. It felt bigger than the teal and looked long. I wore it, but didn't feel altogether comfortable. I realised that the waistline was sitting too low, by about 1 inch. After some measuring, I realised that the fabric had stretched. I don't have a photo of me wearing it - I thought I had but can't find it.
Floral dress held up against me while wearing blue dress
I took this dress to my sewing class on the following Thursday. What I wanted to do was to reduce the bodice length by about 1 inch and also reduce skirt length by at least the same amount. I tacked the skirt and bodice to each other, taking up 1 inch on each, for a total reduction of 2 inches and tried it on. It looked much better. I'm in the process of unpicking the previous stitching, which was over clear elastic. Then, I'll sew the two together, using my new overlocker and feeding the clear elastic at the same time. At least, I understand I can do that but I haven't tried it yet. I'll post a picture of the dress on this post as an edit when I've finished my alterations.

My question, though, is how do you know how much a fabric is going to stretch? I had prewashed and prepared the fabric. The pattern, by the way, didn't specify a degree of stretch. My tutor has advised sewing in fabric loops when I sew the bodice and skirt together again - she said this would minimise stretching when the dress is hung up.
I'd like to make the pattern again, but I'm completely unsure whether my alteration is now too much. I do, however, have a third fabric similar in characteristics to the first two I used. I'm less keen on the colour, which is rather too green for my liking. Maybe that would be successful.

I notice on some Pattern envelopes, there is a required degree of stretch, and I would like that to help me see if my fabric is suitable for the pattern.

Also, I understand there is some differing terminology. 'Two way stretch' can apparently mean the same as 'four way stretch'. This means that if I see pattern recommending 'two way stretch' I don't know if they mean both horizontal and vertical stretch (which some people call four way stretch) or a fabric that stretches in one direction only, horizontal or vertical.

Two other things - I'm testing a pattern just now, more on that later, but as do many others, the pattern maker suggest it's best to cut out stretch fabric with a rotary cutter. I must say, I find a rotary cutter easier, in any case. However, I have read on some of my (many) books that it is best to cut with shears, especially on stretch fabric. I find the rotary cutter easier and I will continue with that but wonder what the opposing arguments are.
The second is, I only recently learned that garment manufacturers cut out numerous layers of garments at the same time and that to conserve fabric, sometimes different sizes will be adjacent to each other. Firstly, I'm amazed that they can cut multiple layers - I find it so difficult. Then of course, they're not cutting fabric on the fold - It's so much easier to cut single layer. I wonder, however, whether their habit of cutting different sizes together accounts for a recent near purchase. This was a top I liked, in a sale so at a good price but one sleeve was significantly different from the other both in length and in width. I didn't buy the top.


Saturday, 27 September 2014

Reminiscing but not much sewing

 
 Warning - not a lot of sewing here! I hope I can be excused. For some reason, I felt I wanted to write this post.

I've been doing a lot of reminiscing recently. It seemed quite appropriate that we've just had the autumn solstice where day and night are equal lengths, a time when one day seems like summer and the next most definitely autumn.

One of the reasons for reminiscing was the Scottish referendum - residents of Scotland voted last week as to whether they wanted to be an independent country, separate from the rest of the United Kingdom.


This question has been hanging over businesses and residents for two and a half years and caused some big companies (including the Royal Bank of Scotland) to announce that they would leave Scotland given a yes vote. 16 and 17 year olds were given a vote for this referendum - it was felt that younger people were more in favour of independence. Older people were on the whole not - worries about pensions, health care etc. My elderly - well old really - mother has been extremely anxious over recent weeks in particular. Although I am Scottish in that I was born in Scotland of Scottish patents and lived and worked in Scotland until my 30s, I have lived and worked in England for 27 years now, so wasn't eligible to vote. My oldest daughter was born in Scotland but the next two daughters were born in in England - in the home of the Geordies. Fabulous people. My DH and I had always considered moving back to Scotland in retirement but the uncertainties around the referendum put us off. So the decision is still there to make; our current house is much too large for us so we need to consider downsizing at some point. Where to go though?

Just a point, we live much closer to Edinburgh (capital of Scotland and site of Scottish Parliament) than London (capital of England and governmental centre for us). By the way, the democratic vote on the Scottish Referendum was against independence 55% to 45% with a turnout of 86%; however, it seems that the issue hasn't been put to bed.

My oldest daughter, born in Scotland, living in the south of England, has been doing a course in diversity and discrimination and considered lots of issues of identity in her answers. She showed me her written feedback where there is an assumption that she is a Geordie. I asked her and she told me she doesn't feel like one, though she and her DH (from the North East of England) would love to move back to the area, in the same way that we have considered Scotland (we've lived in a few cities, moving for jobs). This daughter is hoping to take up machine sewing with a view to making cushions, curtains etc for her home so I gave her my previous class machine  - the Viking HQ100. When I originally demonstrated it to her, it wasn't working well and the tensions were all over the place. I got it serviced and was told the needle had been loose and advised to ensure I always used the correct bobbins (which I had). I gave her a couple of books, too.
 

My middle daughter, born just after we moved to England, has been doing a Masters in psychology in Scotland. Her original degree was in a big city in England - and that's where she wants to be, as she considers that 'home', even though she has split up with the boyfriend she was going to spend the rest of her life with in that city and even though she has been away for 3 years now. Oh and she doesn't have a job. She has already had challenges and faces more but wants to be there. DH is moving her this weekend by van from our house, where she's been for a few weeks now, to a flat share with 3 young professionals.

My youngest daughter has had to make quite a few short term sacrifices in the hope of long term gain. She's had problems with her last flat share and this resulted in her and her boyfriend moving to a flat they're renting on their own - an inferior flat to their previous one (shared with two others) and more expensive but without the hassle of other flatmates. They've just moved and are effectively starting to set up home together in a way they didn't do before. It reminds me of how we started out. When they were up here last weekend, my daughter brought a few garments she'd like repaired or altered. I hate alterations. I'm also not sure that some of these garments can be altered. One of them has a torn bodice and I'm sure can't be repaired but I hope I can salvage the beautiful decorative panels at front. She also wants me to shorten the straps of the Cynthia Rowley dress I made her as they slip down - and the poppets at the back pop open, even though I used 4, so I'll have to consider using heavy duty ones.


I've been very busy with family matters, golf business and play, bridge class and play and sewing classes, which started last week.

I've now done two nights of my pattern cutting class. Very interesting. The tutor decided to use draping rather than mathematical methods, as that takes longer. I'll be interested to see how the result compares to the result from the class I took in August.

One of the things I hadn't appreciated is that I'm very tired after the classes - the journey to the class is very lengthy because of traffic congestion; I thought I'd put rush hour traffic behind me when I retired! So twice a week is more than I'd bargained for.

I've done one night of my beginners' dressmaking class. I'm a bit advanced for it as some have never threaded a machine etc. However, I'm missing a lot of the basics to be suitable for the intermediate class. I have been given a jetted (or double welt) pocket to try - but I've nver done anything close to this so think maybe the beginners' class is the place to be. I missed the second class, where those absolute beginners were going to be shown how to thread a machine and begin to use it, as I travelled up to Scotland, to Gleneagles, to watch the Ryder Cup (Europe v USA golf team competition which happens every second year), or at least the last practice day before the actual competition starts tomorrow (I'm writing this in my mother's home on Thursday night). Gleneagles is beautiful - I just love visiting Scotland, but do I want to live there?
 

As it's Thursday today, I've also missed the second class of my regular sewing class. At the first one, I showed my tutor my white dress - and didn't need to explain anything as she'd read my blog post! We agreed the dress wasn't satisfactory and on discussing options agreed it may as well get regularly washed when I'm washing whites to see if that improves matters. We felt that the idea of embroidering of top stitching princess seams wasn't going to work.

So I've been revisiting some previous makes. I've already jettisoned a skirt I made early on. I saved the lining I made for it and hope that I might be able to use it in the skirt I started a while back - it's cotton and I feel it would benefit from a lining as it's a bit clingy. So more reminiscing - I can see that my sewing skills have improved since those earlier makes.

Now it's Saturday and I'm busy prepping fabric and piecing together a PDF pattern, while watching the Ryder Cup on TV. I think the result is going to be very close. It's true that to some extent I'm putting off sewing by blogging and watching golf and making a rice pudding!

I ordered a recommended draping book and it arrived so I'll have a look at that too.


Over the next few weeks, I'll again be very busy as my mother is going to have operative treatment to her eyes, with the hope of regaining about 40% vision, which would be terrific. She will have the treatment in London, so a few trips there for both of us over the next few weeks.


Saturday, 13 September 2014

Learning from my mistakes?


I haven't been doing much sewing. The weather has been great here on the whole apart from a few recent chilly evenings and mornings when the central heating has come on. During summer I have a lot of golf matches at various different courses - a pleasure in good weather. My back problems have hindered a little but I'm determined that they won't stop me; I go to chiropractor/osteopath, do stretches etc and take supplements and NSAIs and use a belt when necessary. I manage. I'm also preparing a lot of paperwork for circulation to the 40 odd golf courses in the county and then for the AGM (I'm County Vets' Secretary). On top of that, there have been a few family issues that took time and used up emotional energy with the end result that I didn't feel like sewing. But that's okay - it's a hobby and not a job! I have continued to read the blogs I follow and I read some books, some sewing, some not. Oh, and I also bought a few patterns. I did do one or two alterations to garments belonging to me and to one of my daughters.

I had intended to sew some golf crop trousers but didn't get around to it. Maybe next year - the season for golf is nearly over and then I'm into cold weather wear. I do have some warmer golf trousers that would be suitable if I can alter them to fit better. Some are just heavier weight wool but some are water resistant and fleece lined and I'm not too sure about altering those - I don't want to make them leak at the seams with new stitching! I've also discovered that I don't like making alterations.

I signed up for a couple more online courses. The most recent was a Pattern Review course on understanding interfacing. I haven't received my pack of interfacing samples and fabrics to do two half sized samples yet but I've read through all of the materials. It makes interesting reading - I had no idea there were so many different types of interfacing! I don't imagine that I'll be able to get them all in the UK, even online and I don't want to order from the US because of postage charges and import tax. I think our biggest name here is Vilene so I need to see if I can get some samples at the show I'm going to in November. Then, too, I need to be undertaking the projects that need these interfacings. But the biggest lesson is to make several samples to see which one suits best for the purpose and your intentions. When I made my jacket, there were several different interfacings involved. My tutor chose these, though, and we didn't really discuss them in detail. I feel that the hemline needed more structure.

So, onto the mistake of the title.
 
I did view B but in a single colour
My sewing room has been chaotic. It has a whole load of extra stuff in there that isn't usually, making it difficult in any case to sew or even to find things. I was always very organised at work but not so at home. Double whammy! My 'little white dress' (ivory) featured a centre fold right down the front and despite all my efforts, I wasn't able to get rid of this. I hadn't noticed this issue when I was sewing it and would just have assumed it would iron out when the dress was completed. I hope I won't make that mistake again.
 
Clearly needed better pressing! I thought that was the only issue.


Pictures taken before I realised there was a problem
I decided to take the dress apart to salvage the zipper (a beautiful and rather expensive long invisible zipper) when I realised that I could have a go at trying to replace the middle panel, as I still had enough fabric left. There was nothing to lose - either it would work, or it wouldn't.

So, first step was to remove the middle panel. Achieved. Second step was to cut out a new front panel, using the same pattern piece as before. First problem. I couldn't find it - anywhere. I looked into every pattern envelope and my large art folder which holds my traced, drafted and thicker paper patterns. No joy. Eventually I decided that I would use the front unpicked from the dress as a pattern piece. I traced around the piece and added a seam allowance. I added 1cm only as I had previously used the overlocker to join the sections. So the seam allowance of the side fronts was now only 1cm. I found this process rather more difficult than I anticipated, but I did eventually manage. Then the next step was to cut out a new fabric front panel. Originally, the front had been cut on the fold but I now had a full piece which didn't need to be cut this way. Obviously, I had to avoid recreating the previous problem, and had to manipulate the fabric remnant to allow the rather long piece to be cut out. Eventually achieved. Then I pinned the new front piece into the dress and it sat that way for quite a few days while I contemplated the next step. I wasn't confident about the process.. 
 
A couple of days ago, I decided I really had to finish or junk the project. I decided to first hand baste the seams, then stitch with the sewing machine and then overlock. Sounds a bit like overkill, but I wasn't very confident and it was much more difficult to make the alteration than it had been to create the dress in the first place! I still had to ease the bust shaping. I still wanted to understitch in the neck area but this was more difficult because of the previous work - the lining was rather frayed and the seam allowance shorter than it had been. Anyway, I eventually managed - not perfect, but good enough, I felt.

I'm not sure why I didn't notice earlier, but then I realised that the centre panel was a different shade from the rest of the dress and had a firmer feeling. My husband asked me if I had put the wrong side out - no, I hadn't. All of the fabric had been pre-washed but of course the rest of the dress had had several treatments to try to get the centre fold out. So I decided I would complete the dress and then wash it. So I finished pressing and then sat down to watch TV and hand stitch hem and stitch lining down to zip. All finished - off to the wash.

The dress has now been washed twice since completion. I could still see a difference in the centre panel. Then, I realised, to my horror, that I had used the fabric wrong way up! I hadn't considered this at all. I always tend to cut using a with nap layout. I hadn't thought of this pattern - a small geometric - as having a right way up. Well, it doesn't, just that all pieces should be the same way up! They're not. I hadn't given it a thought. Can I wear the dress? Will anyone else notice? Does it matter whether they notice or not? - I'll know.

New panel on bottom of photo
The dress is still wet from its most recent wash. I can still see a difference in shade. And after all this manipulation I realise that I don't even know if it still fits me!!

New panel to left of photo
In the photos, I have shown the seam between front and side front. Once the dress is dry, I will try on again and see if it fits and how noticeable the shading and direction is.

Next week, my sewing class restarts after the summer break and I'm starting an evening class in pattern cutting. I'm looking forward to that. Unfortunately, I'll miss a few sessions because of other commitments but hopefully I'll be able to catch up okay. One of the commitments is a sewing one - I'm going to London to the Bernina Sewing School to learn how to use my new Berninas (sewing machines and overlocker). I'm looking forward to life getting more back to normal and I'll get on with some sewing for autumn. Today I played golf in beautiful sunshine, in crops and short sleeved shirt, but the gold and russet coloured leaves, fallen chestnuts and nights drawing in are a reminder that autumn is just around the corner.

Monday, 18 August 2014

Tissue Fitting, Toile Making and Pattern Cutting


As a treat to myself, I went on a weekend pattern cutting course in Stratford upon Avon with Jules from Sew Me Something.  As per my previous course near Chesterfield, I had to pay for accommodation and travel in addition to the course fee. This time I chose to travel by train as having just turned 60, I am now eligible for discounted train travel. I bought a senior rail card and got 30% off - and it's so much nicer than driving all that way - and faster too. The cost was a little higher than petrol would have been, but well worth it. Two of us would drive.
In advance of the course, I was advised that materials would be available for me but to bring a Pattern Master (see above) and notcher (see right) if I had them. I already had the notcher but bought a Pattern Master. I was also able to carry another few bits and pieces which I felt might be useful. I also took a couple of patterns I'd had problems with - a skirt, made in a Saturday workshop , which I didn't feel like finishing because I knew it didn't fit, and trousers which I was making in my monthly class, which I was starting to construct. More of them later.

I wanted to achieve a bodice block/sloper - plus the rest if there was time!  Most people also wanted this (there were only 6 people in the class, one of whom already had a woven bodice block and so wanted to make a stretch block instead)

I was pleased that the class involved taking measurements and using these to construct the block from scratch, rather than altering a commercial pattern.  A lot of the construction was based on Winifred Aldrich's work, (Metric Pattern Cutting). I own the 4th edition but the current edition is the 5th, covering stretch fabrics in more detail.


All our measurements were in metric, which Jules feels simplifies the process. Before going, I had watched the Craftsy class by Suzy Furrer who felt that the use of 1/8ths was much better. In the UK, metric is more prevalent - I suppose it's what you're used to. I can work in inches as that is what was around as I was growing up - so I suppose that means I'm measurement bilingual! I must say I also really liked Suzy Furrer's class and have bought a couple of her other ones. It will be interesting to see if the results are comparable.
We paired up to take the measurements, which was far easier. We then began to transfer these measurements to dot and cross paper (to help keep things square) as per the instructions and calculations given. I was delighted that Jules was careful about squaring etc - I have a dislike of slapdash work. We were constructing a bodice block and then a sleeve block to fit. I took rather longer than most to construct my bodice block as I had quite a few adjustments to make after making up in muslin and trying on. The main ones were adjustment for sway back (taking up a 1cm tuck and adding the 2cm taken up back at the hem again) and widening the shoulder dart (our draft had 3 darts - shoulder, bust and waist). Finally, I was finished and the muslin deemed to be a good fit. We didn't actually transfer to card as a block at that stage - that was homework. I haven't shown pictures of the pattern working or of the toile - I could do but wasn't sure they'd of themselves be of interest to people.

After achieving a good fit, all the changes were transferred to the pattern. The new measurements were used to construct a sleeve pattern. The sleeve was then made up in muslin and inserted into the armscye. Amazingly, mine was a great fit! I have rather large biceps (weight and golf) and this is a particular problem I have with commercial patterns.
Some people had finished all of this on the first day, but I had to continue into the second. As a result, I didn't feel that I had time to construct a trouser block, as others were doing. I therefore decided to ask Jules to fit my skirt and trousers.

The trousers were being made from a commercial pattern - one by Palmer Pletsch. McCall's 6901.

 
They recommend tissue fitting and in my monthly dressmaking class (where many of us decided we'd like to make well fitting trousers...) we followed PP instructions to tissue fit. I was surprised when I had to add a lot to even the largest size of the commercial pattern, but I know I do have a very marked pear shaped body. I had taken calico to the class but as others voted to go ahead with fashion fabric, I did too, and cut out and began to construct the trousers as per pattern guidelines.
This was what I took to Jules. I quickly stitched up the trousers (I had been in the middle of doing the fly front and zip) to test fit. They were absolutely disastrous!! At least 2 if not 3 sizes too large - 3" pinched out of each leg - and the crotch was nearly down to my knees. This is very unusual as at 179cm (5'11") I usually find the crotch to be too short. 
I'll try to recreate a picture!! On second thoughts - you're just going to have to imagine this , including a crotch down to my knees!  Needless to say, my result was not the fairly close fitting and slim pant worn by the model.
Jules started to pin fit but then said I'd actually be quicker starting again - that is, unpicking and re-cutting from the same fabric using 2 sizes smaller as a starting point. I agreed that I would do this at home. I also took away instructions on how to make a flat fronted trouser block. At this stage, I'm not sure whether to re-cut from the commercial pattern or go through a muslin stage with the flat fronted trouser block I hope to create. I need to decide soon as the monthly class restarts on 3rd September. I'm afraid that I haven't had much chance to sew at home due to various family issues but should be able to restart this coming week.
I then went onto the skirt (version C). McCall's 3830.
 
I hadn't been very happy with the material as I found it took me ages to match the patterns at the seams. I liked the design but hadn't realised the problems it would cause me. You can see that although the fabric is true, the rows of circles are offset, giving almost a diagonal pattern.

 
I started this skirt in a weekend dressmaking class specifically to make a skirt from this pattern. The tutor would have preferred to go straight into construction but recognised that there's not much point sewing up something which doesn't fit! She therefore tissue fitted us all and we made pattern adjustments before cutting out the fashion fabric. There was no muslin stage. As I said, I had huge problems matching the pattern at the seams. I had got so far by the end of the day and hadn't felt like touching it after that.
I tried on the skirt for Jules to fit - and it was HUGE. (I should say that I have GAINED weight since the class so, unfortunately, weight loss was not the reason for the wrong size). There was a good 2" to take in at each side and 1" at the back. And obviously the contoured facing needs to be altered.

I was going to make the photo extra large so you could see clearly how much was taken in - but I couldn't bear it! This is inside out to try to show the seams.
As I was sitting contemplating where to go and what to do, Jules suggested that I make a skirt block as this was a quick project and faster than what I was trying to do. I managed to make up the skirt pattern from my measurements and then draw out again with seam allowances (1.5cm) but didn't have time during the course to go onto a muslin fitting stage. I'll get around to that, too. Jules suggested that due to the type of pattern on the fabric and its relatively small size, the degree of pattern matching I was trying to achieve (and had achieved, I must say) wasn't necessary. I should manage to finish the skirt reasonably quickly - it is a simple make, just the fitting causes the issues.
I started to sew for myself to get garments to fit, though - and that is by far and away the most important consideration for me. An ill-fitting garment can never look good, after all. I chose to go on a pattern cutting course to help me in my quest for decent fit and I think I have taken away a lot of useful tips, techniques etc. I also realise that it is not enough to transfer your measurements to paper and expect a good fit as we are 3 dimensional beings with circumference being made up by different distribution of flesh. Even within the class of 6, there were multiple variations.

I don't have my blocks yet but that will come in the next month - or so. I left the class with a large roll of pattern card (to trace the blocks onto for more permanent keeping) - I was worried about travelling by train and by foot from one station to another in Birmingham with this, especially as I was in rather a hurry, but it worked out well.
I found the class useful. I enjoyed the mathematical challenge of making the blocks and having someone patient and knowledgeable on hand was great. I should say that Jules also made wonderful lunches and delicious cakes for us.

Since the class, I have purchased a further recommended book, which I find fascinating It's expensive but worth it. It covers three methods of pattern alteration - seam method, pivot method and slash method. Some of the pictures in other pattern books made me feel I had made my pattern alterations incorrectly, but this book showed how pictures are manipulated and don't actually show the reality of a particular manoeuvre. For example, if you widen a sleeve in the biceps area by slashing and spreading, the sleeve cap will drop and the centre slashes will overlap - this is not always shown. Often, it looks as if you simply have to re-create a straight line but in fact there can be a very significant step in the line. I thought I was getting it wrong but it seems I wasn't.


Unfortunately, I can't remember the other main author Jules recommended but I have enough for now I think! One day I must do a review of all the pattern fitting books I have!

I've signed up for a pattern fitting course in a college in a nearby city. I don't know what to expect yet. It starts in mid September. The beginner module is 10 weeks long and then I could go on to more advanced modules, I think. They may have different prescribed texts and different methods - I'll just have to wait and see.

I also took away from the class the idea that tissue fitting is useless! I had tried to tissue fit at home but my husband refused saying he didn't think it was helpful as the tissue was so fragile - I now think he was right, though not perhaps because of fragility but because it doesn't bend to shape like fabric. I won't be tissue fitting in the future.

At times, I have found muslin/toile fitting tedious as I couldn't get beyond a certain point - and have cut muslin after muslin ...In my weekly class I was known as the 'Toile Queen'.  I won't resent any of the time spent on muslins in the future. I can't accept Palmer Pletsch's view that after tissue fitting go straight onto fabric fitting and miss out the toile stage. It certainly doesn't work for me.

Monday, 11 August 2014

It's in the detail?

Hello again.

ETA Photos of finished jacket, Sunday 17th August 2014.

It's ages since I posted - not because I haven't been sewing but because I don't have anything completely finished to post.

I've been away from home for a few days at a time and had family visit - in the case of my middle daughter she has moved back in with all her stuff, hopefully on a temporary basis. Her stuff took over my sewing room!! So I had to be away from home to get anything done!!

As a treat for my birthday, from my mother, I went to a town near Chesterfield for a 3 day sewing break, near the beginning of July. I travelled by car, to carry all the stuff I took with me and arranged for hotel accommodation. I travelled down on the morning of the course, starting very early, but still managed to be a bit late because of traffic hold ups. Travelling on the morning and back at the end of the course meant I only had 2 nights away from home and only the cost of two nights hotel and food instead of 3 or even 4. I was very tired, though.

I had the tutor all to myself. In advance we had decided that I would make a jacket. From the patterns I already had, the tutor chose this jacket.


It's edge to edge, no notched collar, princess seamed, casual fit and raglan sleeved so she felt this was a suitable project. I decided to do a variation on view C but without the mock pocket flaps, using a wool tweed.

I was first measured and the size decided on. This was larger than I expected - normally I grade up two sizes from bust to hip but that wasn't necessary with choosing the same size for chest and hip. This pattern comes with a choice of cup size and we chose the C cup, although my bra size is D or DD depending on band size.

I pinned the pattern together and tried it on and the tutor agreed the size was good. She didn't feel I needed to lower the bust point as I usually end up doing - an advantage of the larger size.

I went on to make the basic jacket up as a muslin. This was a little tight across the upper back and the seam had to be released and a little added. That allowed me to move my arms forward properly. In addition, the sleeve needed to be lengthened. Far fewer adjustments than I usually make. It was yet to be seen if they were sufficient.

The jacket in the pattern was unlined with each seam finished with bias tape (a Hong Kong finish). I wanted a lined jacket and the tutor said that lining was as easy as bias tape, which would be very time consuming, in any case. I took the lining material I originally chose - a kind of satiny cotton which I got from my mother who can no longer sew due to visual problems. However, my regular sewing tutor felt that it would make slipping the sleeves on rather difficult so I purchased a regular lining fabric.

The jacket I chose didn't have pockets, simply what appeared to be pockets because of the external braid. Another version (A) did have an inseam pocket but I decided against that for fear it wouldn't lie properly. My regular sewing tutor had counselled against them. There were pocket flaps elsewhere on the jacket, depending on the version but I didn't want these.

So I went to Chesterfield with wool fabric, matching thread, toning lining material, yards of bias binding, yards of braid, fur hooks and buttons (you can see why I needed to go by car!). The tutor didn't like my braid (I had great problems trying to get suitable notions.), so together with the tutor I visited a local haberdashery, run by a man in his 80s - the shop was a real treasure trove. I did buy some rather expensive braid - but then later decided I'd prefer not to have braid at all!

One great thing that the tutor showed me how to do was to fully interface each piece of fabric - using different grades and types of interfacing, depending on the position on the jacket. She has a press and I loved using this to apply the interfacing - but no, I won't be buying one for myself! I don't have a photo of the beautifully interfaced pieces. 

 Front view - jacket closed. I'm standing a bit askew - the hems are level, honest!

 Originally, the front would have had buttons and self fabric loops instead of the fasteners I had to use.
 It could easily be worn open. Some of the other views are open or just have one fastener at the top.

I bagged the lining. I think it looks good. original jacket would have been unlined with bias bound seams. I'm just about to be carried off by the wind in this photo!

Excuse the photos and my facial expressions! It was blowing a gale but I didn't want to wait any longer as who knows when it would have got done!

With no braid and no pocket flaps there was a danger of the jacket looking too plain.  I decided to topstitch the princess seams. This, I think, looks very nice but it is rather subtle (not really a disadvantage in my book!). This took some time to achieve, using a triple stitch on the tutor's machine.  (I will add a photo later as my camera is playing up and I don't have a decent view) I also top stitched the cuffs (shown). I had to use a smaller seam allowance in stitching the cuff to the sleeve as I felt the sleeve still wasn't long enough - next time, I would lengthen it further. This photo shows my fabric, the cuff top stitched at both ends and the notch, which on the pattern is much deeper and has a button at the apex of the notch. I decided I preferred a gentler slope.


I constructed the collar, also top stitched, and attached.


Another problem I had was the closure. Depending on the jacket version,  there was either 1 closure at top but free elsewhere (A),  which didn't seem to make much sense in a jacket for colder weather, or no closure at the top and 4 fairly closely spaced together lower down (C - the version I was most closely following). The closures were loops of fabric on one side, buttons on the other. I took along the fur hooks because I feared the fabric was too thick to make loops - the tutor agreed. She suggested that the fur loops were the best option but that these should be sewn such that they peaked out between the lining and the interfacing. So I sewed the loops on, which took ages. I wasn't able to seam the facing and fabric together all the way because of the bulk of the metal covered fur hooks and the risk of needle breakage or worse, and the was no way I was going to be able to understitch. I machine stitched what I could and the tutor suggested I hand stitch in between.
 
This is a photo of the fur hooks. I didn't photograph when they were in situ between fabric and interfacing, I'm afraid. I'm sure you can imagine that it didn't look good!

I had watched a Craftsy class on how to make a lining for a jacket and reviewed it in the evenings when I had nothing better to do while away from home and on my own. I also looked at Sandra Betzina's instructions (in Power Sewing Step-by-Step). So I was ready to make the lining. However, to save time the tutor took me through the steps but made up the lining pattern herself. I was disappointed but realised that time was very short.

In fact, time had now run out!  My jacket was not finished.  The tutor ran through the remaining steps, involving finishing the closures and facing,  by hand, attaching the lining and hand stitching the sleeve lining to the cuff interfacing and the lining to the hem - she said this was just a couple of easy steps which I could manage.

So I decided to finish it at home.

My first problem was attaching the collar to the neckline, which I did while I was away but when I reviewed it, I decided it wasn't good enough. I ended up picking out and re-sewing twice. It's still not perfect but enough was enough! See photo above.

I didn't like the way the fur hooks were placed between the fabric and interfacing and didn't think it would look good.  My regular sewing class was the next day and my usual tutor agreed with this. I unpicked the stitching and all the fur hooks and eyes. I properly seamed and understitched and I was much happier with the finish.  My regular tutor showed me how to sew/cover the hooks with thread and I was going to attach them simply to the facing.  I wasn't happy, though. I experimented with loops made of the fabric, of the lining, of bias binding and searched my available haberdasheries for a solution. I felt there must be a better solution than the fur hooks!
 
This photo shows the little half belt at the back - also topstitched, with the buttons I would have used had I been able to make the self fabric closures.
 
In the meantime, I decided to bag the lining as per my online class. Thus would include machine sewing the lining to the cuff and to part of the bottom hem.  Well, I had problems. After I stitched it, I found that the sleeve was terribly puckered because the lining was too short. I felt I had a choice between making new sleeve linings or adding a band to each sleeve. This is what I choose to do. I had to add 3" plus seam allowances (I checked with my regular tutor to see if what I intended was sensible). My tutor also constructively criticised my lining insertion to the body as I had pulled too tightly at the curves; I unpicked and adjusted. I managed to attach the lining properly and also finished off as my tutor suggested, anchoring the lining and sleeve together under the arm and also at the seams as Craftsy advised.


My haberdashery search for suitable closures came up trumps. As there weren't enough available to make all the closures the same size, I opted for one small at the top and 3 large, which DH thought looked good. I ordered more to have a better choice. I sewed 1 small and 3 large - the large attached to one side only as I found that one of the hooks was faulty so I couldn't finish until the new stock arrived. I could have used all small but prefer the larger ones. I think they take the stark look away from the jacket.


Overall, I think the jacket looks good. I think it is perhaps a little too big across shoulders/chest and my regular tutor agreed, suggesting raglan shoulder pads. I did buy these and tried them but didn't like them - and they made the sleeve too short. In colder weather there will be room for a sweater. I think I will wear it.
 
Why no picture of the finished jacket yet? I decided I had sewed on the closures all wonky, tried to alter some and then decided to take them all off to redo but I haven't had time (or the inclination to be honest) to redo. So they are awaiting completion. I think I'm going to use 4 large closures. I will edit this post and put in a photo when I'm finished.

So was the class worthwhile? You know, I'm really not sure. It was good value,  despite having to travel so far and pay for hotel accommodation and meals,  the tutor was pleasant and knowledgeable, I had her to myself - and if I'd been at home there was no way I'd get 3 days to sew. However,  I had a lot of problems after I left and feel time in class would have been better spent actually fitting the lining,  for example,  than sewing on hooks, though of course things have to be done in the correct order. There was no way that the fur hooks were going to work attached the way she suggested and that wasted a lot of time both in class and afterwards.

If I cost up this jacket, it's very expensive - but a lot of the techniques I learned can be used elsewhere, so I'm not going to include the course cost. I'm not even going to include the cost of the unused yards of bias binding, the braid or fur hooks as they can be used another time - they've just added to my stash.

Fabric £18 per metre - 4.5 metres (though I have enough left to make at least a skirt) so say 3. £54
Lining £4 per metre 2.5 metres £10
Thread £4
Closures 1@1.35 and 3@1.55 £6 - now 4@1.55 £6.20
Total £74 now £74.20 - and a lot of time
 Do you think it was worth it?

Since drafting the above (while travelling on the train last week), my new closures have come in (I got a replacement for the faulty one with no problem). I started to sew on the closures on the other side (I had done the eye side but not the hook side) and realised that I hadn't done very well - the closures were not evenly spaced and did not lie horizontally. So, I unpicked them all. I've now decided to go with 4 large closures (DH liked the 1 small and 3 large, BTW). I think if I mark the fabric properly where I want the closures to go that will help - previously I put in the right place but they slipped.
 
Finished jacket!
 
 
My mother visited for a few days - she has just returned home - and really likes the jacket.


How Do You Read Blogs?

It's a while since I've posted a blog,  lots of reasons. I'm thinking of starting again. However,  I used to read the blogs I fo...