Saturday, 25 October 2014

Repairs, alterations and things I should have done in the first place


This post is prompted by Sarah Liz talking about doing alterations, and not liking that very much. How I agree!

When my youngest daughter came home last time, just as she was moving from one flat to another and so had gone through her things, she brought several garments for me to alter. Both her old and new flats have extremely limited wardrobe space.

She did apologise later!

One was a dress I had made her (Cynthia Rowley Simplicity 2250), but the fastenings didn't work properly so okay. I needed to change this as my original wasn't satisfactory in use. The straps were slightly too long and I've shortened them. She didn't want the original 'ears' used to tie the back as they wouldn't fit under a jacket without a bump. I wish now I had just gone with them because the style of the back with elasticated edges makes it difficult to get it to meet. So I had put a piece of fabric underneath and used 4 regular small poppets between the elasticated edge and the cloth underlay (after seeking advice from others). These poppets just didn't hold in wearing. I decided to try much stronger poppets (one of the other garments she brought me to repair had giant poppets so this alerted me to the availability of different sizes). Other options are trouser hooks and bars. My sewing teacher has suggested it's probably worth trying the poppets as the next step, if this is not successful, is making a buttonhole in the strap and attaching a button inside the dress but I fear that would be uncomfortable against the skin for my daughter. I think the result is acceptable but it remains to be seen whether it holds in wearing.


New large poppets and showing addition of fabric strap


Final result, back view; straps are shortened by 2"

No change to front view
 
Call me crazy but I'm going to offer to deconstruct two which are irreparable - one is an expensive lined dress, the other a top with sentimental attachments.

The dress shows evidence that perhaps my daughter has had the dress too long - the lining is in shreds and the seams have not just separated but clearly show evidence of strain: there is damage to the fabric.
This is back vent after repair, turned up to show shredded lining
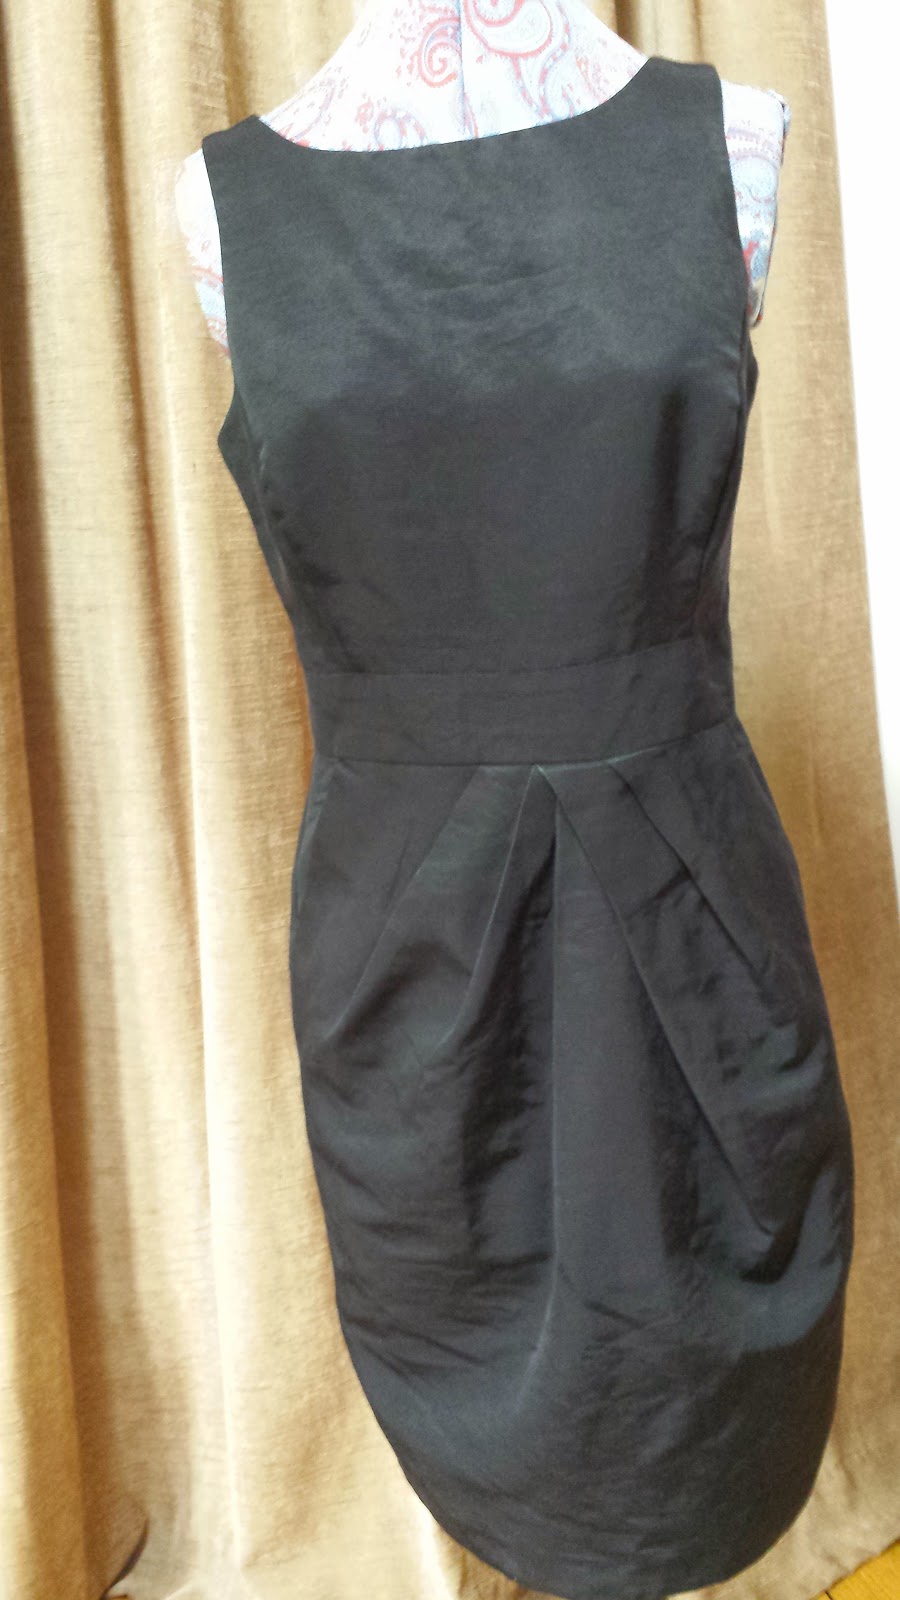
She is slim but perhaps she is less slim than she was when she got this dress, which is a very closely fitting sheath dress with a pleated front, vented back skirt and an interesting back detail. I managed to stitch up the back seam, below the invisible zip. However, I think that this has never been stitched properly, judging by the pattern of damage. It looks like the fabric had been pulled too far over at the vent area. Someone suggested putting a bow over the damaged area - that might work but the lining is in shreds, too. The top half of the dress is fine. I like the look of the dress and would love to deconstruct and remake it - as long as the dress as is fits! I'm going to visit my daughter next week so will see what she thinks. I don't have a suitable bow to use. I don't intend to do anything other than add a bow - that is, I'm not going to try to replace the lining. I think it would be easier to remake a similar if not identical dress. I have a Burda pattern with a similar skirt. The back detail on the bodice is a problem, though

 
The dress has a lovely classic overall shape

I really like the detail on the bodice back

Repaired back seam. Dry clean only dress in need of cleaning and pressing!
 
 
After repair to back seam; shows damage to fabric where I think stitching was incorrect in first place
 One dress was no problem - it was essentially just stitching on a fancy fastener - a giant poppet.. At least, then I found some of the other fasteners were loose too. As this dress has a full back exposed zip, I'm not too sure why it needs the giant poppets!
 
Overall view of the dress. DD has slim hips so can afford to wear this style.

Close up of top poppet fastening
 
Rear exposed zip

Close up of outside of front, over poppets; some interesting embroidery in cruciate shape
There is another top (dress?) and to be honest I haven't a clue how it works and so can't work out how to fix it! A strap has come off, but I'm not clear where it fastens to re-sew it. There is an area of damage, which I reinforced with some fusible interfacing but this one needs to wait until I see my daughter.
 
Front view


It's a strange floppy bit - does it go up like I have pinned? Does strap fix to it?
Area under floppy bit with loop and damaged bit (see next photo).
Can just see other strap - much thicker - and no floppy bit!

Not sure if strap joins here; evidence of previous repair
 
One of the other tops has a double layer - a fine fabric over a stretch fabric and the fine fabric had frayed on one side of the back seam, coming free from the seam. I've unpicked the seam and reattached slightly narrower to take in good fabric. I hope this top wasn't too small as it's slightly smaller now! However, I think it is quite a loose fitting style. The end result looks acceptable so I can just hope it will work in practice. When I put it on the model, I realised it is a dress not a top!


Seam has been repaired - just about to repair hem (while watching TV)

Fine printed light grey fabric over a darker grey stretch base


That brings me to the other top my daughter wanted repaired. It is a black relatively fine cotton cheesecloth type cloth with a heavily embroidered yoke, which she absolutely loves. The fabric in this case is irretrievably damaged. There are two options (other than abandoning the top altogether that is!) - one is to take the top to pieces and use the sections as pattern for a new top, re-inserting the original embroidered yoke; the other is to make up a completely new but similar top using a pattern that I have already but it would be more difficult to get the yoke to fit. It's also going to be difficult to get the black fabric. There is just no way, I believe, to repair this, unfortunately.


Daughter tried to repair with large stitches - fabric coming away

The tear is under arm from front to back


Overall back of top

Back of top showing yoke with embroidery

Overall view of top


I took the garments to my sewing class for some advice. One of my fellow students commented that my daughter's style was quite adventurous (I can't actually remember the word she used). When I was ironing and photographing the repairs (on my smartphone - it was handy and just easier - and I hadn't realised until now I can upload straight from my phone - so much quicker, though no editing of them), I realised that was the case. I also saw that the black dress was very much more difficult to get onto the model, perhaps another reason it got so damaged.

Hopefully my daughter will appreciate the repairs I've done - but not too much as I'd prefer not to have to do any more!  I think she should perhaps invest in some new items. I'm not sure whether her garments show evidence of having been loved - or abused. But I'm sure I can't restore them to their former glory.


Thursday, 16 October 2014

Bodice Block and Dart Manipulation - halfway notes on my pattern drafting class.

Although I live in a city, I'm attending a weekly evening pattern drafting course at a college in a nearby city. Well the city is nearby, only 15 miles away, but the traffic is so congested it takes me ages to get there, particularly as I have to travel at 'rush hour' as it's an evening class. But that's another story. I do consider the class worthwhile, so worth the journey. I still don't understand, though, why my local college, which has a huge textile, design etc section, which is internationally renowned, doesn't do anything for those like me who'd like to learn without attending a full daytime course.

This post links in to my previous post on Tissue Fitting, Toile Making and Pattern Cutting, as I attended a weekend pattern cutting course in Stratford upon Avon.

In Stratford upon Avon, we used measurements and calculations to draw up the bodice - based on Winifred Aldrich's work. After it was drawn, we added seam allowances and cut a test garment out of calico to test the fit. The fit was then adjusted, the pattern adjusted and another toile made. The fit was then fine, though mine did take longer than others in the class, I'm afraid.  There were only 6 others in the class so there was a lot of individual attention from the tutor.

Sunderland College has textile courses by day but this is in an adult education setting and the numbers attending are much larger, so immediately there is less possibility of individual attention though the instructor manages very well and I can't say I've been left disappointed by her response. The class is only 2 hours long and that also reduces the amount possible in the class.

Rather than use the Winifred Aldrich method, which the instructor felt suited some figure types less well, she decided we would drape. She said that drawing up would usually take the first 5 weeks of the course, leaving less time for pattern work.

So we paired up and took each other's measurements, transferring them to a sheet designed for the purpose. This wasn't directly relevant to the draping but was an important starting point.

The first week, we started to drape the front bodice (one side only) - on our bodies, not a dummy, although that's the picture I'm showing. This is a lot harder than it looks! The second week, we continued with that and added the back bodice, which was easier. The 3rd week, we trued lines, drew onto paper and then cut out of calico, adding a seam allowance of 2.5cm. My toile fits not too bad but needs the dart adjusted. I'm so glad that in addition to having a fellow student on the course as a fitting buddy, we have the tutor checking our pinning. Oh, and we don't do sleeves until next term - alongside the skirt block as that's a lot faster.

Unfortunately, I missed this week's class where some of the other students were transferring their block to card. The tutor says that I can catch up no problem next week, which is the week before the autumn midterm break, although it is actually 6 weeks in to a 10 week course.

As a student, I've been able to borrow a couple of books from the library, which is great. I've also bought a draping book, which is very interesting.


I've also looked at some of the Japanese Pattern Magic books - amazing, but I'm not sure how relevant they are to my day to day life!


Looking through Amazon.co.uk., I spotted this book, which looks interesting and is available on Kindle Unlimited, so I may have a look at it.


 In week 3, we started manipulating darts. To start with, we each were given a quarter scale cardboard template of a front and back bodice. We had to draw around these and then practice dart manipulation.

The first thing we had to do was to rotate the dart, which was a standard bust dart, into the shoulder, ready for drawing a princess seam.

Although I had read about this, I hadn't actually done it before. It was rather like playing with the little paper dolls and paper clothes that I remember from girls' comics in the 50s/60s. Quite a lot of fun, though rather messy as the tutor suggested using glue sticks - at home I will use magic tape and this won't be so messy.

The next variation was a yoke top with gathered bodice. Again, although I knew the theory, I found it more difficult to do in practice. It's important that all the construction lines point to  hem level, but I had initially pointed all of mine to the bust point - as a result, I couldn't get such a big gather. Once I understood what was required, I managed this.


At home, I re-did all my little practice models and put them in my folder. I'm determined to be organised.

The following week, we continued with some slightly more involved dart manipulations.

In addition to finishing the blocks, this week was planned to start to look at designing. One of my fellow students has terrific ideas. She has a notebook full of drawings she has done - mainly vintage inspired tops and she hopes to create some of these with what she learns in class. I realised that I am not a designer - what I want to achieve is good fit in some of the patterns I already have and the tutor says that's fine.

So hopefully, next week, I'll catch up and finish my block and start to do a bit of designing - though I hope this is more about learning how to actually use my block.


Saturday, 4 October 2014

Sandpoint Top from GrayDay Patterns

Helena from GrayDay Patterns asked for testers for her Sandpoint Top and I volunteered. There was quite a short turnaround but I didn't think I'd have any problem getting it done. I was pleased to be chosen to test and was allocated View 'A' which is the V neck version. I sewed size XL. The top has a cowl back but Helena was also interested to see if the top could be reversed.

V neckline at front
It's pretty cold and rather windy outside!! 
My last post outlined the problems I had with the floral knit I used for Pattern Review's Winter Street Dress. While I was preparing fabric for this new top, I decided to go ahead and make the top in the floral fabric - I still had loads left. I thought that this would be the best indication to see if I could follow the steps required (I was testing the instructions too, as this pattern is intended for beginner sewers, which of course I am). I decided to sew the pattern in a straight XL with no changes whatsoever as this seemed the best way to test the pattern fit and to see if pieces joined together properly. Another reason I decided to sew a straight XL version is that I have pretty much lost my sewjo and thought this would be an easier way to get it back - none of those interminable fitting issues!

So I downloaded, printed and cut out the test pattern. I had no problems with this and it was nice that I only had to print relevant pages. I managed to tape the pieces together without incident.

There was one front and one back piece cut on the fold, plus 2 x armbands, 1 x shoulder band and 2 x neckband pieces for the V neck. I cut them out without incident - my fabric behaved impeccably at this point; I used a rotary cutter, which I most definitely prefer to shears.

I followed the instructions without problem. Except that my 4 way stretch fabric is so stretchy and has so little body that cutting into the stitching at the V neck wasn't really necessary and I found a hole at the peak of the V  and had to take rectifying measures. However, I managed to finish the V neckline - my first - and I think it looks pretty good (see above and last picture).

Back cowl neck  - I'm standing in a weird way - look at those trouser creases! The shoulder band sits higher up and further forward which causes it to pull a bit, especially on the left shoulder
As the instructions were for small zig zag stitch or lightning stitch, I chose the former and didn't use my serger, which I think would make the insides nicer. After I had some problems with the fabric misbehaving and getting caught in the plate, I changed to a walking foot. Then everything went great. On a side note, this is the first time I have used the walking foot on my new Bernina and it was great - just so much quieter, smoother and easier to fit than the one on the Brother. After one of the sides caught, it grew a little and at that point I would have welcomed some notches, which weren't present in the test pattern - if I hadn't stretched the fabric, I wouldn't have needed them at all. As it was, I managed fine.

I was glad to have both pictures and written instruction for the shoulder band, which fitted without problem, and I trimmed as needed.
Side view of V front and cowl back
Side view of cowl front, V back

V neck at back - see how shoulder strap sits further back. Look at the left shoulder - that's where I feel the pull. 
Cowl at front - V neck at back pictured above.
It looks okay with cowl at front but I don't like the V at the back and don't like the feeling of the fit.
Within the test time, I have had a trip to Gleneagles, a trip to my mother's and then, most recently a two day trip to London to accompany my mother for pre-operative assessment and surgery. Some of you will know that my mother has Age Related Macular Degeneration (AMD) and is registered blind or rather partially sighted, as she would say. She has peripheral vision and can see specks on the ground but can't recognise faces, watch TV, read or cross the road, which require the central macular vision. She was found suitable for intra ocular lens implantation (which as I understand it recruits peripheral vision to do the things normally done by the macula)- and had her first eye (the worse of the two) done yesterday. There are a number of checkups, and she has to use various drops etc over the course of the next few weeks - but here's hoping she regains some vision. So, I accompanied her to London, for two days, and am helping her get used to moving around with even less vision than she had previously (there is hopefully a gradual improvement). She is pretty independent, though, and wants to go home tomorrow. We'll take her back (to Scotland) provided it looks as though she can manage the drops. 

Anyway, all these things cut down my sewing time. I abandoned the idea of doing a second top in 'fashion fabric'.

I left to go to London with the neckband on, the sides seamed together and the shoulder strap attached and trimmed to size after a first fit. I had also pin attached the armbands - and there they stayed until last night. Although I was tired after our journeys, I was too uptight to think about going to bed early and seamed the armbands on. This went fine and as I still had some time, I decided to do the hemming, too. I followed the pattern instructions. I chose to finish with zig zag stitching. I also used zig zag stitching to keep the armband seam allowances flat. I should have done the V neckline too, but didn't at the time - as the seam allowances curl up a bit under the neckline, I may do this later.

I see that I will also need to do some internal trimming of the seam allowance portions beyond the zigzag stitching.

As I didn't make any changes whatsoever to the pattern, I was surprised that the top fitted quite as well as it did. It is a fairly loose top - just not quite so loose on my hips as it should be! Well, I'm pear shaped and unlikely to change from that very greatly. I usually prefer a bit more waist definition but this top is a nice departure for me.

I did try the top on with the cowl at the front - it looks reasonably okay unless you look closely and I think you can see some pulling on the left shoulder. I didn't like it with the cowl at the front - it felt too low and I would be constantly checking to see if my bra was showing. It also felt as if it pulled towards the front at the shoulders. You can see the different position of the shoulder band on the two images.

V at front. Cowl at back. To show silhouette.

Cowl at front. V at back. To show silhouette.
I'm not over keen on the shoulder band though I realise it is necessary. I think I will wear the top, with the cowl at the back. I like it a lot more than I thought I was going to initially.

For the future, I want to finish the insides better and would probably use my (new) overlocker for many of the steps.
 
While I was in London , I had just enough time to pop into McCulloch and Wallis as it was near the hospital. I had never visited before. I had realised that London based sewers had more choice - but I just didn't realise how much more!! Many of the problems and much of the heartache (okay - I exaggerate!) I had with my recent wool jacket would have been solved very quickly with all the notions available in what seemed like an Aladdin's cave to me! The time I spent and the money on fuel - I might have been better paying for a trip to London. Thing is, although many places, including this, do mail order, if you don't know an item exists, you don't search for it and so can't buy it. I'm back in London again with my mother and again to go to my Bernina class so I might have a clear idea of what I want by then. Believe it or not, I didn't buy any fabric. I did get a sample of horsehair and a sample of very fine knit interfacing. Next time!!


Sunday, 28 September 2014

Thoughts on Stretch and size

A while back, I made Pattern Review's Winter Street Dress.  I adjusted the pattern to account for my long front bodice, in particular; however, when I made the dress the bodice was still too short (I should say that on looking at these photos the length of bodice being too long in my opinion at that time is less obvious). This, by the way, was my first real experience of a stretch fabric.

Next, I further altered the pattern - bodice length needed to be greater to bring the waist into line with my waist. I like any waistline to be at my natural waist - in this dress, I felt the original pattern as modelled  had a waist almost like an empire line. This was not a feature I liked. I made up this dress in a fabric very similar to the first, both plain coloured fabrics with some but not much stretch. I felt the final dress I made from this fabric was a good fit. Since then, I have worn the dress a few times and washed it a few times and it's possible it has shrunk a little. I'm not sure - in the same time scale, I was putting on weight, regrettably!


So, I thought I had a pattern adjusted perfectly to my body (I hoped I had one of those TNTs that people talk about!) and went ahead and made another dress with a floral stretch fabric. This fabric was much more difficult to work with. It was thinner, stretchier and altogether 'flimsier' than the previous fabric. I had difficulty sewing on the neckband and was unable to do it the same way I had in the previous dress, where I stitched in the ditch to make the stitching invisible; this time, I had to end up with stitches that showed; I also had 3 tries at the neckband before I was successful. However, I was pleased with the final version, and wore it a couple of times.


For me to wear any of my makes was quite remarkable - these were the first two I ever wore outside the house.

Then, a couple of weeks ago, I went to put on both dresses, on different days. The teal blue dress felt tight but not overly so and I was happy to wear it. I felt pretty good in it. Then, a few days later, I went to put on the floral dress. It felt bigger than the teal and looked long. I wore it, but didn't feel altogether comfortable. I realised that the waistline was sitting too low, by about 1 inch. After some measuring, I realised that the fabric had stretched. I don't have a photo of me wearing it - I thought I had but can't find it.
Floral dress held up against me while wearing blue dress
I took this dress to my sewing class on the following Thursday. What I wanted to do was to reduce the bodice length by about 1 inch and also reduce skirt length by at least the same amount. I tacked the skirt and bodice to each other, taking up 1 inch on each, for a total reduction of 2 inches and tried it on. It looked much better. I'm in the process of unpicking the previous stitching, which was over clear elastic. Then, I'll sew the two together, using my new overlocker and feeding the clear elastic at the same time. At least, I understand I can do that but I haven't tried it yet. I'll post a picture of the dress on this post as an edit when I've finished my alterations.

My question, though, is how do you know how much a fabric is going to stretch? I had prewashed and prepared the fabric. The pattern, by the way, didn't specify a degree of stretch. My tutor has advised sewing in fabric loops when I sew the bodice and skirt together again - she said this would minimise stretching when the dress is hung up.
I'd like to make the pattern again, but I'm completely unsure whether my alteration is now too much. I do, however, have a third fabric similar in characteristics to the first two I used. I'm less keen on the colour, which is rather too green for my liking. Maybe that would be successful.

I notice on some Pattern envelopes, there is a required degree of stretch, and I would like that to help me see if my fabric is suitable for the pattern.

Also, I understand there is some differing terminology. 'Two way stretch' can apparently mean the same as 'four way stretch'. This means that if I see pattern recommending 'two way stretch' I don't know if they mean both horizontal and vertical stretch (which some people call four way stretch) or a fabric that stretches in one direction only, horizontal or vertical.

Two other things - I'm testing a pattern just now, more on that later, but as do many others, the pattern maker suggest it's best to cut out stretch fabric with a rotary cutter. I must say, I find a rotary cutter easier, in any case. However, I have read on some of my (many) books that it is best to cut with shears, especially on stretch fabric. I find the rotary cutter easier and I will continue with that but wonder what the opposing arguments are.
The second is, I only recently learned that garment manufacturers cut out numerous layers of garments at the same time and that to conserve fabric, sometimes different sizes will be adjacent to each other. Firstly, I'm amazed that they can cut multiple layers - I find it so difficult. Then of course, they're not cutting fabric on the fold - It's so much easier to cut single layer. I wonder, however, whether their habit of cutting different sizes together accounts for a recent near purchase. This was a top I liked, in a sale so at a good price but one sleeve was significantly different from the other both in length and in width. I didn't buy the top.


Saturday, 27 September 2014

Reminiscing but not much sewing

 
 Warning - not a lot of sewing here! I hope I can be excused. For some reason, I felt I wanted to write this post.

I've been doing a lot of reminiscing recently. It seemed quite appropriate that we've just had the autumn solstice where day and night are equal lengths, a time when one day seems like summer and the next most definitely autumn.

One of the reasons for reminiscing was the Scottish referendum - residents of Scotland voted last week as to whether they wanted to be an independent country, separate from the rest of the United Kingdom.


This question has been hanging over businesses and residents for two and a half years and caused some big companies (including the Royal Bank of Scotland) to announce that they would leave Scotland given a yes vote. 16 and 17 year olds were given a vote for this referendum - it was felt that younger people were more in favour of independence. Older people were on the whole not - worries about pensions, health care etc. My elderly - well old really - mother has been extremely anxious over recent weeks in particular. Although I am Scottish in that I was born in Scotland of Scottish patents and lived and worked in Scotland until my 30s, I have lived and worked in England for 27 years now, so wasn't eligible to vote. My oldest daughter was born in Scotland but the next two daughters were born in in England - in the home of the Geordies. Fabulous people. My DH and I had always considered moving back to Scotland in retirement but the uncertainties around the referendum put us off. So the decision is still there to make; our current house is much too large for us so we need to consider downsizing at some point. Where to go though?

Just a point, we live much closer to Edinburgh (capital of Scotland and site of Scottish Parliament) than London (capital of England and governmental centre for us). By the way, the democratic vote on the Scottish Referendum was against independence 55% to 45% with a turnout of 86%; however, it seems that the issue hasn't been put to bed.

My oldest daughter, born in Scotland, living in the south of England, has been doing a course in diversity and discrimination and considered lots of issues of identity in her answers. She showed me her written feedback where there is an assumption that she is a Geordie. I asked her and she told me she doesn't feel like one, though she and her DH (from the North East of England) would love to move back to the area, in the same way that we have considered Scotland (we've lived in a few cities, moving for jobs). This daughter is hoping to take up machine sewing with a view to making cushions, curtains etc for her home so I gave her my previous class machine  - the Viking HQ100. When I originally demonstrated it to her, it wasn't working well and the tensions were all over the place. I got it serviced and was told the needle had been loose and advised to ensure I always used the correct bobbins (which I had). I gave her a couple of books, too.
 

My middle daughter, born just after we moved to England, has been doing a Masters in psychology in Scotland. Her original degree was in a big city in England - and that's where she wants to be, as she considers that 'home', even though she has split up with the boyfriend she was going to spend the rest of her life with in that city and even though she has been away for 3 years now. Oh and she doesn't have a job. She has already had challenges and faces more but wants to be there. DH is moving her this weekend by van from our house, where she's been for a few weeks now, to a flat share with 3 young professionals.

My youngest daughter has had to make quite a few short term sacrifices in the hope of long term gain. She's had problems with her last flat share and this resulted in her and her boyfriend moving to a flat they're renting on their own - an inferior flat to their previous one (shared with two others) and more expensive but without the hassle of other flatmates. They've just moved and are effectively starting to set up home together in a way they didn't do before. It reminds me of how we started out. When they were up here last weekend, my daughter brought a few garments she'd like repaired or altered. I hate alterations. I'm also not sure that some of these garments can be altered. One of them has a torn bodice and I'm sure can't be repaired but I hope I can salvage the beautiful decorative panels at front. She also wants me to shorten the straps of the Cynthia Rowley dress I made her as they slip down - and the poppets at the back pop open, even though I used 4, so I'll have to consider using heavy duty ones.


I've been very busy with family matters, golf business and play, bridge class and play and sewing classes, which started last week.

I've now done two nights of my pattern cutting class. Very interesting. The tutor decided to use draping rather than mathematical methods, as that takes longer. I'll be interested to see how the result compares to the result from the class I took in August.

One of the things I hadn't appreciated is that I'm very tired after the classes - the journey to the class is very lengthy because of traffic congestion; I thought I'd put rush hour traffic behind me when I retired! So twice a week is more than I'd bargained for.

I've done one night of my beginners' dressmaking class. I'm a bit advanced for it as some have never threaded a machine etc. However, I'm missing a lot of the basics to be suitable for the intermediate class. I have been given a jetted (or double welt) pocket to try - but I've nver done anything close to this so think maybe the beginners' class is the place to be. I missed the second class, where those absolute beginners were going to be shown how to thread a machine and begin to use it, as I travelled up to Scotland, to Gleneagles, to watch the Ryder Cup (Europe v USA golf team competition which happens every second year), or at least the last practice day before the actual competition starts tomorrow (I'm writing this in my mother's home on Thursday night). Gleneagles is beautiful - I just love visiting Scotland, but do I want to live there?
 

As it's Thursday today, I've also missed the second class of my regular sewing class. At the first one, I showed my tutor my white dress - and didn't need to explain anything as she'd read my blog post! We agreed the dress wasn't satisfactory and on discussing options agreed it may as well get regularly washed when I'm washing whites to see if that improves matters. We felt that the idea of embroidering of top stitching princess seams wasn't going to work.

So I've been revisiting some previous makes. I've already jettisoned a skirt I made early on. I saved the lining I made for it and hope that I might be able to use it in the skirt I started a while back - it's cotton and I feel it would benefit from a lining as it's a bit clingy. So more reminiscing - I can see that my sewing skills have improved since those earlier makes.

Now it's Saturday and I'm busy prepping fabric and piecing together a PDF pattern, while watching the Ryder Cup on TV. I think the result is going to be very close. It's true that to some extent I'm putting off sewing by blogging and watching golf and making a rice pudding!

I ordered a recommended draping book and it arrived so I'll have a look at that too.


Over the next few weeks, I'll again be very busy as my mother is going to have operative treatment to her eyes, with the hope of regaining about 40% vision, which would be terrific. She will have the treatment in London, so a few trips there for both of us over the next few weeks.


Saturday, 13 September 2014

Learning from my mistakes?


I haven't been doing much sewing. The weather has been great here on the whole apart from a few recent chilly evenings and mornings when the central heating has come on. During summer I have a lot of golf matches at various different courses - a pleasure in good weather. My back problems have hindered a little but I'm determined that they won't stop me; I go to chiropractor/osteopath, do stretches etc and take supplements and NSAIs and use a belt when necessary. I manage. I'm also preparing a lot of paperwork for circulation to the 40 odd golf courses in the county and then for the AGM (I'm County Vets' Secretary). On top of that, there have been a few family issues that took time and used up emotional energy with the end result that I didn't feel like sewing. But that's okay - it's a hobby and not a job! I have continued to read the blogs I follow and I read some books, some sewing, some not. Oh, and I also bought a few patterns. I did do one or two alterations to garments belonging to me and to one of my daughters.

I had intended to sew some golf crop trousers but didn't get around to it. Maybe next year - the season for golf is nearly over and then I'm into cold weather wear. I do have some warmer golf trousers that would be suitable if I can alter them to fit better. Some are just heavier weight wool but some are water resistant and fleece lined and I'm not too sure about altering those - I don't want to make them leak at the seams with new stitching! I've also discovered that I don't like making alterations.

I signed up for a couple more online courses. The most recent was a Pattern Review course on understanding interfacing. I haven't received my pack of interfacing samples and fabrics to do two half sized samples yet but I've read through all of the materials. It makes interesting reading - I had no idea there were so many different types of interfacing! I don't imagine that I'll be able to get them all in the UK, even online and I don't want to order from the US because of postage charges and import tax. I think our biggest name here is Vilene so I need to see if I can get some samples at the show I'm going to in November. Then, too, I need to be undertaking the projects that need these interfacings. But the biggest lesson is to make several samples to see which one suits best for the purpose and your intentions. When I made my jacket, there were several different interfacings involved. My tutor chose these, though, and we didn't really discuss them in detail. I feel that the hemline needed more structure.

So, onto the mistake of the title.
 
I did view B but in a single colour
My sewing room has been chaotic. It has a whole load of extra stuff in there that isn't usually, making it difficult in any case to sew or even to find things. I was always very organised at work but not so at home. Double whammy! My 'little white dress' (ivory) featured a centre fold right down the front and despite all my efforts, I wasn't able to get rid of this. I hadn't noticed this issue when I was sewing it and would just have assumed it would iron out when the dress was completed. I hope I won't make that mistake again.
 
Clearly needed better pressing! I thought that was the only issue.


Pictures taken before I realised there was a problem
I decided to take the dress apart to salvage the zipper (a beautiful and rather expensive long invisible zipper) when I realised that I could have a go at trying to replace the middle panel, as I still had enough fabric left. There was nothing to lose - either it would work, or it wouldn't.

So, first step was to remove the middle panel. Achieved. Second step was to cut out a new front panel, using the same pattern piece as before. First problem. I couldn't find it - anywhere. I looked into every pattern envelope and my large art folder which holds my traced, drafted and thicker paper patterns. No joy. Eventually I decided that I would use the front unpicked from the dress as a pattern piece. I traced around the piece and added a seam allowance. I added 1cm only as I had previously used the overlocker to join the sections. So the seam allowance of the side fronts was now only 1cm. I found this process rather more difficult than I anticipated, but I did eventually manage. Then the next step was to cut out a new fabric front panel. Originally, the front had been cut on the fold but I now had a full piece which didn't need to be cut this way. Obviously, I had to avoid recreating the previous problem, and had to manipulate the fabric remnant to allow the rather long piece to be cut out. Eventually achieved. Then I pinned the new front piece into the dress and it sat that way for quite a few days while I contemplated the next step. I wasn't confident about the process.. 
 
A couple of days ago, I decided I really had to finish or junk the project. I decided to first hand baste the seams, then stitch with the sewing machine and then overlock. Sounds a bit like overkill, but I wasn't very confident and it was much more difficult to make the alteration than it had been to create the dress in the first place! I still had to ease the bust shaping. I still wanted to understitch in the neck area but this was more difficult because of the previous work - the lining was rather frayed and the seam allowance shorter than it had been. Anyway, I eventually managed - not perfect, but good enough, I felt.

I'm not sure why I didn't notice earlier, but then I realised that the centre panel was a different shade from the rest of the dress and had a firmer feeling. My husband asked me if I had put the wrong side out - no, I hadn't. All of the fabric had been pre-washed but of course the rest of the dress had had several treatments to try to get the centre fold out. So I decided I would complete the dress and then wash it. So I finished pressing and then sat down to watch TV and hand stitch hem and stitch lining down to zip. All finished - off to the wash.

The dress has now been washed twice since completion. I could still see a difference in the centre panel. Then, I realised, to my horror, that I had used the fabric wrong way up! I hadn't considered this at all. I always tend to cut using a with nap layout. I hadn't thought of this pattern - a small geometric - as having a right way up. Well, it doesn't, just that all pieces should be the same way up! They're not. I hadn't given it a thought. Can I wear the dress? Will anyone else notice? Does it matter whether they notice or not? - I'll know.

New panel on bottom of photo
The dress is still wet from its most recent wash. I can still see a difference in shade. And after all this manipulation I realise that I don't even know if it still fits me!!

New panel to left of photo
In the photos, I have shown the seam between front and side front. Once the dress is dry, I will try on again and see if it fits and how noticeable the shading and direction is.

Next week, my sewing class restarts after the summer break and I'm starting an evening class in pattern cutting. I'm looking forward to that. Unfortunately, I'll miss a few sessions because of other commitments but hopefully I'll be able to catch up okay. One of the commitments is a sewing one - I'm going to London to the Bernina Sewing School to learn how to use my new Berninas (sewing machines and overlocker). I'm looking forward to life getting more back to normal and I'll get on with some sewing for autumn. Today I played golf in beautiful sunshine, in crops and short sleeved shirt, but the gold and russet coloured leaves, fallen chestnuts and nights drawing in are a reminder that autumn is just around the corner.

How Do You Read Blogs?

It's a while since I've posted a blog,  lots of reasons. I'm thinking of starting again. However,  I used to read the blogs I fo...