Friday 29 May 2015

Finished Blouse New Look 6407; more computer issues arghhh!

I finally managed to finish my blouse! New Look 6407. I've posted about it previously.


In my last post, I had successfully managed to attach piping to BOTH front edges, so running out of piping in the process.
 
I’d had a bit of difficulty attaching the piping.
First, I had to change my machine needle to a microtex needle as I was running into problems with stitch quality and tangling and I reckoned this was due to sewing through two layers of cotton and two layers of piping, plus, eventually, some of the cord too. Fortunately, this seemed to solve the problem
I used preformed piping and the stitching to hold the piping together was so close to the cord that I couldn’t cover this using my narrow zipper foot when sewing the front and facing together. I ordered a foot for my machine, thinking this would help, but it didn’t as the groove was much too large, really for upholstery piping not this fine garment mini piping, so the piping wasn’t held in place properly. Eventually, in desperation, I decided to use my edgestitch foot, using the stitching I made using the zipper foot as a guide and moving the needle over further. This worked well. This problem wouldn’t have arisen with self made piping which I had originally planned to use.

 
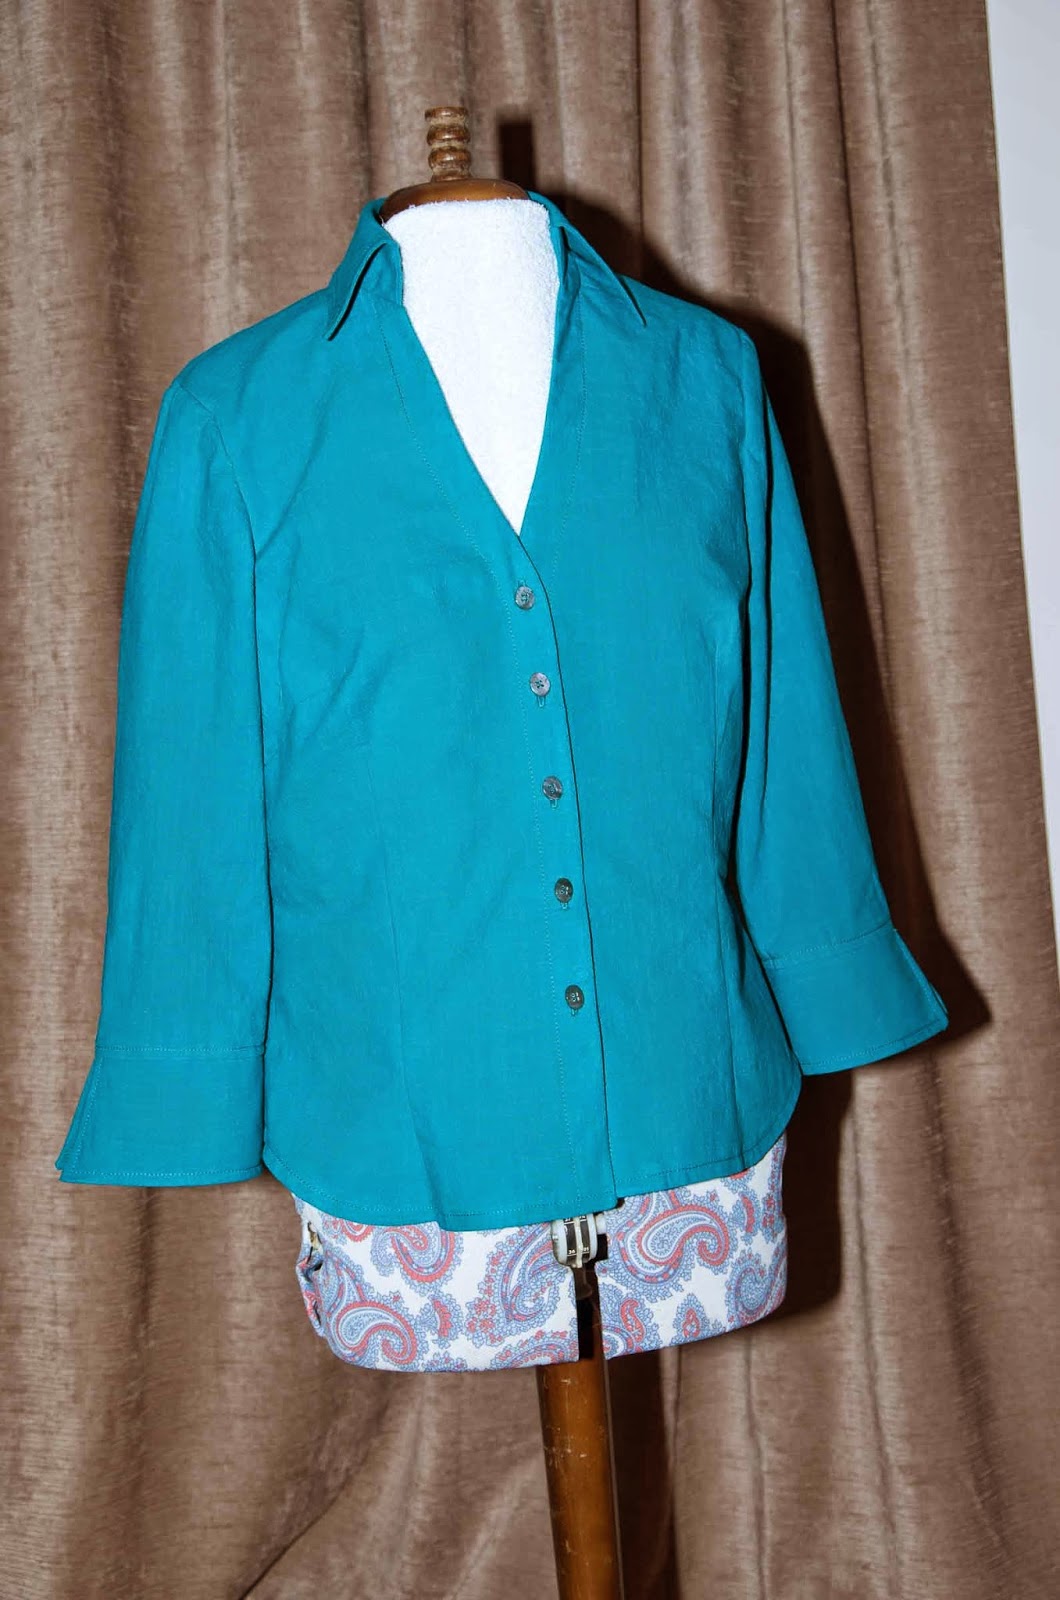
I managed to attach the piping around the collar seam, curving the original fairly sharp points to the collar to make the process easier. I assembled the collar as per instructions on the pattern sheet and it looked pretty good, I thought. I didn’t do any understitching (and didn’t cut undercollar smaller) because I used piping.
 

Apparently, I should have attached the collar to the blouse neckline before I started placing piping on front edges (though these were easier to do and I had wanted practice) and I found I had attached too long a section to the front, so had to remove it. No problem, though. However, I had huge problems attaching the collar and getting it to look neat and even. I had that collar in and out on a few occasions and eventually gave up as I was afraid I’d stretch everything out of shape. The collar is not perfect, the main issue being on the inside. I’m sure there must be a better way to construct a collar! I didn’t have access to my tutor for advice as this is mid-term holiday week (and I missed the week before because of my golfing duties in the Lake District and a funeral I attended). I will do another blouse in class to see if I am advised on a better way to finish professionally. Meantime, though, I am entering this blouse in PR’s beginners’ contest. At least everyone can be assured that it was all my own work!

After the collar was attached to the best of my ability, the facings had to be attached. This was no problem now that I had worked out how to deal with the piping. Part of my issue with the finish in the blouse, however, is these facings, which, it seems to me, are used to cover less than tidy work! I’m really not keen on them. I did do the topstitching required by the pattern instructions at 1 inch from the edge. I chose to use matching rather than contrasting thread as I thought the deep pink would be too much.
 

Because my collar ends were now curved rather than pointy, I also curved the cuffs and bottom of blouse front.
We had a bank holiday weekend last weekend and the fabric shop where I bought my piping was closed on Bank Holiday Monday. Luckily, it was open on Tuesday and still had the same piping available. I bought a further 2 metres, though really I didn’t need that much - then I thought I had bought sufficient firts time, so better to be safe than sorry!
I washed the new piping and was then able to carry on.

I decided to insert the piping between the cuff and the sleeve, rather than around the cuff.

 
The cuff was already  constructed by this time - I didn’t topstitch the edges as per pattern instructions because I was using piping and didn’t want everything to be too busy, but in retrospect wonder whether I should have done so. I had to sew the sleeve seams together before I could add the cuffs - this made it slightly more difficult to insert the piping but I was becoming an expert piping inserter by now!
 
Now, I had to insert the sleeves into the armholes - set in sleeves. I have had a demonstration of this and have done it before and managed without too much of a problem. My sleeve width had been increased because of my large biceps and during muslin fitting, I had to add an additional allowance to the back of the sleeve cap, but I was still using the original armhole. This meant, unfortunately, that the marks I had tried to transfer so carefully weren’t in the correct places. I think I managed to do a reasonable job, though.
 
Nearly finished!
 
The last time I did buttonholes, I had problems because of uneven thickness across the area where the buttonhole foot had to sit and I was very concerned that this would be the case here - I had 5 layers at the piping side, including interfacing,  and only 3 at the other. I did some practice on spare fabric made up the same way with piping etc. I managed to make the buttonholes. I did mark out carefully beforehand. I wasn’t able to use the buttonhole guide from the pattern as I had altered the length of the front band, and the buttons I eventually chose were a little bigger than recommended. I made up my own buttonhole band, using 1 extra button, 6 instead of 5, and will be able to use this again. I feel that buttonholes are one of the least professional arts of the blouse - I must find a better way to deal with them. Perhaps one of those chisel cutters would help?
 
So, I finished the blouse last night.

Between some of the steps, I decided to draft out my contest entry and PR review. I used Google Drive on my PC - this was late on Wednesday night. On Thursday, I went to access this on my tablet, as I realised I’d forgotten to say I had changed the shape of the collar - and it wasn’t there! To cut a long and sad story short, my PC was extremely ill. I could switch it on but it wouldn’t do anything and I had no access to the Internet - obviously this must have started the night before as my Google doc wasn’t on Drive. With lots of help from DH, I managed to access important documents on the hard drive and save them to a USB stick; although I do back up to an external drive, it looked as though this wasn't up-to-date. DH disabled the faulty Internet connection (we still don’t know what the problem is). I wasn’t able to go back to a restore point as this didn’t work. After he disabled the Internet connection, I found the programs on the PC worked better and faster than they had done for ages. Now I don’t know whether some of the problems I had previously with uploading to blogger were due to this rather than other issues.
 
Recently, I bought a new laptop and a new copy of Microsoft Office to go on it. Today, DH took photos of me in my blouse, between heavy rain and hail showers, and I decided it would be best to use the laptop rather than my tablet to write this blog post and re-do my PR review and entry notes. To cut another long story short, it seems that my copy of Office may not be genuine as Microsoft did not recognise the product key. I have contacted the company I bought it from for a refund or correction and meantime used Google Drive Docs on my laptop.

Then, I couldn't pick up the photos DH put onto our shared drive on our network - still can't - don't know why. So I've had them passed to me on a USB stick. I hadn't used one of those for ages and then had to use 2 on different computers in one day!
 
Anyway, I rather like the blouse and think I’m likely to wear it!


Sunday 24 May 2015

Piping on the Pink Blouse and the White Shirt Project

I managed to get back to a bit of sewing today.
 
Firstly,  I had to alter the bust darts. They were pointing too low, and were a bit short. The dart points weren't sufficiently tapered. I've never altered darts that were already sewn before. I took apart  the side seams and picked apart the sewn darts and pressed out the creases. I carefully drew in a line from the middle of the existing dart ends to but 5 cms short of my marked bust point. DH marked them for me on the actual blouse. The new dart is slightly higher but considerably longer. That may be a mistake - I was thinking to perhaps lengthen by 1 - 2 cms. I really don't want to alter again,  so they are staying this time.
The pins mark my bust apex - the tape measure is lined below that
 
When I sewed the side seams together again (and of course because the dart angle was different,  the shaping for the dart at the side seams was no longer correct), I took the opportunity to narrow the side seam to give me a bit more hip room. I still felt they were rather neat (ie on the tight side).
At this stage,  I hadn't cut out my interfacing,  so I decided to have some practice putting on the piping. I tried to buy a piping foot for my machine but the one I got isn't the right size. I carefully attached the (pre-made; washed) piping to the right side of both blouse fronts.  At the sharp points,  I needed to round.
 
Another mistake - although it's okay to pipe all the way down the button side of the front, it's not necessary - and I now realise I don't have enough piping. I'll need to try to buy some more - hopefully the fabric store is open tomorrow (it's a bank holiday here and it's often closed on these Mondays). If I unpick the piping I added but didn't need to, I still don't think I'll have enough. Might be borderline.


I've now cut out all the interfacing required and fused to pieces. The collar is the next step. I've only tried a collar once before,  for this same blouse and it wasn't spectacularly successful. I've read some instructions on how to achieve a collar but I've decided I need to follow the instructions given in the pattern. I know some people talk about a markedly smaller seam allowance being better,  but my tutor didn't feel this so my SAs will stay at 1.5cm.
 
I also intend to insert piping in the collar seam. This means that there is no advantage to marginally reducing the outside centre curve of the collar. The collar as cut had markedly pointed tips  - I can't bend piping at this acute angle, so I will make as tight a curve as possible. Of course, I'll have to match the two sides;  more difficult.


Lots of snipping necessary in the corners to let piping turn. I haven't tried next stage as yet1


That's the shadow of my wine glass at the top of the photo.
I just used my phone as I had lots of problems again with computer today
 
It's a pity I have to spend some sewing time tomorrow trying to buy extra piping.
 
On Friday there, I went to buy the buttons for my blouse. On the way to this fabric store by a slightly different tie to our usual because of another errand, I realised we were passing close to the Shipley Art Gallery so we decided to call in. It's an interesting place. I knew there were two current exhibitions in addition to their permanent exhibits; The White Shirt Project and The Knitted Garden. The latter was interesting but I was really fascinated by the shirts produced by the first year BA (Hons) students at Northumbria University. Such rich imaginations!
 
 
I took some photos but I'm not sure about copyright etc so I won't show the more detailed pictures of shirts and patterns or the shirts on models. Apparently the shirts are shown on rotation, presumably because the room isn't huge and the shirts have to be displayed to their advantage.


Modern shirts in front of an ancient statue
Loads of inspiration, though. Lots were based on Japanese designs;  not my cup of tea but fabulous nevertheless. There were a couple I'd wear and a couple for DH, too.
 
In the meantime, I'll get back to working on my pink blouse - just having a break for dinner and,  I admit it,  a couple of glasses of wine. I hope I can still sew straight! Newcastle United managed to avoid relegation today! That's good for Newcastle as a whole.


Tuesday 19 May 2015

Blouse started but stalled; wedding dress plans; ex-sewers

After all those blouse muslins, I reckoned I must have a perfect fit. I felt ready to start the real thing.

First,  though I practiced darts after getting a further demonstration. My tutor had commented on my poor darts previously so I wanted to find out where I was going wrong. It seemed basically that my angle at the end of the dart was too great and I needed to end exactly on the point. My tutor backstitches on darts and produces lovely darts. In the end,  I decided that leaving long threads and tying off was better for me. I practiced double ended darts, too. Some things I've read say to start in the middle and work towards both ends. My tutor starts at one end and works to the other.

My practice darts looked beautiful.

I also got a demonstration of inserting piping. I managed okay on the short samples I did but have some concerns about firstly the curves and secondly having to put buttonholes in.

I have cut out the blouse pieces. I nearly forgot to increase the cuff width to match the widened arm. I remembered to alter the facing. I haven't cut out my interfacing yet. I thought I had everything ready,  then realised that I haven't bought buttons. Mmm,  pink blouse with fuchsia piping - do I do my buttons to match blouse or piping and how about buttonholes? I don't know. Opinion?

I sewed the darts,  thought they looked lovely and so went on to sew side and shoulder seams.  I tried on and am not happy with the darts. I'm not sure if it's my sewing or the fit.

I'm currently in a hotel in the Lake District. I'm here for a few days because of a Golf championship over 4 days, 3 plus a practice day. I'm here as secretary of our county group, but not to play golf. I had always hoped to leave on Thursday morning with a view to catching the second half of my sewing group, to get some advice in the last week before the holiday week.. It's a 3 hour drive. Unfortunately, one of my friends lost her battle with leukaemia and her funeral is on Thursday afternoon. So I won't be able to get comment on my darts. I'll go ahead after I get back, though,  and hopefully get finished to enter the PR competition. It'll be very tight, though, as I hadn't fully anticipated more than a week away from sewing. I'll post photos when I've finished.

I haven't brought my sewing with me,  other than the link with the blog. I had planned to call into Linton Tweeds on Carlisle on the way here but then decided not to as I don't want to buy expensive tweeds at present and I thought I might be a bit tight for time. I decided instead to visit a fabric shop in Penrith;  I found it via Google search. The rain was torrential and my windscreen wipers weren't coping,  so I went to Penrith to shelter and for lunch. That's when I realised I should have had a sample of my fabric with me - I couldn't match buttons. The fabric shop was staffed by pleasant knowledgeable people. They had loads of quilting materials and a selection of dressmaking fabrics, a decent haberdashery and some pattern books. Upstairs, they had a selection of bridal fabrics. I found air soluble marker pens, which I haven't found elsewhere and bought some machine needles.

Last weekend my youngest daughter came up. We went bridal dress trying on. She looks good in them all. The dresses tended to be a standard size UK12 (US 8) and all were too big around the chest apart from one which wasn't wide enough across the shoulders. However, she is interested in the idea of heirlooms and tradition and would like to wear her sister's wedding dress (I would then make a more pared down dress,  but still a wedding dress,  for her to change into).  The trouble with her sister's dress is that the top is too big and it's strapless which H dislikes. We agreed I'd try to find a decent dressmaker to see if the dress is alterable  - the top needs to be made considerably smaller and straps added. I believe that a well fitting boned top would stay up and she'd manage without straps,  but we'll see. The dancing dress would be bum hugging.

Tonight at our meal, I found that one of the golfers in my group is an experienced dressmaker and she'll give me the name of a dressmaker to discuss the wedding dress with. She's also going to look through some of her patterns. She is about to alter a spare bedroom into a sewing room and start sewing again.

It's interesting, I regularly meet ex-sewers.  At bridge recently, one of my opponents was an ex-sewing teacher. I met loads of women who've done a lot in the past but no longer sew. Eyesight was an issue with some.

My daughter has a reasonable idea of the colour she wants for her two sisters' bridesmaids' dresses. I contacted a silk supplier by email to see if they could provide by Pantone colours. They responded very quickly to say no,  but they had 400 shades of silk dupion and would send me samples of what they thought might be suitable based on my info. However, today in Penrith I found some of the non-silk satins etc gorgeous and much much cheaper so it might be better to consider using them.  I'm no further with my sample outfits.

I'm going to bed now. Tomorrow I have some duties in the morning and evening but have arranged to meet an old friend who lives in this area in the afternoon. She does volunteer hospice work (she's a doctor too) and is actually working in this self same town tomorrow morning. So it's worked out well.

Sunday 10 May 2015

The Sorry Tale of Three and a Half Blouse Muslins

I'm making a blouse. This was on my plans earlier in the year: I wanted to make a garment using excellent technique in the last term of the year and Lyn, my sewing tutor, suggested a blouse.

Then, I decided to enter the PR competition for beginners. One of the criteria is that you have you use a technique that's new for you. I originally thought I'd use French seams but on the discussion board it was suggested that was usually for finer material; I'm using medium weight cotton. In addition,  there was discussion about the need for seam finishes, at all. There was a reminder that seams are utilitarian things and that many finishes add unnecessary bulk, when usually the inside of a garment like this isn't seen. I thought about it.

I then thought about felling the seams as per men's wear. Some other contributors dislike this type of seam finish. It's not usually found in a women's blouse. I was a bit concerned about how it would look on the outside in a blouse,  rather than a shirt, and how easy or difficult it would be to do over bust dart ends. I wasn't sure I'd like the extra line of stitching on the outside.

In the end,  I decided I would plain seam and finish the allowances using my overlocker. The fabric is cotton and frays so I feel it does need a seam finish. Overlocking may be commonplace in RTW  but that won't deter me (I haven't yet achieved the standard of cheaper end RTW, after all) and I think this is the finish I'll use. I'll use for the seam finishing, not to construct my seams, though - I prefer my sewing machine for that. I'll press the seams open.

I decided my 'new to me technique' would be to insert piping in the seam between bodice and facing and between sleeve and cuff. I've received lots of very helpful advice via the competition discussion board. I think PR is a wonderful resource with very helpful sewers willing to advise.


I've made this particular blouse before - for my oldest daughter. She wasn't around when I was making it, as she lives nearly 250 miles from me,  so there was no opportunity to fit it properly. I did try to make adjustments - mainly for her large bra cup size in a slight frame. I've posted about it previously;  suffice it to say when I saw it in her I wasn't happy - well with anything,  really. There was insufficient room for her bust, waist dart position was in the wrong place by quite a bit etc.

I thought these were probably fairly simple fit issues - is there ever such a thing?
I struggled with the collar; I followed the instructions to the letter,  I believe.  The finish outside was acceptable but I thought it was very messy inside. I need to check out various collar tutorials. I need to achieve a better collar finish.

Initial changes on pattern:
I lowered bust dart as my apex was quite a bit lower.  I did this by adding 2" to the length between the armhole and the bust dart.
I had to do this front and back.
In retrospect, while I needed the extra overall length, I needed less than half that at that position. Had I made a smaller change in the first place,  I think my subsequent changes would have been easier. My final apex position isn't much lower than the original as I had to raise it again. I also had to raise the waist position in front and more on the back.

First Toile:
The whole thing was too tight and I took out all the vertical darts, which felt much better but was much less shapely of course. DH felt that shaping was required and pinned some smaller and longer darts for me. He recognised some problems but wasn't sure what to do about them.
My husband very much disliked the bust darts - he felt they started much too low at the side. Indeed, they were almost like French darts,  except they're attractive and intended and these weren't.

Second toile:
I asked Lyn at class to look at my first muslin/toile (I suppose really to check that DH was making reasonable changes!) but I forgot to take it to class. I did have the pattern (I hadn't transferred the changed info to it) so I made up a new muslin incorporating the changes to the dart lengths as far as I could remember, or could work out, and I rotated the bust dart so it was less vertical.

I have a sway back or at least my back length is relatively short for a tall person like me, though longer than the norm, together with a rather large derriere, so my waist darts had to be altered. The area of maximum dart intake had to be raised (equivalent to shortening bodice but no waist seam here). In addition,  the darts were too far lateral and had to be brought in by over an inch - plus, they had to be extended quite a bit up towards my shoulder blades (3 - 4"),  and shortened so they stopped short of the hem. DH hasn't moved lateral position but had worked out the rest.

In addition to my previous changes, Lyn suggested adding an additional seam allowance ie 1.5cm/⅝" to the sides as it was rather tight. Lyn could see what my husband disliked about the bust darts and suggested moving the dart even more towards the horizontal. Further, I thought I needed a bit extra room in the bust area and deepened the dart slightly at the same time. Unfortunately, I forgot to add that extra length to the side seam - I only noticed when stitching toile number 3. It wasn't a full FBA, but maybe I'd have been better doing that! Or I've just read Louise Cutting's cheat FBA and if I'd read that before doing my changes, I think this could have worked well.

I had also set in sleeve version 2 (number 1 was far too tight) and this one was a good bit wider over the biceps - I added 1.5cm/⅝" to each side,  but didn't alter the sleeve head. I had severe restriction moving arms forward and we decided that the back armhole was too wide. Taking a fraction off improved that. I wasn't sure if I should add what I'd taken off the bodice to the sleeve but at the time Lynn suggesting waiting to see how it turned out when made up.


Third toile:
So, at home,  I stitched up toile number 3 with one side of the 'band' attached to each front bodice to get a better idea of finished fit.
I detested the fabric I used,  which I bought cheaply for toile making. It moved and squirmed and the needles didn't like it one bit, as they made a crunching noise when going through it (I think it's polyester and quite silky)  and there are a number of snags in the fabric from the seam stitching. Not worth it - I prefer to pay more for a better quality fabric. I reckon it has probably destroyed my needle after just a few seams.


What I found:
There was now enough overall width at the hip.
I still didn't think there was enough space for my bust.
I couldn't see the back but thought it was probably okay.
The back side seams were longer than the front. I checked the pattern just to make sure it wasn't due to slippery cutting but it was there too - I forgot to lengthen by the amount I'd increased the bust dart. So I realised I needed to lengthen the front.

There was some gaping in the front armholes - I thought this might be an indication of a need for more FBA.  The fold formed at the a armscye was pointing right to my apex. This confirmed what I was thinking.

The front vertical darts seemed much too far out. This,  I think,  was now more obvious because of the addition of the 'band'. I  looked at the instructions again,  because what was labelled 'centre front ' didn't seem to be central. I had been thinking 'band' but actually it's not - it's a facing which turns under. (I had forgotten) So in fact,  turning it under,  and stitching where centre front would be made the bust darts lie in a better position, but then it seemed tighter across the bust and lower hips.

On Thursday past at class I asked Lyn to look at the fit again. This is allowed, as far as I understand, just so long as she doesn't do any of the work,  which she won't do,  of course.

I had already decided that I needed more bust space so had made a Full Bust Adjustment to the pattern at home the night before and moved the waist darts slightly. I took the opportunity to raise the pattern bust apex as I thought it was now too low. When I drew up the pattern,  I took the opportunity to ensure that the front length matched the back length at the side. However,  I got Lyn to look at the muslin I had made before that correction. At first she thought the changes I had made worked well,  despite me having said about the FBA but as I moved she agreed it looked tight. I went ahead and cut out a new front piece with the FBA and sewed this in place. One advantage of the FBA was that it gave just a little extra space at the hips.


Toile 3.5
So I then cut out a new front piece (muslin three and a half!) and attached that. Then I sewed on the facing.
Lyn agreed it looked much better.
Only two more changes were made at this point
Further shorten bust dart by a half inch
I wanted to raise neckline slightly - by 1 inch.
These changes have all been transferred to the pattern. I also cut out a new facing piece.

Then I set in the sleeve piece from the previous muslin. Reaching forward showed it was too tight, still. I needed to add extra to the sleeve rather than the bodice,  and have now done so. I've decided that enough is enough as far as the muslins are concerned and next I'll do in fashion fabric. I think,  though,  that I'll add extra across the whole of the sleeve head. It's easier to cut back than add.

The pattern was by this time such a mess that I transferred everything over to pattern cross and dot paper. I found that I'd forgotten my tracing/ carbon paper and borrowed some from another student. Not all tracing paper is created equal!  I used my tracing wheel and the tracing paper to transfer all markings but had great difficulty reading the marks which were in pale yellow.
New tracing of front bodice, with new facing piece attached.
 
My fabric is pink linen-look cotton.

 
The colour reminds me of the beautiful blossom that is now falling as pink snow across the lawn.


I was going to make bias binding (something else I've never done) and enclose fine cord  - in other words,  make my own piping.  I was torn between a darker pink cotton polyester fabric and a striped seersucker type fabric with stretch, both from my stash. My decision was made for me - I couldn't buy fine enough cord for my own piping as everything I found it was for cushions,  but the fabric store had ready made piping in dark pink. So that's what I'm going to use.
Pink cotton linen look fabric with dark pink small piping
 
 
It's a bit out of focus, but here's my inspiration for the contrast colours.

I have a fair bit of practice to do,  but first things first.

Next,  I will make up in my pink cotton. Ideally,  I will cut this out at home as I can use my rotary cutter and mat , which I find so much easier than shears. I'm not sure I'll manage to do much more than cut out,  though.  We'll see.

I'm pretty busy at the moment with county vets' golf committee related work. Last week was the silver championship over three days but dreadful rain and flooding closed the course we were using on day one, resulting in lots of extra work and an extra day had to be added. The championship was successfully concluded just before another bout of dreadful rain. The extra day caused difficulty with those qualifying from day one due to other commitments - our captain had to postpone her ferry taking her on a cycling trip to Holland for an extra 24 hours,  not so good when she was just going for a long weekend.

Tomorrow is the bronze championship,  in which I'm playing as well as having committee duties. It's only over one day, though.  Fingers crossed, as last year it was washed out and had to be rearranged a few weeks later. This is more difficult than it sounds especially when the field is in excess of a hundred.

I'll have to leave early to get to my evening class. (Unless I'm likely to win a prize of course!) Tomorrow we'll find out if the garment construction techniques class is going ahead in an acceptable fashion. I suspect not, as the room had already been modified to seat 20 and only one tutor is involved. Decision time approaches!


Monday 4 May 2015

Blogger and Google Drive photo problems solved (I hope!); update on pattern cutting and dressmaking techniques classes

Just to prove I can still add photos - but this is the only one here! Unless you want photos of apple blossom, tulips, snowy mespilus, grape hyacinths etc. The garden is awash with colour. Gorgeous!

One of the problems I had was that my photos disappeared from my blog. This followed computer problems after which I changed the location of the photos to organise them better (not realising the chaos this would cause).

A few months ago, I discovered that photos taken on my smartphone could be directly uploaded to Blogger. In the add photo box in blogger, taking directly from your phone was an option. This worked well and was very easy. The only issue was the lack of editing of the photo.

I think I changed the settings on my phone, however, as I didn't like that every photo I took was potentially going to be broadcast. This is only in retrospect I'm working this out, so I'm not sure. However, I think I changed the share/privacy settings a little (my photos were always private, anyway). Anyway, my phone photos stopped being available to blogger. I couldn't work out how to change it back. At the same time I cleared up the photos as my phone had lots of photos on it and any particular one was difficult to find - but found this meant I deleted them from blogger.

Fortunately, I was able to restore the photos, after finding out how by Google search, though I couldn't restore their links into my posts. I manually restored the links, or at least some of them. Others I decided could be missed off the post.

I now found that if I downloaded my phone photos onto Google Drive, I could upload them into blogger. Still no editing but that seemed to work for a little while. I shared the contents of Drive across all my platforms - by this time my laptop was long gone, so that meant PC, tablet and phone. I did some posts on my PC and some on my tablet. The tablet was easier as I could start working on a post when I had some spare time eg waiting for a class to start. My tablet did not have access to my PC hard drive where I stored photos and had editing software. I decided this was okay.

Although I shared Drive across all platforms, I found that if I changed Drive, I could not access the changes to Drive made after a particular post was started. This meant that the image of the Drive was outdated. Changes I had made didn't show. I had previously noted that not all photos I tried to put onto Drive got there. Anyway, I realised I couldn't just use my modified Drive to replace the photos.

After the problems with the computer, I tried to organise my photos in Drive as they were so very difficult to find. Not at all like the lovely folders of individual projects I had envisioned. However, I now found that my blog posts were full of empty photo frames, some with captions. Only so far back, though, as my use of Drive to get photos from my phone and onto Blogger was relatively recent.

I still had the photos in Google Drive but Blogger couldn't find them (the ones that I had taken from our shared drive were fine - these were the ones DH took on his camera). Okay, I thought - all I need to do is to copy them or move them onto my computer. No. Nothing that straightforward. I've solved it now, but if anyone has problems with this, please ask me and I'll give you more details how to manage the transfer.

Some of the photos downloaded okay (select, choose download, choose 'save as ' after message about zipped file appears and choose where you want them to go). They downloaded into a zipped folder, but I could choose the site of that. Getting the photos out of the zipped folder was fine except on a couple of occasions when my computer hung or something - saying it was going to take over 4 hours to copy 40 photos - something I achieved later in a few seconds.

After I was sure that all the photos had downloaded okay, I took them out of the zipped files and put them into the appropriate file. At this stage, I didn't then delete the photos from Drive - I may as well leave them there!

I started to go through the blog posts to try and replace the photos. I have replaced some but decided others didn't need to be there. I don't feel that it's worth a lot more of my time to sort them to the nth degree. I have the info in my physical learning log.

I have decided that my blog posts from now on will not use Drive as an intermediary unless it's simply to get a photo from my phone onto my PC. I can then call up the photo from the appropriate folder, edit it if necessary (I'll probably continue to use Photoshop Elements as I've used it before) and then get Blogger to download, I mean upload, the edited photo.

So my next posts should have appropriately edited and oriented photos, even if I take them in class on my phone! No photos in this post, though - I spent a long time getting photos back into my blog posts and I'm quite tired! I still have one post, that I know of, to update, but I can't find the photos anywhere!

Update on classes:
My pattern cutting class has restarted - we enrolled on Thursday past and the first official class is next week. We worked in the extra enrolment class on modifying the style of a quarter trouser block. Next class, we will start on our personal block.

The news isn't so good with the dressmaking techniques class (now called sewing techniques).

I have enrolled but the new person in charge wants to have so many students in the one class that it just won't work. Previously there was a class size of 12, with different classes on different nights divided into beginners, 2 or maybe 3 classes I believe (absolute beginners included and those who were starting course even though they had some experience), continuers and advanced. I did one term of beginners, where we learned some skirt making techniques, one term of continuation where we learned some trouser and jean making techniques and the third term you do your own project, with the tutor on hand to help as required.

However, new guy wants to have 20 students, mixed levels (as he says we are all starting at the beginning of a BTec.) and they have 20 enrolled in the fulltime college course, during the day - but during the day, at any one time, some are doing research, some are doing fabric painting, some are ...etc so there is never a situation of 20 trying to sit and sew.  There isn't the power supply for 20 sewing machines, certainly not safely.The room might physically hold 20 students. The new guy has been told repeatedly that a mixed class of 20 won't work - we are adults there for 2 hours per week to learn how to sew, not students there for several hours a day over a college year.

At this stage, I still don't know what's happening - I believe new guy is prepared to have 2 classes if the number of students is 24+, but at the moment , due to all the chaos around this - people being enrolled for the wrong course, wrong night, wrong fee, being told class was full when it wasn't, turning up for enrolment and finding no-one there, giving up because they don't like fee increase or want to do a course etc, the numbers have not reached 24 (last term there were 50+). D is trying to chase up the 35 students who told her last term they wanted to continue but who haven't enrolled.

So I'm going back next Monday (today is a bank holiday here) and don't know whether this will be a class of 12 which would be tolerable or a class of 20 - meaning that in 2 hours my maximum share of tutor input would be 6 minutes - but then there's all the whole class stuff, admin, course related work etc taking time away from hands on sewing. A lot of us who were together last term are very unhappy and it's possible that we'll withdraw altogether, but only as a very last resort. If that happens, D and R have said they'll do extra classes in their studio (they currently only have one night work each per week - previously they each worked 3 or 4 nights, so their income has plunged). That's great for me as their studio is only 20 minutes from my house - the college is an hour, but not so great for those students who live closer to the college.

I actually quite like the idea of a course as it keeps things more structured. Extra sessions would be a sewing bee and not provide me with the basic foundations of technique that I am seeking. So I'll be at college to the bitter end, whatever that end might be!!

Friday 1 May 2015

Wild Ginger, more toiles, Pattern Review skills levels and change to plans plus a secret Me Made May

In my last entry, I said I had 3 bodice blocks - or at least 2 from classes,  neither satisfactory. and a third on the way. I'm carrying on developing the third, which is based on the Sure Fit Designs system, with a few tweaks. In fact, I now have a good close, but not too close fitting bodice pattern, stopping at waist length. I'll also do one which goes down past hip. I've done all modifications, removed seam allowances from my pattern and now need to draw the block onto card , notch etc. I feel excited that I've finally got a block I'm happy with. I'm not going to post pictures - apart from having problems with that, there is nothing to see, really . I'd rather post pictures of the garments I make using my block as a starting point.

However, just to complicate things further, I bought Wild Ginger Boutique software in their 20th of every month sale (to celebrate their anniversary).  I had been thinking of software for a while and Catina Ferraine's (patternhackfairy.com) offer of online tutorials, the good reviews, the excellent customer support and the price reduction - not to mention my frustration that I'm still altering every pattern from scratch, meant that now was the time to do it.

I'm absolutely fascinated by the whole process of pattern making/cutting and hope to continue with this through the use of this software alongside my classes, should they go ahead as planned. Catina made it clear that a good knowledge of the maths behind the processes is important and I'm very happy with that. I already have a few pattern drafting books, though not the one she likes (by Jack Handford - I haven't heard of him,  I'm afraid)  and says Wild Ginger is based on. A search of Amazon.co.uk showed up 3 books with very high price tags.  I have also bought the book linked to Wild Ginger - Digital Flat Pattern. Postage was ridiculously expensive but my savings on the program and book paid for that. It's international priority mail so I hope to get that fairly soon.

I have done the basic measurements for the program and entered. Initially, they recommend making a toile based on these basic measurements. Later the program details get tweaked depending on the results of the muslin fitting. So even though I know that the bust point is too high based on these measurements, I'll go ahead and make up the muslin. I bought Boutique, which is for ladies' garments (there are several other modules including for knits); the basic garments for this are a dress with jewel neckline and pants. I created and printed the PDFs and taped them together. That took quite a while. One of my sheets didn't line up properly with the rest, though I could make it work - then I realised that the reason I had so many pages was that the pants pattern had printed out twice! 30 pages each time. The 'other' page 1 fitted perfectly. There were 28 pages for the dress and they fitted together well. I should say, I am printing on A4 paper, which is the standard size here.

Catina's tutorials/ informal live video hangouts on Google will not start until May so that gives me a little while. Hers are actually going to be based around WG Cameo, which is a more advanced pattern making software but I believe there is a common core.

I mentioned a possible change of plans. Well, Pattern Review is doing a beginners' competition this year. I recently upgraded my status from 'beginner' to 'advanced beginner'. However, there were clearly some issues last year with people's stated skill levels during the fitted blouse competition which was subdivided into skill categories and this time they listed a number of skills saying that if you were competent in 5 of them, you should be considered intermediate rather than a beginner. I wasn't sure. I have attempted most if not all of the things on the list but don't consider that I'm competent in 5. Many of the things have been undertaken in a class situation where I had help and support, though I'm getting to the stage where I am prepared to attempt on my own (then get help when they go wrong!!) which is why I upgraded my status to advanced beginner.

As I wasn't sure and wouldn't want to enter and have people say 'but she's not a beginner by any stretch of the imagination' etc, I asked the question about my status on the competition forum. The responses I have received indicate that I am indeed legitimately an 'advanced beginner' and should enter the competition. So I may well do. The competition starts on 1st May which will fit in nicely with the blouse I am planning to do for myself - so this may become what I enter. I haven't completely decided yet - either about actually entering or if I do, which garment I would make. It's important to incorporate one new technique. I'm considering adding piping. Obviously, anything I submit has been in the past and will be in the future my own work! Background support is permitted. By next year I will most definitely be intermediate so this is probably my last chance.

This is now Me Made May. I'm not going to make impossible to achieve pledges - or post pictures. I will say that I endeavour to wear all of the garments I've made during May at least once, to fix the items I've made that need little tweaks and wear those, to make one new garment for myself - and certainly not least of all - fix my blog!! Oh, and I promise not to post pictures of me wearing the Me Made May garments! I'm getting there with my blog problems, I think.

How Do You Read Blogs?

It's a while since I've posted a blog,  lots of reasons. I'm thinking of starting again. However,  I used to read the blogs I fo...