Showing posts with label Jetted pocket. Show all posts

Tuesday, 27 February 2018

February Fails!

Camellia flowering in snowy branches (it was thawing earlier)
I'm not now entering the PR wardrobe contest. No real surprise there! I thought that to make 1 topper, 2 bottoms and 3 tops that coordinate was both achievable and desirable, that is it fitted in well with my plans. I had time to test fit before the start of the real sewing, TNT patterns were of course allowed, and there was/is six weeks after the start of the actual sewing (the end date is 15 March). So not too difficult! Yeah, right.

I thought I'd start with the bottoms. As mentioned elsewhere, I'm doing a PR Sarah Veblen pant class, have her book and read her article in Threads last month. In the PR class, Sarah does post some replies to your queries but is clear that she will not give individualised or personalised answers. She does provide this via her personal platform but of course you have to pay extra for that.  I haven't achieved a suitable fit yet. David is helping me, which isn’t ideal as he really doesn’t understand/agree with the process. I'm sure I'll get there. I hope. I'm not going to rush for an artificial deadline.

I did not want to substitute skirts.

I also made a top from what I thought was a TNT pattern but it didn't work. I think I’ve mentioned this elsewhere, probably with a photo on IG as it didn’t merit a blog post - briefly, it was too tight as the fabric I was using had much less give and drape and I have put on weight. I modified the pattern and tops are on my (near?) horizon.
                                                                 
I'm in the middle of a Paprika Patterns Jasper sweatshirt. I messed up the welt pockets and was forced to redo.


I cut into the welt in the totally wrong direction and couldn't salvage it, though I tried.
The pencil is pointing to a raw end and hole through to the inside of the sweatshirt

Overall view didn't look awful but wasn't right - I would have left but for the hole, above
They look great now but I'm not going to finish in my timescale as there are too many other things going on.


Poor photo on my phone tonight - take my word for it the welts are much better!

I was due back at class tomorrow after midterm holiday, but I can't go as I'm in Scotland with my mother. (I was as I wrote that, last week) Anyway, the sweatshirt would be better with jeans. I have RTW jeans that it will work with - but of course that's no good for the PR contest! Until I get my pant block right, jeans are not on my horizon.

I bought some nice but rather heavy double cloth wool in navy/grey for the topper part, which I've shown before, again on IG, though I also have a Blackwood cardigan ready to cut out. I thought in the end that the cardigan would be better for the wardrobe contest (read speedier!) but the wool would be great in a reversible version of Butterick 6244 to showcase the double cloth nature of it - when I noticed that there was a PR reversible garment contest coming up on 15 March, I thought okay I'd enter. I thought I'd make a toile, though, to get a bit ahead (this is permissible) partly to get the right size and eventually to practice on the fabric to work on the reversible seams before working on the real thing. I thought that getting it truly reversible could be tricky. 


Butterick 6244. A nice pattern, great reviews but just not my style and the fabric was just too heavy, too


Anyway, I modified the pattern for larger hips and larger biceps, cut out from calico and sewed up the toile - and hated the result! I'm not showing you a photo! I did learn a few things from sewing it up - don't forget any of the notches for one thing!! Another thing I learned was to trust my first judgement. I hadn't been at all sure about the pattern for me, or for the fabric, but couldn't find anything more suitable. When I said this to Rory and showed her me wearing the toile, she said she had hoped to find some redeeming feature to mention but couldn’t! She said there was nothing flattering about it for me. She sees me as someone who suits more tailored garments (that’s true) and that normally we’re pulled towards things we suit, particularly as we get older and we know what suits us. Things outside our usual, with a few exceptions (she’s not advocating in the rut thinking) are generally not for us. I also thought this was going to be an easy pattern, but I didn't find it so. I have abandoned this idea. There is nothing whatsoever wrong with the pattern, which came together nicely once I had marked the notches correctly.

At least I still have all the lovely fabric left, unharmed! As I started preparing this post in Scotland, the sun had quite a lot of warmth in it, so I reckoned I'm really thinking about next winter before I use the fabric. Today we have thick snow with more forecast all this week because of the ‘Beast from the East’. It’s chilly outside too so more sewing forecast!

I did get to Sew Club last night (Monday), before the snow proper hit.

I bought some jersey fabric and decided to make a Blackwood cardigan from Helen's Closet, among other things (my originally planned fabric probably wasn't going to work as it had less stretch than the pattern suggested). I planned a matching tank and cardigan. I know matchy matchy isn't ideal these days, but I thought the style wouldn't look like the old style twin set so would work okay.

The fabric was pre-washed and dried. Did I do this incorrectly I wonder?

I sorted out the Blackwood cardigan pattern. I did a small FBA following the excellent instructions given on the sew-a-long. Although I'm tall, I didn't think I needed to lengthen arms or body as it seemed long enough as it is designed super long. I cut out the pattern paper ready to apply to fabric and cut out proper.

I took the fabric to Sew Club as there is a bigger cutting table there.

I found the printed pattern on the fabric is WAY off. As the pattern will be lying horizontally on my body, this is important. 


Yes, it's that far off!

Trying to fold the fabric using patterns as guide - well, you can see the twisted folded edge.
To fold with a nice fold created very off ends

Rory showed me how to try to try to get the fabric on grain (block square and steam). This improved the small piece we were able to do (space, time) and Rory felt it was workable with. She advised cutting out pieces larger than each pattern piece and blocking the pieces individually.

I think I can do that at home as I think I have a cardboard cutting board somewhere. I normally use a cutting mat and rotary cutter but Rory advised against this in this instance. I found that the piece from class had sprung back to the wrong shape.

I wish I had just returned the fabric. This is a lot of effort. I have emailed the company I bought it from to complain, but as the fabric is washed and dried and now has a chunk cut off, I won’t get anywhere. Still, I didn’t want to just let it go. It’s a lot of money even if bought in a sale.

I can't say anything about the Blackwood cardigan as this fabric is a long way from being ready for it! Lots of good reviews so I'm hopeful. Good instructions. I might see if another fabric I have would work - the first I looked at had insufficient stretch. I’ve gone off this fabric big style!!

Current plans

  • Complete pant fitting process - then there's no limit! I wanted to make some winter weight pants but by the time this is finished, I'll need to use lighter weight fabrics so those fabrics will get stored away too. I had planned to use navy and burgundy wools. (On that note, Fabworks online has some fabulous wools in a snap sale lasting until next week I think. I don't need any so have resisted the temptation. There are some great buys though)
  • Complete Jasper sweatshirt - I’ll post separately about that.
  • Make a Blackwood cardigan (plus or minus tank, depending on fabric chosen)
  • I do have need, not urgent, for a workout top to go with my workout trousers. The top I tried to wear last time is no use.
Then, who knows? I'd still like to complete the wardrobe contest garments but in my own time.

I've had a few things I've abandoned this year so far for one reason or another (they don't fit the FLF description - Fit; Like; Flatter) but I don't feel bad about them (though I do feel bad about that off-grain fabric - and I have a coordinating piece from the same range which I finally dared to check and it’s off too!).

I'll have to re-look at what I want to do.

Sunday, 1 March 2015

Soft tailoring jacket workshop - part 1 - inc jetted pocket

Last day of February. I spent all day, 7.5 hours, at a Jacket Tailoring workshop run by R, my regular pattern cutting tutor, assisted by D, my dressmaking techniques tutor. They work together in their workshop which is much nearer my home than the college. D was there to help as originally more people were due to attend. In the end only Sarah, whom I know from my pattern cutting class - she's the enthusiastic, vintage inspired person I've mentioned previously, and I were there. This meant we got lots of attention. Both Sarah and I are quite slow and fairly exacting though for the purposes of the workshop we had to let some things go.

BTW, this is not intended to be a tutorial just an aide memoir for myself. As I write, I don't yet have the promised notes so I'm trying to get my thoughts in order. I'm sure I've already forgotten a number of steps. Then I remember some and add in. The notes will act as a better reminder.

On a side note, I received a letter from our local college which has a large fashion and design and textiles etc section saying my application for their 6 week pattern cutting workshop had been accepted and I should turn up on 9 March. I replied, declining. I believe I applied last year but didn't hear anything and then found R's class which although much further especially at rush hour can be for 30 weeks. I'm more than happy to stick with that. I believe the local college only does the one six weeks, making a skirt block. It's also as expensive as the year I attend for just 6 weeks.

Before I went to the class in the morning, I called in at the local fabric shop, across the road, to buy some fabric for the pockets and linings of DH's jeans.  I got some satisfactory strong but lightweight cotton and R and D both approved the purchase. R showed us the inside of a jacket which had a two piece pocket - ours was folded. R said that the folded pocket is stronger. I'll have to consider this for DH's jeans.

Back to R's jacket workshop.
R and D had cut out all the jacket sections.
When I arrived, I helped fuse interfacing onto a number of pieces. This was to be a soft tailoring workshop. I'm pleased about that as I'm not into either heavy structured traditional tailoring or a lot of hand stitching - I don't mind a little, in fact it can be very relaxing.

I took some photos but towards the end we were rather rushed and I couldn't. Not all my photos worked. I just used my mobile phone as trying to use a camera in that situation would have been difficult.

There was fusible interfacing at the hems, top of sleeve, around neck and part of armhole.
The whole of the front piece was fused with 'body' wool and hair canvas interfacing. The front interfacing was fused with a lightweight interfacing.

Because all these pieces had been cut and fused, you might have thought we'd be quick. Not so - we're both slow and there was also chat and doughnuts and beverages. In some cases, D was working just ahead of R to get things ready. Also, many of the markings made by pencil had come off. R had a printer malfunction so we won't get her interesting looking hand-out until next week. We didn't see a finished garment or pattern picture so I wasn't altogether clear what exactly we were making.
The first step was sewing the dart in the front. This dart ended at the jet pocket so accuracy was important. We had to cut the dart, press open press and cut into the seamline at the end of this dart. I won't mention pressing again (much) but rest assured every step was pressed.


The next step was the shoulder dart and the diamond dart at the back. Then we joined the panel with the split for the jetted pocket to the back piece. This was rather tricky as we had to make sure the pieces of fabric above and below the jet split kept abutted together. I thought I had succeeded but pressing revealed otherwise and we tried to use steam to rectify the situation - we both had the same issue. Relative success.


The reverse of this slit and the adjoining fabric were given a layer of interfacing. R helped with this and I got a slight pucker in the fabric which would cause problems later.

Pocket

There is a terminology issue here. Our tutors refer to this type of pocket as a 'Jetted Pocket' and this is the language which comes naturally to them - even though D isn't 30 yet. We haven't had the class hand-out yet. All my personal reference books originate in the US and refer to this as a 'Double Welt Pocket'. My internet search reveals that these are also called 'Besom Pockets'. I found that the name for the strips is either 'Welts' - hence the alternative name, double welt pocket, or 'Jettings', which I seem to have abbreviated to 'Jets'. I go between the terms. Apologies for this. No apologies for use of centimetres. Flaps were originally designed to cover the jettings and prevent rain getting in and these were therefore tucked in while indoors. That is no longer the case and the flap is considered an accessory which completes the style, with the flap being left out. It tends to be more formal jackets which have a double welt pocket without flap. 

We then marked out 16cm for the jet placement, on the right side. The line was evenly spaced around the slit and ended in a clearly marked line.

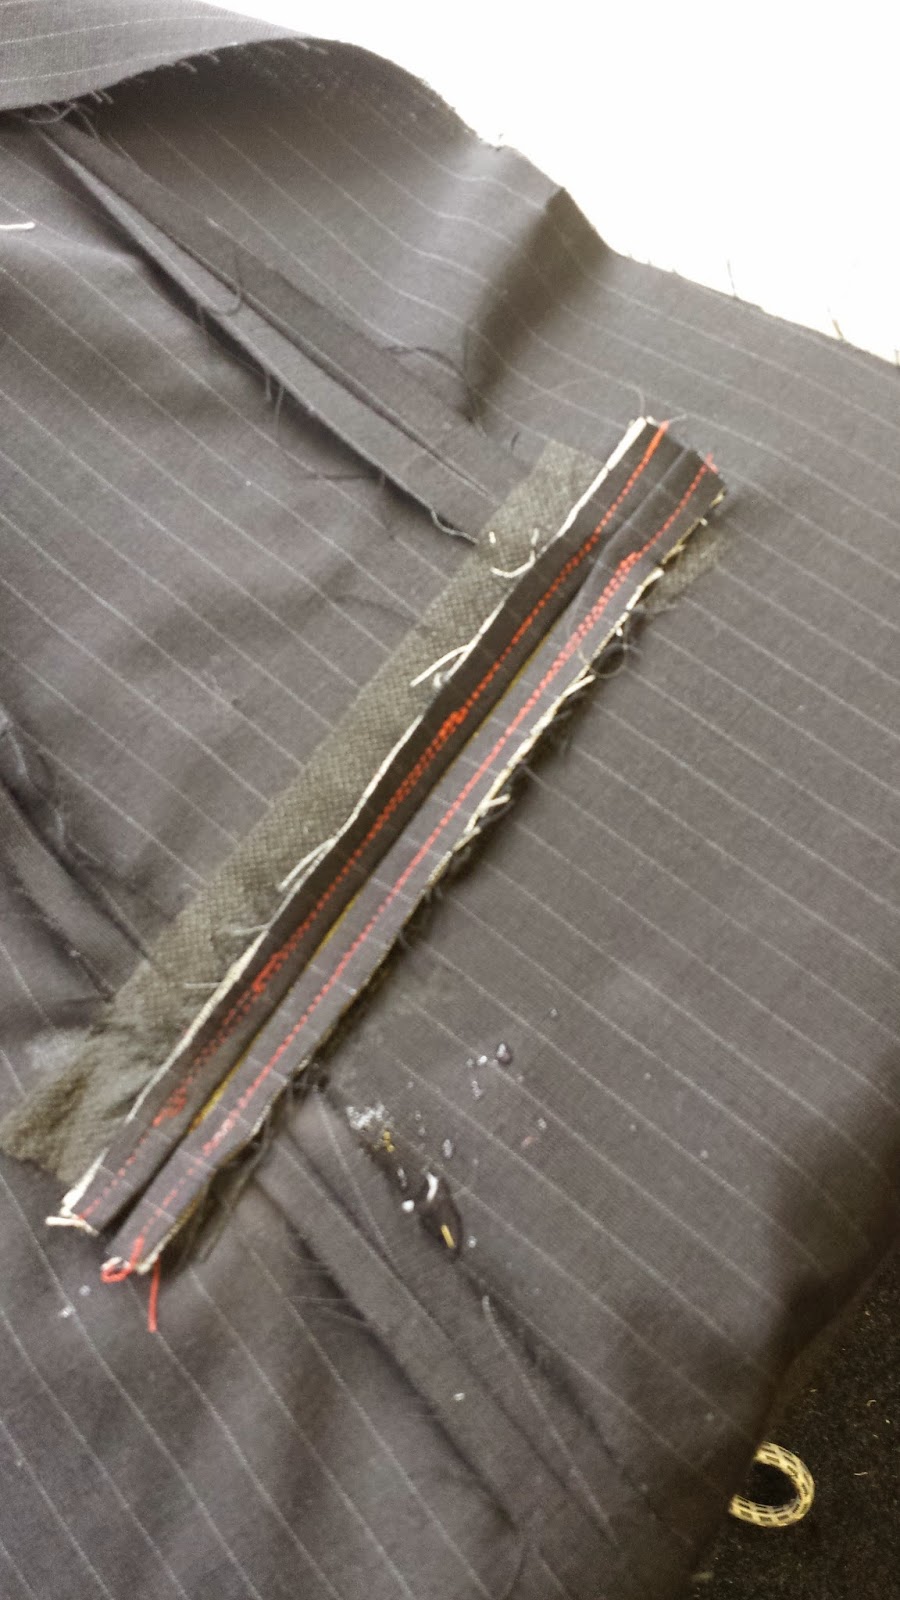
We created the strips for the welts. These were already interfaced. The strips were about 20cm by 2cm as the welt was going to be ½ cm. We folded these in two lengthways and pressed. We marked a line up the middle then stitched up the middle of the resulting 1cm strip with a fold at one side and a raw edge at the other. This stitching could show and was designed to be removed however I had stitched up in a regular stitch length before we realised this. I should say all our stitching was done in red to contrast. It would also have been helpful to have stitched this in yet another contrasting colour in a longer stitch length as I found it difficult to say what was what.
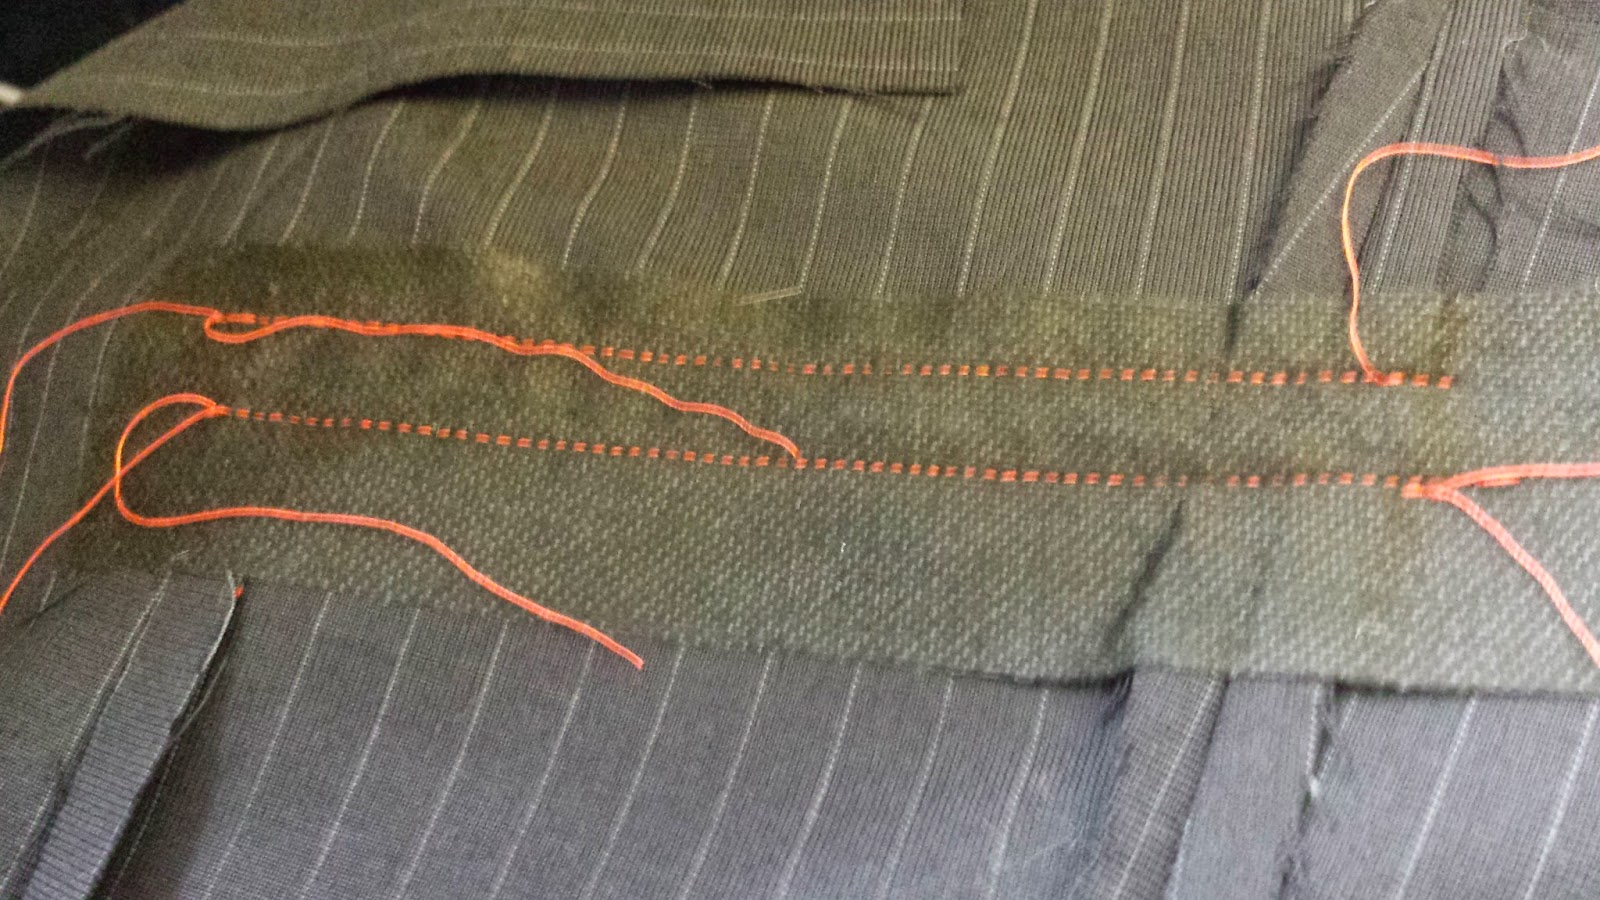
We then placed one welt piece along the slit, raw edge inwards, evenly spaced on each side. We then had to carefully stitch along our marked line, starting and ending exactly at the marks originally drawn at the ends of the line marking the pocket position. Fortunately, this stitching fell just to the side of my original stitching line so it wouldn't show.


Then the second piece was applied. Raw edge to raw edge, similarly stitched. We had to check they were even - two methods I remember - firstly, the stitching was visible on the interfacing at the back and the two lines had to be parallel, 1cm apart and ending exactly at the marked end. One of mine was a stitch too long and so I had to take that back. The second method was folding up the folded ends to ensure they met each other. Mine did.


Then, from the interfacing side we had to cut into and open up the slit ensuring we didn't cut the welts. The cut had to stop 1cm short of each end. Then the cut bifurcated virtually up to the end of the stitching. I forgot that step at first so it was no surprise that I couldn't adequately turn my welts through. Even after I did get them turned through, I had some puckering and my cuts needed to be extended closer to the stitching - I hadn't been brave enough.

After the welts were turned through and deemed satisfactory - this took quite a bit of time! - we needed to secure the end of the pocket by stitching through the little triangle of fabric created by the bifurcation of the cut onto the welts, avoiding the bulk of the fabric.

We were hungry and pretty tired by this time but had to finish our pocket before lunch! We took a piece of cotton and added some of the main fabric to the top so that's what would be seen through the jets - I forget the name of this. We were rushing a bit and you know what they say - festina lente - the more hurry, the  less speed. We sewed on our pocket bag to the two jets but forgot to under stitch - I asked the question too late. Lunch was calling so we ploughed on. Later I did one or two hand under stitches. R told me this would have been done by hand, though not in the industry where she worked.


Lunch (late lunch) was a relief. Neither Sarah nor I had done this kind of pocket before and both found it quite difficult.

Ironically, when I go to my trouser/jeans techniques class on Wednesday, we will be doing the double welt/jetted pocket as that isn't covered in jeans making but is important for trousers making! I should be pretty good at it. What do they say? See one, Do one, Teach one!! The manipulation will be easier as we will be starting with a 4cm width fabric to make a 1 cm welt/jetting. (update - we didn't actually ever get around to doing this!)
 
R gave us a sheet at the end with interfacing samples used in the construction of the jacket which, BTW, was a small size half jacket with a two pieces sleeve, intended to be lined.


Still to come:
Collar


My collar isn't finished as it wasn't lying nicely. I need to have a look at that tomorrow, too.

Sleeve insertion - in fact we didn't get that finished and said we'd try to do it for Monday. I'm pretty busy tomorrow so I may not manage.

R also gave us the sleeve head, briefly telling us how to add, and a shoulder pad. Sarah and I were both brain dead by this time and I didn't really take it in!


I'm really very tired, wimp that I am, and I think I'll give up at that for tonight. I've recorded a documentary in which my youngest daughter is credited as a researcher. Her first credit. I'll watch that with a glass of wine.

Sunday - St David's Day
I didn't get to post last night after all. Better late than never? I missed the bit of the documentary where my daughter actually appears on screen so I'll have to find that!

I decided to wait to post second part until I had finished jacket sample as I can ask R at class on Monday. I'm busy after that so the second part of the post will be at least a week away.

How Do You Read Blogs?

It's a while since I've posted a blog,  lots of reasons. I'm thinking of starting again. However,  I used to read the blogs I fo...