Thursday 27 December 2018

Hits, misses and neutrals in 2018


I seem to have been quite busy with sewing this year but with very little to show for it! I have quite a few craft items which have been successful in their own category and some knitting - oh and repairs and refashioning. As there is so little to show, I’m doing one post for both successes and failures for the year. I'm not including failures that didn't get as far as being made up - and there are quite a few of those!

I will do them in order from the start of the year, all together in one category. Click the title to get to the appropriate blog post where the pattern number and details will be listed.

As before, I'm linking to  Crafting a Rainbow’s Top 5 of the Year.

January
Kimono - success
In January, I made a kimono for myself. I like the kimono, feel it fits well and do wear it. There is a but - the colours are not right for me and I have been intending to remake with a fabric more suited to my colouring and my other clothes. I tried to get a similar fabric but haven't been successful. Nevertheless, I consider this a success.


In January, I finally finished the Chanel-type jacket I had been working on for some time, after starting it in a two-weekend class I attended with Margaret of The  Crafty Creek in the autumn of the previous year. I think the jacket looks great but I haven’t really worn it. This is mainly because I feel it is a bit snug (I have put on weight, alas). I feel it is snug around the biceps and it lies with the two fronts quite far apart. I learned such a lot from this exercise, though - very much including what I would do differently next time. The main thing I would change would be to overlock raw edges before started construction. I’ll have to say this is a neutral as it hasn’t been worn in the way I had intended – so neither failure nor success.


February was a very unsuccessful month with several items and pieces of fabric being rejected. March was a more successful month

It was cold in March. We haven't had much cold weather yet this winter.
I made the Jasper sweatshirt and have worn it a lot though it’s only getting cold enough now to think about it again. I like it but it was criticised on the style website I’m a member of for being too dark for my colouring - while I didn’t want that to influence my view of it, it has to some extent. I plan to make it again but in slightly lighter weight fabric

New Look 6481 tops - 2 x successes 1 x fail
I’ve worn these tops a lot. The fail was as a result of using a fabric with insufficient stretch and it was too tight for me. It went to my daughter who wears it, as far as I know so not a total failure. Operative error.


Regularly worn. I like one better than the other - the one that has slightly more stretch - as it feels more comfortable. Same fabric as the NL 6481s


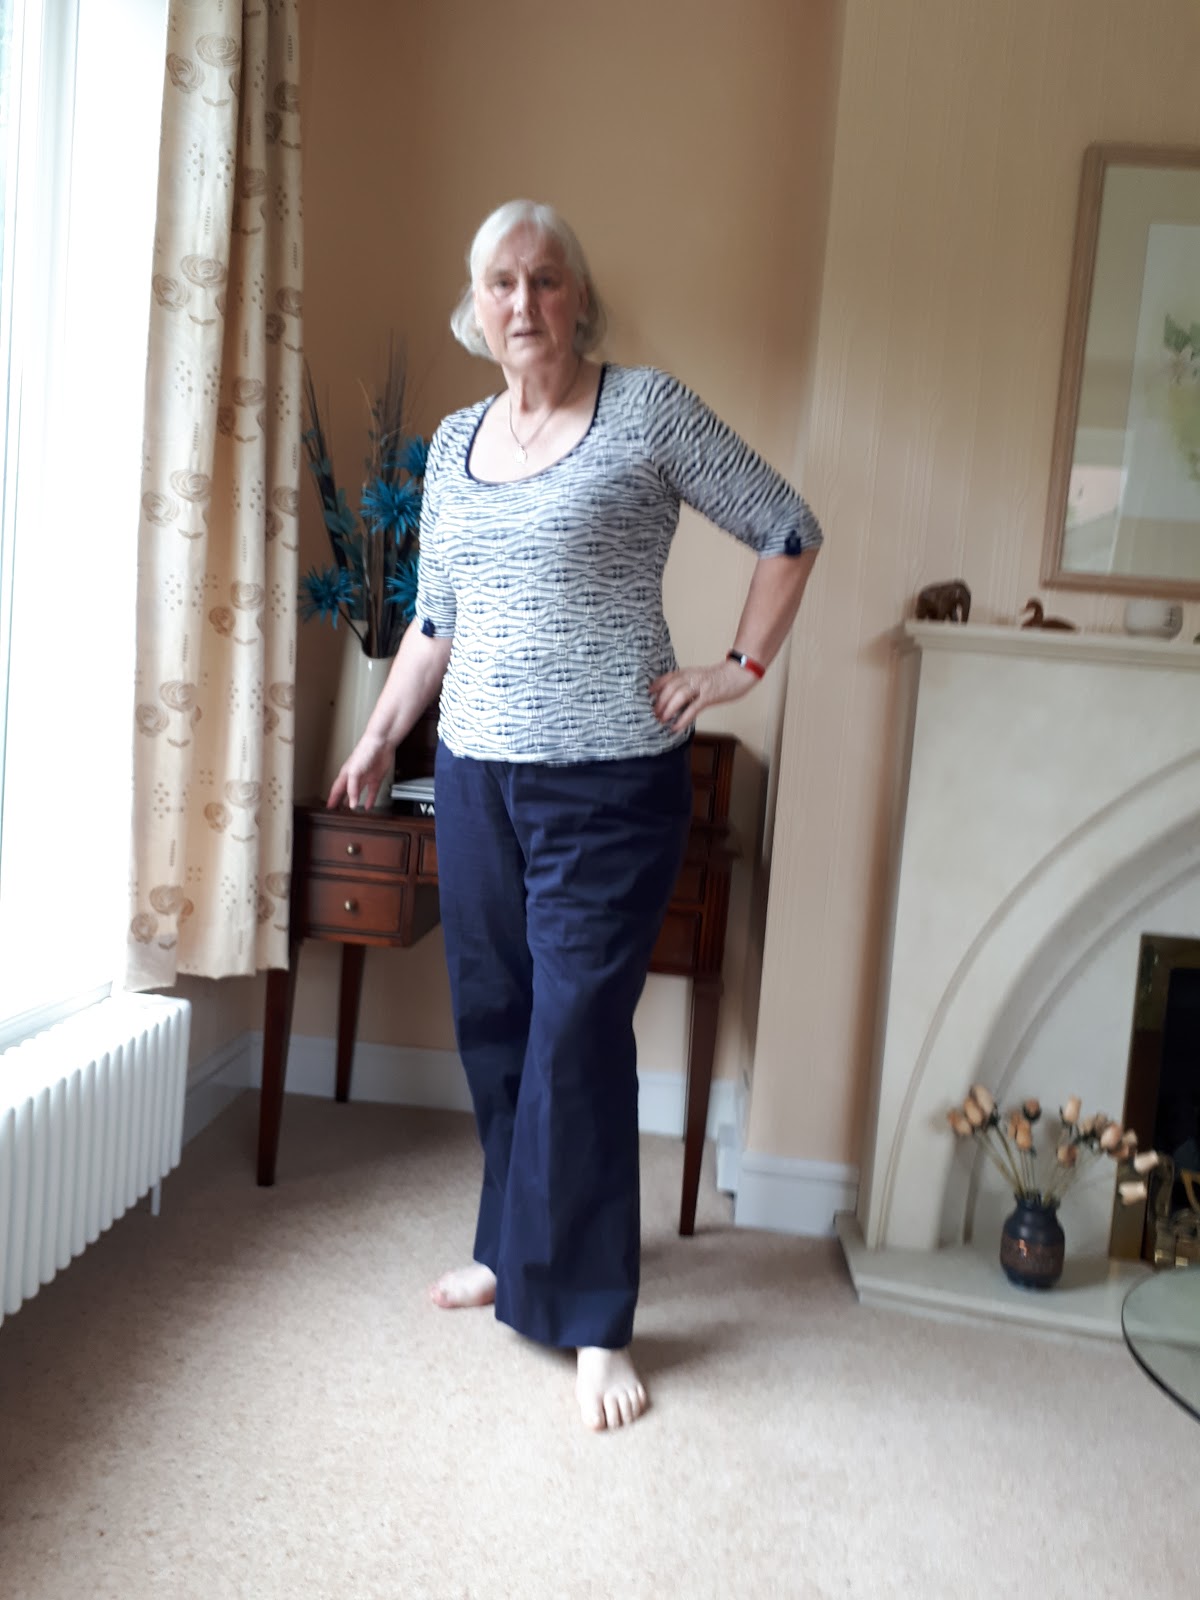
Trousers - epic FAIL
For the whole year, well until autumn really, I was trying to make well-fitting trousers. The closest I got was making up a pair of trousers that I was forced to wear for golf matches as I had no other suitable trousers which still fitted me. I did get to wear them but they were neither stylish nor comfortable.
I intend to solve the problem in 2019!
 
I have so many awful photos of the various stages - this was the least bad
I haven't linked to a post

Self-drafted top - failure
I finished this but have never enjoyed wearing it. The fit just isn't right.


I made another Cashmerette Concord, this time with a V neck, tunic length. I’m not really wearing it - I think because the neckline is a little loose/stretched and a bit low for my liking. Operative error again.

Items for my daughters - successes. Probably
I made another pair of culottes for Joanne. While she was visiting for Christmas, I made some repairs to a much earlier pair of these culottes (she loves this style) and has told me she hasn't started to wear the most recent ones as yet.


I also made another silk dress for Helen. 


I am sure these will be successful but it’s too early to say as yet.

Gosh, that’s not much to show for a year! The trousers took up a lot of my time and made me feel completely despondent so I had to give up. I did a lot of garment refashioning, garment repairs

Machine embroidery - successes
I started to use my embroidery machine and enjoyed it. There is quite a big learning curve that I haven’t mastered yet, but I’m beginning to produce items that I have enjoyed making and the recipients have liked receiving.

Classes 
I attended a few classes - working with leather; silks and sheers and corset making. I have taken something from each class. My oldest daughter likes the corset I made (a standard size 12 with a D cup, clearly not for me!) and even though it is a sample speedily made up a couple of days before Christmas, she has taken it home with her. My youngest daughter found a little too much space in the cups - she added a couple of cooking apples to fill the cups out! She liked the waist shaping it gave her, though - she has a fairly straight figure

WIPs
I have some WIPs, ready to restart in January

Make Nine Project - failure
I signed up for the make nine project and have not succeeded in making anything like 9 items. This is because quite a few of my items were going to be trousers/pants and I haven’t got the fit right as yet. Is it possible that I won’t be able to? I didn’t make the jacket as that was to go with the trousers.

RTW Fast
I have been more successful with the RTW 2018 Fast, depending on how you measure success! I have done the fasting - but have not managed to fill the gradually increasing holes in my wardrobe.

7 Steps to Style and Evolve Your Style - failure
I intended to put everything into this but found I just didn’t. This was partly because I was on the RTW Fast and so wasn’t buying new clothes (or even charity shop clothes for refashioning). I had a huge bundle of old clothes that needed restyled but they got me down, I had little idea how to proceed (Lots of trousers) so I abandoned that idea.
I haven’t seen much point in buying new fabrics when I have huge stash or new patterns ditto. So this coming year, I will concentrate on making what I have manageable and reflect me.


Wednesday 26 December 2018

Helen finally got her green silk dress today - and loves it!


Helen in finished dress
You may remember that last year at this time, I made a red silk dress for Helen, which was a  tribute (near identical clone) to a beloved but almost dead designer dress which she loved. That cloned dress has been worn LOTS, Helen tells me. She says it is better than the original. That was my intention as I tried to minimise the areas which would experience wear. You can read about it if you wish in last year's posts.

               Original designer dress

Last year's red dress, outside 

Last year's red dress, inside - colour not quite right
She asked for one of these dresses in any colour I cared to sew. She agreed to a slight lengthening of the dress skirt with each iteration. Even she’s getting older!

Earlier in the year, I bought green silk to make this dress for Helen’s birthday (30th) in late November. Helen’s best colour is a lovely emerald green. I also bought some in blue/green silk - I liked the colour which would suit me but wasn't sure whether Helen would. She liked that too.

I fully intended to get it done weeks ago but - well, life! I did manage to adjust the pattern and work out my steps, which is an improvement on winging it I’m sure you’ll agree! And yes, okay, I’d been putting it off!

I washed and dried the silk but when I went to press it ready to cut out, I found horrible whitish patches all over the fabric at regular intervals. To cut a long story short, I rewashed twice more and finally concluded that this was an intrinsic flaw in the fabric - or at least a permanent flaw. As the marks were at regular linear intervals, I wondered at first whether this fabric had been too long on the bolt and had experienced fading, but realised that wouldn't work as an explanation because it would only be the outside of the bolt which would be affected. I was going to cut out trying to avoid the patches but this was going to be virtually impossible. Fortunately, they are much less obvious on the side of the fabric which became the right side. After discussing with David and with Helen, I decided to go ahead.

Oh, the blue fabric was exactly the same! I had thought I’d just make the blue one instead. I bought the red fabric from the same retailer and is was absolutely fine, but I won’t be going back there. Does anyone have a recommendation for decent quality sandwashed silk in a variety of colours? I took care to try to avoid as many of the marks as I could and I THINK I succeeded.

I hoped to finish for Helen's birthday but I found the process of cutting out difficult. At the time I was in a moon boot and this made it awkward and painful on my foot and my back. So the whole process was very slow but I felt went well with no major marks on the fabric to cause concern. After cutting out, I stay stitched the armholes and neckline and sewed the small bust darts. I’m not going into much in the way of detail because I did first time around last year at this time - it’s on my blog over a number of instalments.

I sewed the back bodice, which has four pieces, like princess seams. Each seam is overlocked and then top stitched. No issues.

Back of (completed dress) dress; princess seamed bodice; waist casing


Back of dress


Then the pockets, which I find quite tricky. As this fabric seemed so much ‘thinner’ than the last one, I decided I needed to interface the pocket front as well as having an interfaced facing behind the poppets to provide some strength - this was one of the places the original RTW dress failed. Incidentally, Helen told me that she finally threw the original dress out (I’d rather she had given it to me but never mind - she likes my version, which is superior and it would just be more stuff to look after!).

I slipped up with one pocket and cut the band too short so I had to unpick (understitching too!) and redo. However, apart from that this went okay. I also made the interfaced pocket flaps.

It's just as well I had more fabric than I needed as I had to redo that pocket band and later the bias strips.

I then attached the pockets to the front dress using a matching edge stitch to that around the junction of band and top pocket. No problems. The most important thing here is to have the placement very clearly marked - I thought I had but it could have been better, it turned out. I think that despite my care in cutting out there might have been a bit of slippage.

You can see the side seam above and below the pocket
The pockets are attached to both front and back dress but I was originally advised by Rory, when I was doing the last dress, that it would be easier to attach to the front dress before the front is sewn to the back and then add the back piece which is a much smaller piece. I found it easier this time as the interfaced pocket behaved much better. However, I have always thought these pockets are too heavy for the dress (but Helen likes them and they are copied from the original RTW dress) - and the interfacing makes them heavier still, but at least they stay in shape!

I attached the back bodice to the back skirt (front is all one piece). Between the bodice and the skirt, sitting across the waistline seam, is a casing to take a self fabric belt. This is attached to back and crosses the seam line to the front. So, again, I attached to the back within a few inches of the seam and left the front until after the side seams were sewn.


These are sewn, carefully keeping the pocket and  waistband casing out of the way, then overlocked (serged) and pressed to the back.

Front of (completed) dress
The back skirt, like the front, has to be carefully marked as the pocket is now attached across the seamline as is the belt casing. No major issues. I also joined the dress at the shoulders. I didn’t find it helpful to attach the pocket flap before joining so that was next.

I felt I could be running out of thread so I next did the hem - the edge is overlocked, turned up 1” and top stitched. I had also made the belt.

So things appeared to be going reasonably well - all that was left were bias binding facing around neckline and armholes and the poppets, which David was going to be helping me with. The dress appeared to have picked up some stains so my plan was to finish it, wash it and post it special delivery for Helen's birthday. As Scotland’s national bard said "The best laid schemes o' mice an' men / Gang aft agley" Mine certainly did.

Over the course of all my previous stitching, I had had no major issues, even through multiple layers. I was using a microtex 70 machine needle.

I prepared my bias strip facing from self fabric and attached it to the neckline and armholes. I then understitched, trimmed, folded etc. A small issue was that my bias strips weren’t all the same width - somewhere, my cutting width changed but I didn’t think this was hugely important. (I had actually redone these once already - I found cutting slim bias strips from this silk very awkward indeed!

I couldn’t, just couldn’t, sew the top stitch required to hold the bias in place behind the neckline and armholes. I tried and tried. I used different needles. Even a different machine (I wondered if the noise the needle made going through the fabric could be a machine problem). Different feet. Single hole stitch plate. No joy. The problem, I believe, is that this fabric is like tissue paper made of steel! The needle had to make a huge effort to get through the multiple layers of fabric at the neck edge (I could hear the effort!), two of them bias if that makes a difference, and I believe that this adversely affected the stitch feed. I tried dual feed and tissue with no joy. Sandra Betzina in her book ‘Fabric Savvy’ suggests a jeans needle size 80 H-J for thicker sandwashed silk. I tried that but no joy. I was very reluctant to go bigger as I wasn’t sure if the holes in the fabric would heal. Oh, I also tried different foot pressures and machine fabric program settings. I tried sewing both from the font and the back of the fabric.

So, I realised that Helen wasn't going to get her dress for her birthday - I could have hashed and bashed but I didn’t feel that was satisfactory. It was going to have to be for Christmas.

I took lots of advice. The first advice came from those who hadn’t seen the dress. They ranged from using tissue paper - hammering the fabric flat (it’s not that bulky just steel-like!) - walking foot etc. I was very grateful for all the suggestions made.  I asked Lyn at sewing bee her opinion - I took the dress so she was able to see and I demonstrated the issue on some scraps. I liked that she didn’t have an immediate solution. She suggested taking out my tacking which I had used to keep the bias in place for stitching and trimming the under layers as much as possible - way more than I had done, in order to reduce the thickness - some of my stitching was going through many layers as by trying to keep the stitching at the same width on both armholes and neckline, this was a bit narrower than ideal. She thought I could perhaps gently hammer the seams only but advised against either the ¼” foot I had tried to use and would have liked to have used or a walking foot and also advised that I sew closer to the folded bias edge. In her experience, she felt that my rather narrow bias required a foot sitting as much as possible on the fabric. So it turned out.

Two other things she commented on - one was that the fabric didn’t seem quite right for sandwashed silk (I had wondered about this but my experience is very limited); the other was that she thought my stitch marks would disappear. I do hope so as they are unsightly and uneven both in length and in course.

We carried out a burn test and the fabric is definitely silk.

I took a break from the dress. Helen was going on holiday immediately after her birthday so I just needed to get it ready for Christmas.

I was in danger of putting it off again!

I made some tests on scrap fabric to see what would work best. I trimmed away even more of the enclosed seam allowance towards the understitching. I found that the best result was using my #1 dual feed foot fully placed on the bias strip with the needle (a size 70 microtex) offset the appropriate amount. This worked! My ¼” foot didn't work as the support just isn’t there (sadly as I need the stitch guide to keep at the same width) . I stitched over the earlier stitch holes in the armholes which is narrower than ideal but each armhole was the same. I sewed wider, towards the folded edge, on the neckline. It's far from perfect but I have zero options for improving it. I don't have any photos of the inside.

I learned that it is important to get your bias strips the same width! And how important it is to trim well.

Getting close to the end!

The next step was fixing the poppets onto the pockets.


I marked them up and asked David to do the fixing - I helped but didn’t do the actual banging. This worked well. I do like the SnapSetter snap attaching tool - it works really well.

In the course of this, I found a few loose threads which I needed to tie off and thought that was all - until I remembered that I hadn’t edge stitched the belt! I wasn’t completely happy with the belt but didn’t have enough long pieces of fabric to re-do it.

I was getting the dress ready to wrap but decided it could do with a wash as there were a couple of greasy looking marks on the front. The dress and fabric by this time felt quite nice - not the steel tissue I had been working with. I wish I hadn’t washed it (though I didn’t want Helen to have to go to dry cleaners all the time and why should you with a sandwashed silk dress that had been washed a few times already?). Why do I say this? The fabric of the pocket that was backed with interfacing became quite orange-skinned. I don't know if this is the interfacing shrinking or whether I hadn't put it on properly. I pressed it and it looks and feels better but I don’t have the same very positive feelings for this dress that I did for the red one last year.

Fingers crossed that Helen will get some use from it.

Christmas Day

It's a little longer than the last one


Helen loves the dress and thinks it’s ‘perfect’ though she agrees with me that as the fabric is thinner than the last one and a bit see through that she’d be better wearing a slip.

What colour next? I think I'd be best interlining fabric - what do you think?


Saturday 22 December 2018

Celtic Owl Notebook Cover - In the hoop machine embroidery design


I’ve been enjoying playing with my embroidery machine, finally. I’ve found this easier than trying to dressmake while I’ve been less mobile than usual. Now I have my moonboot off but my foot is still sore (and could be for up to 6 months apparently) and less mobile than previously. So I need to keep going with some mobility exercises.

By now I may have posted about a couple of the projects I’ve done - presents for my grandsons. This depends on me having taken photos which I haven’t managed up until now. I’ve been busy but next week should be a bit clearer, I hope! When I’ve been at home, the weather has not been good for photography. Or dark. Or both. The photos I am including in this post all show wide angle distortion - that's why all my straight lines, including those on the cutting mat, are curved. Apparently you can correct for this but I've just cropped most of it away. Next time maybe.


My latest project was a Celtic owl notebook cover. I bought an embroidery pattern for notebook covers of various sizes. I absolutely love it - and so does everyone who has seen it.
The lines are straight! This is the 1:1 printout of the design to be stitched;
you can just see the lines showing the centre of the design. 
I decided to start with the A6 size. There are two owl designs, one denser than the other so I decided to start with the simpler of the two. I started with the front cover - the front and back covers are stitched separately and joined together using a quilt and go technique; the spine is made to the thickness required. The instructions directed me to a video which was very helpful.

I love the effect with the gold lame.
This of course is my second attempt
The photograph with the instructions was what attracted me in the first place, so I followed the use of the same fabric. I used a gold lame fabric.  Behind the fabric was a layer of batting, and both were loosely mounted, using glue, on cutaway stabilizer. This is called floating as the fabric is not actually inside the hoop. I was a bit wary of the process, but the design stitched out beautifully. The gold lame is slightly raised between the black and dark grey stitches and gives a beautiful embossed leather effect.

I had to put the lining and the sleeve on the back of the hoop and join the two together then trim away all the excess fabric from top and bottom. I used too much glue, I believe, and made this process harder than it needed to be. 

I used my duckbill scissors to trim away the excess fabric (the stabilizer to which the design is stitched is still in the hoop and needs to stay there so I didn’t want to cut it) but in retrospect realise I probably could have been closer to the stitching.

The step after that is that the edge is then stitched all around with a satin stitch border. It looks lovely.

BUT
My cutaway stabilizer was white as was my batting and the former in particular showed at the edges. This is inevitable really, since this is not cut away until after the design is finished.


In theory the batting shouldn’t show as the excess batting and fabric is trimmed away before the satin stitch border is stitched. Having the batting set back a little would help enormously.

I’ve bought black stabilizer to solve that problem. I also bought some black batting while I was at it.

SECOND BUT

My A6 notebook front cover would not fit inside the front owl cover. My embroidery turned out the right size but it needs to be a bit larger to take account of the border which takes away from the space available. When I checked the sizes of A6 and the embroidery quoted sizes, it looked as though there was enough - but this was the outside measurement of the cover not the internal measurement

A6 notebook cover and A6 notebook - you can see the notebook is too big
I even had to trim the notebook for the bigger design in the end

I could make the embroidery the bit bigger it needs to be. There are many sizes provided with my purchase - trouble is, these don’t necessarily equate to our sizes. The one I sewed was labelled A6, though. Perhaps I should have realised when at one point the instructions suggested there might be some need to trim the notebook used.

Another issue was that the pocket didn't work properly - I think because the lame interacted with the glue. I used too much.

Anyway, I love the design and felt I could get around the issues I had come across.

I have put my original front cover inside the plastic cover on an A6 cover and it looks great!

I did ask some questions on an embroidery group I’m part of. That's where I became aware that black stabilizer existed. They also said that the batting should ideally be within the stitching line, which makes sense - however, this particular design does not do that and the way of making it within the hoop leaves me rather bewildered as to how to achieve that better finish. The group advised that I email the seller. (I've since realised that I could print out and then cut the batting slightly smaller and adhere to the design)

The seller responded after a few days asking for further details and after a few further days saying that
  • I needed to trim MUCH closer - recommending a particular type of scissors that I cannot source.
  • Best to use really thin batting - I don’t have enough experience to know where in the thickness/thinness spectrum my batting comes - it was the only black batting I could source.
  • Best to use black stabiliser and batting - I found a source for black stabilizer, which is thicker than the white stabilizer I previously used
  • I could burn off any stabilizer still sticking out, using an ordinary lighter
  • Might have to trim the edges of the notebook as maybe the cover on mine was too thick (no, it wasn't)
  • I could increase the size of the design using (free) software recommended
  • I also asked about using just the background design on the reverse, but this question wasn’t responded to.

Next try

I used black stabiliser and batting. I also increased the size of my design so that the internal measurements matched up with A6 rather than the external as previously. I had to use my own software as the one recommended didn’t work for me, as I couldn't save in an appropriate format. I used much less glue than on the previous occasion and this worked much better except that part of the lining turned over so I had to unpick and redo part - this was much easier than I expected as the lining hadn’t been stitched at all and had the advantage that there was an extra line of stitching to make me feel more confident about close trimming.  

This time, I used black Kona cotton as my lining - this is perhaps a little thick but it works much better than the lame I used last time. I trimmed REALLY closely. However, while I trimmed right up to the stitching, as close as I could manage, there is still stabilizer outside the stitching line as of course it is removed after the stitching is done and the satin stitch is actually further in than I feel it should be - that is, rather than stitching across the original line, it only stitches up to it. I can’t alter that, sadly. I do feel it needs to be about 1mm further out.
The covers before they are attached together. This was black cotton cut to make the spine binding.

I wondered about burning off the bits showing but no, I can’t bring myself to do that. David feels there is no need for the level of perfectionism I wish to achieve - this design is for him in the first instance and that I certainly shouldn’t burn off the excess - too much chance of things going wrong.

I have run out of A6 notebooks and wasn’t able to get any in my local shops. Loads of A5 but not of A6. I can get online and tried a couple of supermarkets and WHSmith but didn't get any. I  needed to know the size of the spine in order to finish. I decided to use my existing test A6 notebook - I did have to trim that ever so slightly, by the way.

Final update

Well, I was unable to buy any suitable notebooks and ones I bought online arrived to day but are not suitable and others may be okay but haven’t arrived yet and my time for embroidery - or any other kind of sewing - has run out. So I went ahead with my existing notebook, with the few used pages torn out. This is for David!

I followed the instructions for binding back and front cover together. I was directed to watch an excellent video on 'quilt as you go' as the seller said he/she couldn’t explain it any better.

I then followed the instructions on the PDF accompanying the pattern. This did not work!! The pieces cut were far too narrow for my notebook with a spine of only ¼” and the back and front were overlapping. On re-watching the video, I realised that to abut the quilt pieces, the joining piece is 1” - so that’s the minimum starting size.


So I worked it out mathematically and redid and this appeared to work. However, the very narrow spine means that the notebook is pushed forward by the seam allowance edges - remember, these have dense satin stitch around them - so I had to trim ¼” off the long edge of the front and the back cover to allow them to fit in the sleeves. I guess the spine needs to be wider than the notebook spine to allow the notebook to slip between the front and back.


The inside of the cover


I was far from happy with the finishing instructions.
The tips of the wings are cut off

As the owl wings go right up to the satin stitching, and I have to stitch ¼” in from the edge you will see that this cuts off part of the owl wing. The satin stitching is 4mm wide (the mix of measurements is all around in machine embroidery and quilting!) Also - what’s the point of having satin stitch that’s going to be covered in a seam allowance and just creates bulk? I couldn’t bring myself to cut it off but tbh that’s what’s required, I think. It shouldn’t have been stitched in the first place. Why couldn’t the design have created a suitable blank area at the side to be joined? After all, this is a notebook cover

Conclusion

I still love the owl
But I won’t be doing further notebook covers until I can work out a better way. The specific issues are the satin stitch being too far into the design and the poor finishing instructions.

Post script

I found a beautiful notebook, with a sparkling gold but smooth cover, smaller than A6 which would fit nicely into the cover but unfortunately its spine is wider so no can do for this rendition - it get pushed too far forward.

Then today, one of the notebooks I ordered online arrived - although the spine is thicker, because the notebook is smaller, it fits well as is. I need to decide whether Joanne is getting it with this new notebook - not perfect but okay - or David with the old notebook. I think David, as I can improve the notebook cover for Joanne. 

Helen and Anthony are coming late tomorrow (Saturday) night after their return from Argentina - I'm not sure how much they're going to be affected by the problems caused by the drones around Gatwick - they're flying into Heathrow but the repercussions are widespread.

I'll be busy tomorrow as Alison and family (including Thomas, the cat) are arriving. My mother arrived today. Joanne will be coming Sunday. So I've scheduled this post - hope that works!!


How Do You Read Blogs?

It's a while since I've posted a blog,  lots of reasons. I'm thinking of starting again. However,  I used to read the blogs I fo...