I decided that I’d
like to put up a blog post at the end of each month - my sewing speed doesn’t
merit more than that, usually. I have very little completed to show for the
month. My time has been more limited than usual and motivation even more so!!
My sew-jo is critically low! It has been a time of rethinking and evaluation.
I’m posting today even though there a couple of days left in the month and I
might achieve a bit more.
Trouser progress
Yes, there has been
progress. Slow progress.
My original block was
almost at the stage of making up in proper fabric when I put it aside last
year. Almost, not quite, as there was an ongoing question around the crotch
point. Add to that that I’ve put on rather a lot of weight, and it was
important to re-toile. Rory fitted me and I made another toile with extra
fabric at the hips for the extra weight. I’m somewhat lopsided and originally I
was making 4 pieces, left front and back and right front and back.
However, for this last toile, I made symmetrical pieces to the larger
measurement of the two sides and reckon that is fine. This is so much easier!
Rory re-fitted this new toile which wasn’t a million miles away. I needed to
remove a little of the front rise by tucking out in the pattern - I have a very
sloped waist. The other change was that I needed a little more space at the
bottom of the upright back crotch seam - this is the opposite of crotch
scooping. I found it difficult to get my head around the different pattern
changes which might be required but understand better now that I have seen the
changes marked on the toile and carried over to the pattern.

I redrew the pattern
to get a clean copy. I started to draw up a contour waistband as I really like
them, but Rory asked me to do the first pair with a standard waistband
I was going to use
wool - after all, I bought loads of wool fabrics for this purpose. However, I
was sure more tweaks would be required - and we had two days of summer heatwave
just at that point, so I thought wool might be too warm. The first cotton I prepared
was really too thin
I finally decided to
start with a thickish bottom weight navy cotton. I washed, dried and trued the
fabric. It crushes rather a lot. I found a fade mark down the centre so will
have to avoid that. I could have had 3 pieces side by side, but just cut back
and front on the fold which wastes fabric but avoids the marked crease.
 I made up the
trousers in sewing bee as far as needing zip and waistband. I found them snug
to say the least on my left high hip and the back waist height was still too
short - I had allowed a 1’ waistline seam allowance but I needed it all and
more at the back. Rory marked the waistline with only a ½ cm seam allowance at
the back. There were no other major adjustments and I planned to finish the
trousers over the next few days.
I inserted an
invisible zipper in the left side seam, the snug side, and allowed just a touch
extra for hip space. It seems that I perhaps didn’t really need that. I tried
on the trousers and asked David to mark them for good waistband position. This
is way easier said than done!! At the second attempt, I've fabric marked on the
right side (I can’t really try on inside out as I’m asymmetrical.) as the
original method d didn’t work - the pins kept falling out. This is okay as I’ve
decided these are a further toile, perhaps wearable - I forgot to finish the
seam allowances before I sewed up. I did it afterwards but to say that it isn't
perfect is a master of understatement. In addition, the trousers are a bit
short - they seemed okay until the trouser was hitched up to the right place.
Also, I really don’t like the fabric - it has poor drape, shows every crease
and is quite firm. It picks up dust and lint and looks filthy just a short time
after being washed and pressed. It’s similar to a pair of golfing trousers I
have which, likewise, never look smart.


I’ll try to finish
today so I can show Rory on Wednesday to see if she agrees with what I’ve done.
I'll adjust the
pattern to reflect what we decide. The next pair should be better and I’ll use
a nicer fabric.
Rory feels I suit
wide leg trousers best and I may alter this pattern in that direction. I do
like wide legged trousers but have a hankering for a slimmer fit. A princess
seamed pair is also on the cards as that will make fitting my ‘muscular’ front
thigh much easier - as it is, I get a bit of pulling across the front. I
suspect that a slight lengthening of the front crotch point, tapering down the
inseam a few inches would help that but I’ll leave it for the moment.
MAGAM and wrap dresses
I didn't manage my
garment for MAGAM's Alternative April - in April, anyway, as I haven’t started
even to think much about it. I might still do it, late as is often the case. I
like the idea. MAGAM is something that doesn't have rigid timeframes, just
suggestion of a theme. Come to think of it, I didn’t manage March’s MAD make a
dress. I did have a plan for that, but I’ve shelved it for the moment. I
might rectify that one by trying to make a wrap dress for #sewtogetherforsummer
(#stfs), which is by midsummer day, 21st June, which is probably achievable
even for me! A wrap dress has the advantage, I think, of being more flexible
for disguising fluctuating weight - or perhaps I should say fitting better over
a wider range of weights.
While I was doing my
textile course, one of my pieces was a Vogue wrap dress - this was made in a
polycotton fabric. I looked back at the photos and David commented they
looked frumpy.
I know I could make this dress with much better technique now as
I have improved a lot. I didn’t really like the dress because of the skirt - it
was much shorter and much more flared than I anticipated. My tutor commented to
be wary of a pattern without a photo of a model wearing it. There were only
illustrations.
I gave the completed dress away to someone who appreciated it. I
think it would be okay longer with this degree of flare. Or I could reduce the
flare. Though I’m not too keen on the tucks at the shoulder either… Or I could
start with a new pattern. I could even use a pattern for a stretch fabric. What
do you think? #stfs has put up a lot of pattern suggestions and I have one or
two of them already. I think I’d like a proper wrap rather than a mock wrap and
one that includes both bodice and skirt. Slimmer fit skirt. Comments please!
Pattern Alteration
I liked the top I
made for myself but felt it needed a few more tweaks, especially when I’m
heavier. The previous fabric had a touch of give and was more forgiving than
the quilting cotton I tried to use a couple of months ago.
 |
| My first top is still the most successful though my weight gain has made it a little uncomfortable at present. |
I increased the width
at the sides, 1” at the hem, tapering to zero at the armscyes. I made the back
deliberately longer than the front and added a hemline split. I added seam
allowances to neckline and armscyes. I adjusted dart position. I made a toile, which was pretty much okay, and further adjusted the dart.
 |
| I've pinned along new stitching line to show how much I had to take out. |
I cut out and made up
the front and back in class. I found that it was much too big around the waist
area in particular - this is where the French darts start. I had quite a few
problems with those darts! I’m not sure I’ll use them again. I’ll finish my
top. Darts slightly remodelled. Sides taken in. What a difference a fabric
makes even in a woven with no stretch! I need to rethink a TNT in a woven
fabric
Raincoat - alteration
I bought a rather
nice teal raincoat in a charity shop last year, while I was away at my bridge
weekend. I thought it fitted nicely but the sleeves were too short. I hadn’t
thought they were much too short, or I wouldn’t have bought it but now realise
they were shorter than I thought! Last year, I took down the hem of the
sleeves. While there was a lot of fabric, enough, just, to get a nice length,
the lining was considerably shorter, of course. I discussed this with Dan at
Sew Club. She suggested adding a facing to the sleeve and then stitching the
existing lining to the new facing. She also suggested that I could stitch along
the old hemline mark to disguise it - there is quite a bit of topstitching on
the coat already.
 |
| Overall view of coat |
 |
| Taken to show old hem mark. How obvious is it? |
 |
| Sleeve turned back to show added facing and junction with original lining |
So, eventually, last
week, I got around to the alteration. I added a 7 cm interfaced facing piece in
a teal-ish heavy-ish cotton from my stash. I understitched and pressed. Then,
the process was like bagging a lining, which I have done before. The seam on
one sleeve lining was opened up, the sleeve extruded through it and the lining
sewn raw edge to raw edge, some anchor points made (so the lining doesn’t fall
below the sleeve) then everything put back together and the seam resewn. The
second sleeve was clearly how the original constructor got into the garment -
but it was easier to do the cuff from the sleeve on the same side rather than
trying to get to one sleeve from the other. Originally, I hand stitched the
seam closed, but realising that the original seam entry point had been stitched
by machine, I did that on both sides. Easier and neater - my hand stitching
isn’t great
The coat looks quite
nice but feels a little tight at the moment. I decided not to stitch the seam
mark on the cuffs as I thought this might draw more attention to it. I’ve been
advised to steam well. I’ve put it away for the moment. Even if I never wear
the raincoat (though I probably will wear it) I feel I’ve learned quite a bit
about this type of alteration which I need regularly as I have long arms and
RTW garments are invariably too short.
Wet hair wraps
When I’ve washed my
hair, I like to wrap it in a towel wrap. Over time I’ve ‘lost’ most of my wraps
and decided I’d make some new ones from an old disintegrating towel - it’s a
towel we love because it dries so well but it is rather disreputable! The body
of the towel is absolutely fine but the edges and ends are something else!
I took my one
remaining wrap and drew up a pattern from it.
However, my towel has
no stretch and the wrap does, plus there is elastic in the band. I decided not
to use the old towel, but bought some stretch towelling from Minerva, hoping I
might get around to making a couple of head wraps.
I ended up thinking
that my time is more valuable than this exercise and I bought 3 online (my
local supplier didn’t have any in stock when I visited). It’s true, I could
have made them more cheaply (and I don't know yet what quality these will be!)
but I still have the time and the gorgeous towelling and I’m thinking I could
make something rather nicer! One day.
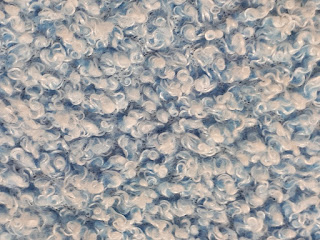 |
| The towelling has quite a loose loopy texture |
Knitting
I've carried on doing
a bit of knitting and I've enjoyed that. I had to rip back a large chunk as
sadly I'd made an error and hopefully now I'm on the right track. It looks
better, certainly. I feel the instructions didn’t tell me how to decrease
around a cable area as I thought I had followed them. Now I’m knitting by the
seat of my pants as I’m trying to copy the pattern photo. Hopefully it will be
fine.
Discards
There have been two
discards of diy garments or potential garments this month
Skirt
First was a skirt
that I was trying to let out again (after having taken it in last year!) but I
felt that there was too much to do as the waistband would need replaced as with
the much smaller seamline I couldn’t see how I could get the zip back in. I
reckoned that the waistband was short by about half an inch on each side. I
never did like the fabric; I think I gave it away so possibly couldn’t have
replaced the waistband even if I had wanted to. The skirt has gone; it’s in 2
pieces, a fully finished back with kick pleats etc and a fully finished front -
the two pieces just need joined together and a zip inserted. Okay provided
whoever takes it is a bit slimmer than I am currently! One of my sewing friends
was keen to take it - but not keen to sew it up.
 |
| Photo I posted in my 2017 fails post. The skirt is much worse now! |
Kaftan
Second was a kaftan
that I bought last year very cheaply for the fancy dress murder mystery weekend
I attended but it was too tight and I didn’t use it. I asked advice and we
decided that I could take out the stitching down the sides. The thread used,
and therefore the needle used, was huge and there are some pretty big holes
left in the fabric, but no tears. It seemed possible that washing and ironing
etc might get rid of these. However, when trying the finished neckline on
to see where I should put new seamlines, I then noticed that the design on the
front is off centre. I can’t just sew up the side seams - I couldn’t live with
this. Others agreed that it was unacceptable. I may use the fabric for
something else or it may go the same way as the skirt (not lost forever; it’s
been put into the sewing class cupboard!)
Other discards
We’ve been continuing
our plan to get rid of a lot of ‘stuff’. David is working on contents of garage
and of side loft area and we’ve had trips to the dump AKA Recycling Centre. I’m
working on clothes and shoes. Already a lot has gone to the charity shop.
However, we have scarcely scratched the surface as yet! I had originally
planned to alter some clothes if possible but there were so many, and this
seemed such a big task. It wasn’t a case of taking in which would have been
easier. Lots of nice stuff has gone to the charity shop so hopefully someone
will enjoy the items and the charity will benefit from the sale.
We’re way behind in
our plan to downsize and move south but what we’re doing is a necessary part of
the process.
I have way too much
fabric but that's not being included in the culling process! I am planning to
sew more of it. There will be some that gets donated.
Reading
I’ve been reading a
lot more as I used to do. Some of my reading has been sewing books. I love
buying old sewing books after I see them recommended. I bought a couple of
Claire Schaeffer books about pockets. They are pretty old fashioned and
don’t have photographs but are full of marvellous tips. I’ve come across a
technique that might improve the pocket with gusset (I now know that’s called a
Bellows pocket) on Helen’s red silk dress - I’m going to be making one in green
silk. I will need to modify the pocket ever so slightly, I think, but will have
a look at the pattern pieces this coming month. Helen may not find any
modification acceptable so unless it’s imperceptible in the finished pocket I
may have to rethink! Anyway, I did manage the pocket by the original method. I
was planning to buy the fabric for the dress on a trip to London over Easter
but that got postponed. Hopefully we'll manage to get there next month.
I’m also reading
Sandra Betzina’s Power Sewing book and think it’s great.
So what have I
abandoned?
Another ‘Twin Set’
I hope/had hoped to
get another Blackwood cardigan finished by the end of the month. I have the
pattern. I have the fabric. It really doesn’t take long. I just need a bit of
motivation! Maybe that trip to Cambridge and London will be the incentive
required. This is a temporary abandonment only.
Remodelling
I have a skirt from a
few years ago in colours I like in a fairly heavy cotton/linen. I didn’t ever
feel comfortable in this skirt as it rode up a lot at the back due to my shape.
No matter what I did, I couldn’t get it to lie nicely and be acceptable even
when I tried to remodel it. It was also rather on the short side for me. I
generally prefer skirts straighter and knee length. This was A line and above
knee length. Another ‘what was I thinking of?’ moment.
Anyway, I thought of
trying to make it into a top and enter it into the Pattern Review Recycling
Contest.
I took the skirt
apart - this took quite a while surprisingly. I should've realised before, but
all the pieces are cut on the bias! I decided to make a waistcoat for myself
with the main pieces in this fabric and the back in plain contrast cotton (the
cotton I’m using for my trousers). Then I thought - why?
I’ve decided not to
pursue this at the moment. I may later as I do like the colours in the fabric
Craft
I’m not much into
making craft items but there are a couple of things I have wanted and need.
- The
large bags I carry to class are not strong enough and rip. I’d like to
make a strong canvas bag and maybe even have a couple of internal
partitions or pockets. I’d also like to use some machine embroidery to
decorate it. In the meantime, I’ll be using supermarket heavy duty
bags.
- I’d
like a bag to hold my knitting, so I can carry it around. It needs to be
long enough for the needles and fairly capacious. I’m sure somewhere I do
have a knitting bag (though I seem to remember the needles always stuck
out) but we haven’t come across it in our culling as yet. I’m sure I’ve
also got more knitting needles. I don’t want to buy more until I’ve
checked properly but I could really be doing with a second set of 5.5mm.
- Thread
catcher/pincushion. This is on my someday list. However, my Thursday
sewing class has set a pincushion as a voluntary project this term, so I
may just do it! I have some patterns.
- If I
had loads of time, there is a bag I’d really like to make. S in class is
making it and it’s fabulous.
Only number 3 has any
chance of being completed in the next few months!
I'm going off now to try on some tops from my wardrobe, to see which I'll keep and which will go. Wish me luck!


