Showing posts with label tartan skirt. Show all posts

Wednesday, 23 January 2019

A long time ago....


Those of you who have read my blog in the past will be aware that I have been trying to make a tartan skirt/ kilt for Helen, my youngest daughter, for yonks, using the family tartan we had specially woven; many many many yards of it (yes, that many!) We have two weights of the tartan - a heavy one woven many years ago (some of it made into a kilt for David) and a medium weight one woven two or three years ago or more specifically thinking about Helen's skirt. Yes, she requested it that long ago! Actually, it was even longer ago as she requested this using the heavyweight tartan before I started sewing, when we going to get it made. I can't quite remember. It took us a long time to decide that the heavyweight tartan was too heavy and to elect to get a medium weight cloth woven. The story of the tartan is here and in earlier blog posts.  Here, for example

The tartan


In the past, I have had two main attempts at tartan skirt toiles, using plaid fabric but not the real deal. It was slightly problematic as Helen wasn’t then, and still isn’t, exactly sure of the style she wants. She is clearer than she was though. She now wants ‘a cute pleated mini skirt’ in the family tartan.

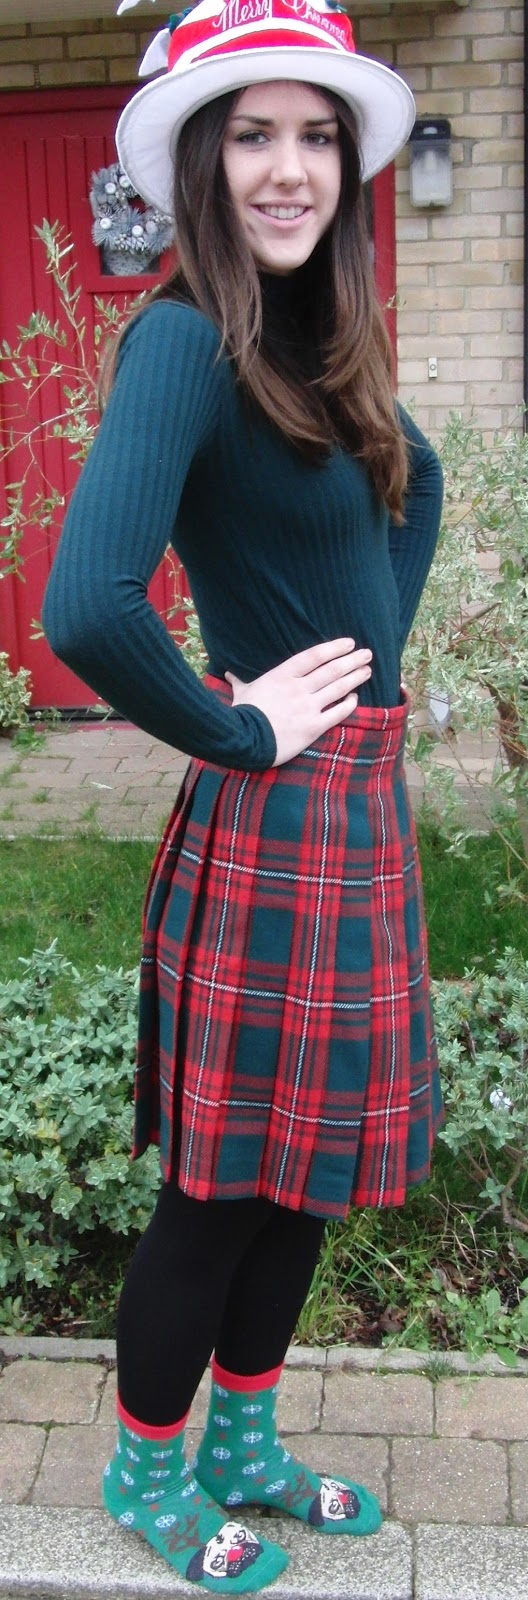
The first toile was a fully pleated skirt. Narrow waistband. Pleats stitched down part way. Very classical. It was knee length and so was far too long for Helen’s taste, but it was designed to see if she’d like the style. 


Christmas 2015!! I didn't realise it was that long ago!


I didn't use a pattern, as that was the advice I got from books and in person from those who might know. At the time, I got the impression she didn’t like it but I think on reflection that was to do with the length; I thought I could just have made it shorter. She told me this week that the issues were that it wasn’t a mini skirt but also that it made her look very hippy on the side opposite the zip as it didn’t lie flat and the pleats seem to twist around (I thought it was too big at the waist when I saw her wear it previously but that was a while ago). She says she does like it, and it fits well at the waist, so she’s tempted to go for a shorter version of that. I didn't use a pattern, struggled a bit and wasn't at all happy with the zip closure, by far the weakest part. Helen held a Burn’s Supper in her flat at the weekend (yes, early!) and wore it then so her thoughts on the skirt are current.

The second toile was a shorter circular skirt - at that time, she hadn’t settled on pleats. I used a commercial pattern. This just wasn't what she had in mind.


I have this pattern:
This has many good elements but Helen doesn't want a yoke like this and it's probably too long. Maybe it's still doable

Originally, she was against the idea of a proper kilt (or maybe that was us as kilts aren’t for girls in theory and by tradition at least) - but isn’t now. She has said too that she’d be happy with box pleats (but not like the pattern I showed her as she found that one frumpy). 
No to this
Modern Simplicity pattern; I don't have this pattern and I couldn't get any of the older ones.
I could buy this one but kilts are usually made directly on the fabric

She has recently bought a skirt from Pretty Little Things that she likes. I've seen a photo but not the real thing. It's fully pleated.

Helen tried on and liked a skirt from Jack Wills; she took photos of her trying on the size 10 (UK), a perfect fit, but didn’t buy it. I decided to buy it but unfortunately could only get a 12 so it will be going back after a bit of examination! It’s not on the website. I tried the 12 on Missy, the dressmaking model adapted to Helen's size (see here)  and it just slipped down below the waist onto the hip.


We're going to have a chat on the phone, but I think I’m clearer. I have already said to Helen that our tartan is a heavy wool and pleats will inevitably make it bulkier - and therefore make her look hippier. I also said that I thought the kilt-type closure is potentially better for fitting.

I have a pattern for a short full pleated skirt. 

It’s slightly long but could be shortened by the 2” required. A bigger issue is that although it is shown in tartan, the tartan repeat (the spacing of the checks) is not the same as ours. Therefore, I can’t really follow the pattern, though it might give me a better idea of how to proceed. When I made the previous full pleated version, I didn’t use a pattern and wasn't sure how to finish off. I had one long piece sewn together at one side, the zip side - maybe that’s why the skirt twists on wearing?

A big issue with pleating tartan for a woman is waist shaping. When I made the full pleated version, I carefully increased the depth of each and every pleat towards the top to try to achieve the reduction in width without compromising the pattern match. This took a long time and involved lots of calculations.


My preference is for a version of the Jack Wills kilted skirt. This has the kilt wrap at the front but there are two pleats each side of the plain wrap. The side seam is smooth for about 2” each side of the seam. No zip of course. The back then has two pleats plus a dart at each side, but the centre is smooth.

The JW skirt is pretty good but isn’t exactly matched - so perhaps that issue is less relevant to Helen than the overall ‘feel’ of the garment. Having the side seams free of pleats and using the darts will help with the shaping. Having just the two pleats allows me a far greater flexibility. The pleats can be 'any' width to fit in so I can match the pattern to the set size. In the full pleated version, the pleats had to match all the way around. A lot of calculation and experimentation and careful measurement. Of course, each tartan is different, so those calculations are worthless now.

Another issue is that I’d like the selvedge to form the bottom of the skirt as a hem would be bulky. This is traditional in kilts. I need to examine the tartan to see if this is possible. I won’t be doing that, though, until I am well into the process of pattern making and toileing.

I think I’ve decided what I want to do, unless Helen has a strong opinion to the contrary. I don’t think she does as she said ‘whatever is easiest’. I don’t have a pattern, so this may not be the easiest route, but think I can manage to create one. I hope I can manage. I asked for advice in sewing bee - and there are complexities I hadn't considered, mainly to do with shaping.  The RTW skirt has a curved hem and waistband. I tried to make a kind of pattern but it was difficult, even with help and the conclusion is that I'd be better doing straight from the fabric. I'd make up a toile of course. I have some pieces of plaid that will work for that. Just for the shape and rough size, not the pattern matching.

Any thoughts?


Sunday, 27 November 2016

Another tartan skirt 'wearable muslin' for Helen

Pleated skirt for Helen


On Missy
Some of you may remember that for last Christmas I was going to make Helen a full pleated skirt from our family tartan, at her request. I ran into problems with time and with the rendition of the skirt. I didn't use a pattern. I made a full pleated toile using another plaid, not our own tartan, which looked quite nice but I felt had problems with the closure. No, I didn't just feel that - it had. I didn't get the opportunity at that stage to move on from that version of the toile. These photos are from Christmas 2015.


I also had the skirt quite long as I felt that a traditional pleated skirt should be around knee length. Helen didn't really want a traditional pleated skirt, simply a skirt made of tartan. Unspecified design.


This is DH wearing his kilt in our tartan.

I started to think about it again this year after the wedding, some recovery time and the PR Sewing Bee. I planned to make it either for Helen's birthday or for her Christmas. I spoke with Helen a while back.

I felt that, apart from the side zip closure on the full pleated toile, there were issues with weight - a full pleated skirt is very heavy, particularly in a medium weight wool tartan. Another major issue was that the waistline was too big. To create a smaller waistline, it's necessary to fold over the pleat more at the top than at the bottom. If there are enough pleats, as there are in a full pleated skirt, this is scarcely noticeable. If we reduced the number of pleats to lighten the skirt, it could be very noticeable.


Still under construction here - you can see that the pleats are deeper at the top to create a smaller waist.
This is the side closure that gave me so many problems

We discussed styles but didn't really come up with a clear plan - discussion time was limited. I did show Helen two patterns. On the basis of our discussion, I went ahead and made a toile from McCall's 7022 in the version shown here - view B.


McCall's 7022, view B - I like this view and bought the pattern after seeing it


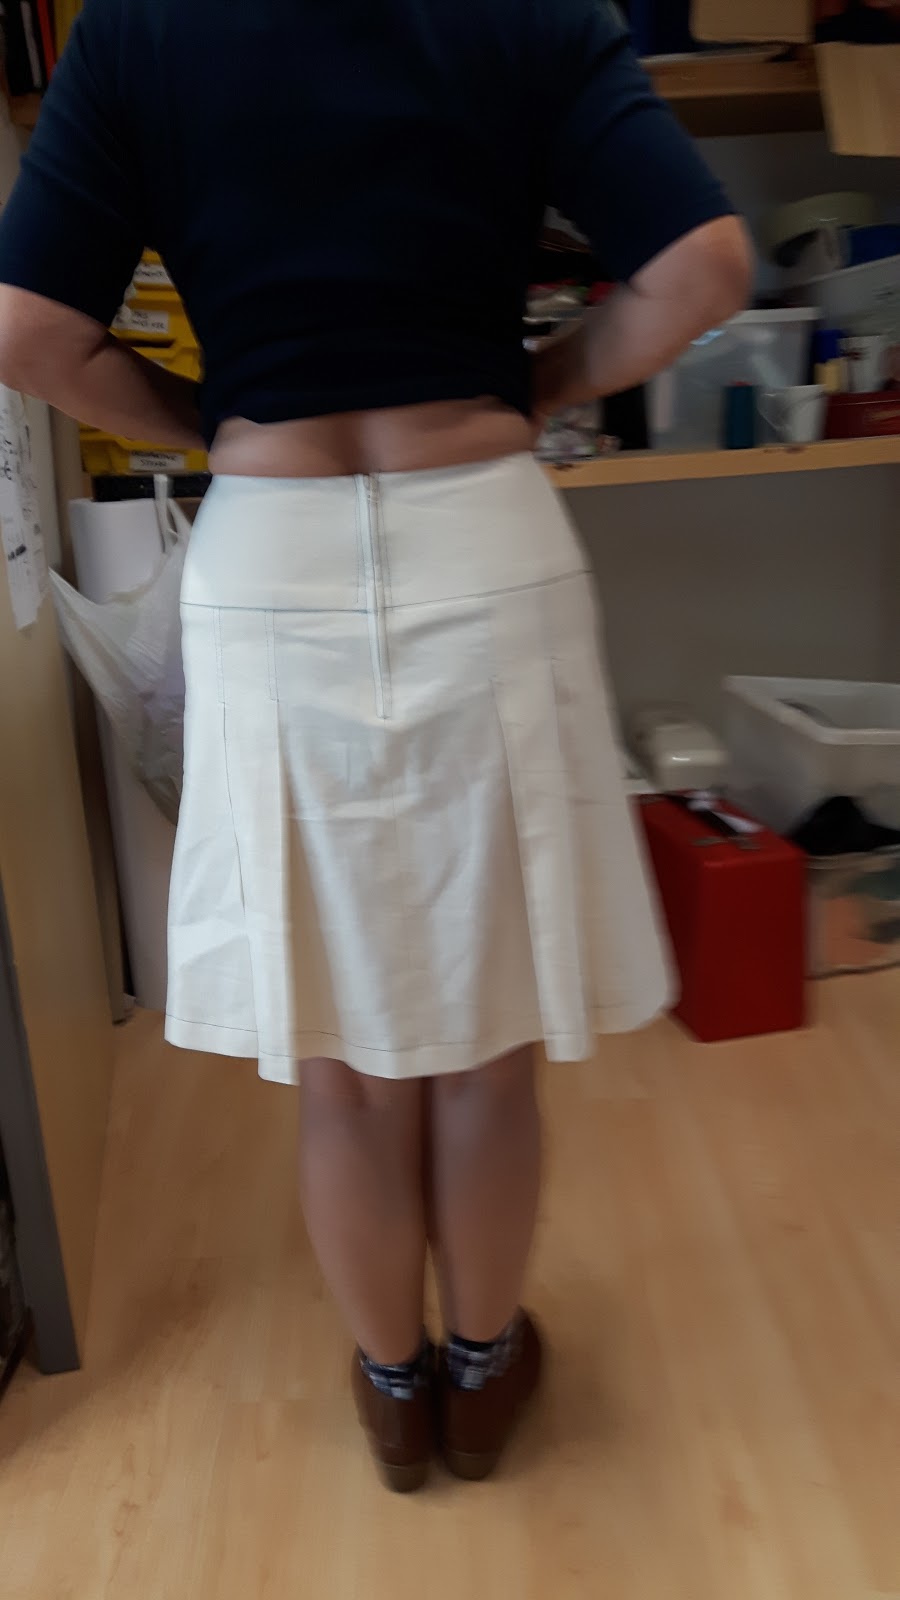
This is the toile, below, worn by someone else in my class. It's made of medium weight calico. I thought it was pretty good and sent it off by post to Helen for fitting and pinning (I thought it unlikely that it would fit perfectly and I can't use Missy for fitting any more; I reckoned it would be too big) I heard nothing, so chased her up and learned that the skirt was too long and too loose at the waist, as expected, amount unspecified. 


Sewing class side view on classmate

Sewing class back view on classmate

Sewing class side view on classmate

Sewing class front view on classmate

In my Thursday sewing bee, I explored how I would develop the pattern, using the width of a tartan set to determine the pleat width. I noticed that the pleat markings are not parallel all the way down. Lyn said this is to create waist shaping (so rather like the pleat issue on the earlier tartan full pleated toile). I was surprised how much waist shaping there was as there is a yoke, which already has any darts built into it. I was worried about trying to make the skirt as is (well, a smaller size) because of this issue - I didn't want my pleats to be uneven.

I also considered changing the two knife pleats into an inverted pleat and sent Helen a sample (the other side was a box pleat, of course)

The pattern comes with two other versions. An A-line skirt without pleats (versions C and D) and a full circle skirt (versions E and F), both on the same yoke.

I originally planned to alter the pleat position, size and orientation but use the original skirt version, in a smaller size and shorter. I puzzled over how to include my pleats at the width I wanted. The original pattern front is cut in two pieces - presumably that's even more shaping. I had decided by this time that I wanted to have the inverted pleat rather than the knife pleats. So I looked at how I would do that. I struggled. I couldn't see how to do it and decided that it was probably easier to add the pleats to the plain A-line version. Lyn agreed. 

Then I remembered that in a telephone conversation, Helen had mentioned the possibility of a circular skirt. I hadn't been sure because of the way a plaid would lie in a circle skirt. I decided in class that I would indeed make the circular skirt version of the pattern, in a shorter length, one size smaller.
I decided, however, that the full circle was too much for a wool plaid and proceeded to remove some of the circle, following advice from Lyn. I guess I took out about 6" from each quarter of the skirt - so about 24" from the total circumference - that is wedges starting at the hem and tapering out at the yoke seam. The seam length to be attached to the yoke was unchanged.

The pattern comes in two lengths and I had previously made the longer one. This time, I split the difference, shortening from the longer pattern length by approx 5 cms.

So I made up a standard size 10 yoke. The skirt was between lengths and had a slightly reduced width at the hem. I made this up as a rather fancy toile, using a remnant of a lighter weight wool plaid I had in my stash. I took it to class to make a pleated version and there would have been enough fabric to make a skirt. However, because I decided to make a circular skirt, I was very short of fabric. I was unable to match the fabric pattern at the sides. Nor did I have enough for the yoke facing. I decided that I would fully line the skirt and facing, using a fairly standard type lining material.

I had no problems making up the skirt. I didn't entirely follow the instruction order because I was lining the skirt. Another slight change was that the pattern had the back on the cross grain, the front on the straight of grain but Lyn advised me to keep the back on the straight of grain too.

The following photos are on Missy. She's okay for modelling but not for fitting as Helen changed quite a bit running up to her wedding.


Finished skirt front - on straight of grain

An idea of the circle shape, one side held out

The skirt back, on straight of grain

I made up the skirt, made up the lining 1" shorter, joined the lining to the skirt at the top, understitched etc, inserted the centred zip, stitched the lining to the zip tapes at the sides and then stitched the lining yoke seam to the skirt yoke seam, hidden above the junction. I did the zip and the yoke seam by hand. All seam allowances were overlocked to reduce fray. 


Inside of skirt, back
I then hung the skirt up for two days to allow the hem to drop - and it did drop rather unevenly. I measured and cut off down to the same length all around. I had to do this from measurements on the fabric as of course I had no live model to allow me to measure from the floor.


Very little to be removed at back seam, on straight grain
Rather more to be removed where skirt was on bias


I double turned the hem and hand stitched.


Showing double turned skirt hem. Yes, and simple overlocked lining hem!

The lining was now too long so I measured and then decided to trim off using the overlocker rather than make a proper hem. Lazy I know - but then, this is a fancy toile and by this time I had feedback from Helen that she wasn't sure what style she wanted and didn't really like the yoke, she'd prefer a narrow waistband...

I didn't lose heart, though. I have had loads of admiring comments about the finished skirt. It is eminently wearable. My original class model is currently making up the knife pleated version of the skirt for herself and declared it to be her favourite pattern. She's doing it in denim and it looks very good.

I'm giving the skirt (as is) to Helen as part of her birthday present (next week) - it would be fairly easy to reduce the waist and yoke at the side seam if necessary though I don't think it should be. It's a nice skirt. Although it is a toile, I think this is truly a 'wearable toile' or 'wearable muslin' - it is finished in every respect. I've also bought a grey ribbed polo neck to go with it. Others have pointed out that the hem of the polo neck will cover the yoke, anyway. 


The ribbed polo neck looks tiny compared to skirt! Perspective to get everything in photo.

Helen has asked me to 'hack' and slightly modify her favourite red sand-washed silk dress, which is worn out past the point of acceptability, for her Christmas (instead of the tartan skirt - no way can I manage both!). She was going to do it herself in emerald green velvet (she looks fabulous in green). Helen's dressmaking skills aren't quite there yet. I've agreed to do the pattern if she gives me the dress home with me, or we might have time to do it when I visit. I'd like to make it up in red sand-washed silk for her. Does anyone have any idea where I could buy sand-washed silk in the UK? Yes, I know I could get the same stuff as I used for the wedding dress but that is ivory or white and would need dyed and is mega-bucks (that was from Soho). It doesn't need to be of such high quality. Preferably red or dark green or dyable (my spellchecker doesn't accept that as a word - should it be 'able to be dyed'?).

I wrote this up with no plans to publish it until after Helen had seen the skirt, tried it on and commented - I'm visiting her next week. I don't think she'll see this blog post - but I have already sent her a photo of the skirt so that's not new to her.  However, I have decided to publish the post in the hope that someone can give me a source for the silk. I can buy in London (assuming a London source, I know - otherwise mail order) when I visit as I have a little free time.

I'd be grateful for your comments and possible silk sources, TIA


Tuesday, 26 January 2016

Sleeve and Back Crisis - hopefully averted!

The pressure of the wedding sewing is starting to get to me. To be honest,  it's more the pattern making than the thought of the construction. I'd be more than happy to take a pattern and make it up. No decisions. No problems. Certainly no designing. I don't mind the minor alterations required - not even FBAs!


I've been struggling with the design of the bridesmaids’ dresses. We have an inspiration photo,  which I can't show here, but it has a pretty open back. That itself causes issues as there just isn't the fabric available to provide support so the open parts gape.


Worse, the girls were keen to have a boat neck at the front.


Boat neck plus open back = disaster! There is just no support available and the shoulders fall off the sides.


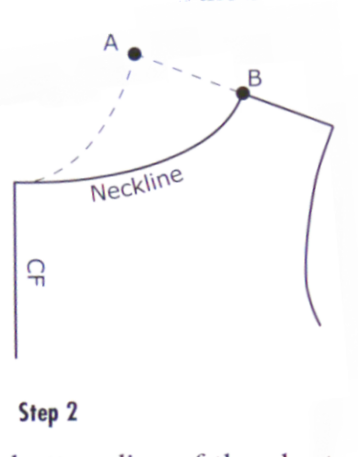
I have Suzy Furrer's classes and her book, 'Building Patterns, The Architecture of Women’s Clothing', which I like and use. I carefully watched her video on how to create a boat neck and carried out the steps on my pattern. The video was more detailed and I have included a photo of my pattern alterations on one of the patterns (Joanne's). The diagrams below are from the book, not specifically about boat necks, though the video section was.


Showing front neckline


At Christmas,  I had the first basic toiles and a front boat neck version for the two bridesmaids to try; the back was a standard back. Reasonably successful and I marked the changes required.


I attend a Sewing Bee with Dan and she is helping me think about the dresses now, for which I'm extremely grateful as I was really struggling.


Joanne, my middle daughter, visited last week. I was able to take her briefly to the class and Dan fitted the toile. There were a number of issues related to the boat neck and the open back, which I had now created for Joanne’s visit. Helpfully, Dan pointed out that the bodice was too long - it looked much better when pinned shorter. I thought I knew where I was going.


I had made a sleeve but found it took full and puffed and we didn’t like it. This was a sleeve from a pattern I'd made previously - Simplicity 1418 - which I thought would have worked. It didn’t. So Dan also went through how to create two types of  cap sleeves and roughly pinned one on one side, using the sleeve I had created. The other side was sleeveless and finished. I rather liked the sleeve she pinned and so decided to make a ‘proper’ version later - I haven’t got around to this as yet! Dan says that a cap sleeve can be added later, so I don’t need to worry about that at the moment, particularly as we’re thinking sleeveless at present. That could change! So many things have changed already.

We originally preferred the sleeve on the left


I have some photos of the toile, which I'm not publishing. As Joanne has returned south, that's what I have to work with.


As I can’t show any photos, I'm including the step diagrams instead.


Alison, my oldest daughter,  visited over the weekend (nice to see my grandsons). As I've been pretty ill,  I hadn't had a chance to make the alterations to the toile she tried at Christmas. I did some quick pinning and hacking when she retried it! We identified some serious flaws and I realised I’d have to completely redraw the pattern


I also read about how to contour for a low back in Suzy Furrer's book and while Alison was attending a function on Saturday,  redrew the pattern and made up a new toile. I quote here from Suzy Furrer and show her diagrams:


“If the back neckline depth is level with or lower than the base of the armhole an adjustment needs to be made to the back bust ease. If the back neckline depth is level with the depth of the armhole, bring the back underarm/bust seam in 3/8". If the neckline is midway between the armhole and the waist, bring the back underarm/bust seam in 5/8". If the neckline depth is at the waist, bring the back underarm/bust seam in 7/8".
This adjustment will prevent the back from gaping and wrinkling. The more skin exposed, the tighter the garment should be. This is a negative ease situation. This adjustment is only done to the back, not the front. The adjustment is in addition to the 1/4" taken off the sloper to reduce ease at the bust.”


In addition,  I decided to follow instructions on how to make a cut on cap sleeve using Tanya Whelan’s book Sew Many Dresses sew little time; the ultimate dressmaking guide. I haven’t used this book as yet but have read through and it seems interesting but I can’t review it as yet. I have other sewing instructional books but wanted to use this one as it is modern and I thought more suitable for these dresses! The all in one cap sleeve was a suggestion from Alison who likes this type of sleeve. It didn’t work - my fault entirely. Perhaps the problem here was that the sleeve pattern I used wasn't one of the ones in the book (the book comes with patterns). I used the sleeve pattern from my original block for Alison - worse, I hadn’t altered the sleeve pattern in line with the bodice alterations - the armscye had been altered because of the contouring required. Anyway,  the back part of the sleeve looked okay, just like the diagram. I wasn't at all sure about the front as it didn't look at all as per photo in the book,  no matter how hard I tried. I sewed it up. The armhole was so tiny that Alison said even if she lost so much weight that she became skeletal it still wouldn't fit!

This is where I went wrong! The back was fine but the front awful.


I’m including the diagrams from the book to show the process. I haven’t included the actual instructions - you know that this isn't intended as any kind of tutorial (perish the thought!) but rather to make up for my lack of photos! The one instruction I realise that I didn't follow as I didn't fully understand the way it was written was to make the top of the sleeve front match the back front. Mine didn't.


Looking from the front. front/back shoulder seam along the top.
 Additional fabric inserted measures nearly 2" at sleeve edge
On one side I inserted a patch (or gusset?). I've shown a photo of that here. I slit open the other side and was going to see how much fabric was required but we ended up hacking the sleeve off completely. I mean hacked!


I wasn't happy at all with the toile fit. I have a number of photos - though it turned out I didn't have all the necessary photos - no photo of how the side seams lay.


I sent a lot of photos to Helen. I indicated the problems I was having and suggested changes - largely providing more fabric and therefore more support. I think I anticipated some objection to my suggested changes. That didn't happen.


I came to some decisions and can’t afford to change direction now. I have to get on with it! No more procrastinating by writing blog posts!!


Last night, I went to Dan’s sewing bee.  Of course, no Alison but I was able to take the photos.


I was keen to get advice on how to deal with the problems. Interestingly,  once again the bodice waistline was a bit low - I seem to have difficulty working out where the waistline should be.


The shoulders were falling off the shoulder line and I thought this was entirely due to lack of support - however,  Dan showed me that the shoulder was too wide in the first place. She also recommended a change in the design lines.


We also discussed how to construct the facings and generally make up the dress.


So, I'm going back to the original toile - it was too difficult to start to work with a partly altered one. I got confused almost instantly. Despite having to remake all the alterations made previously, it's worth it. So - alter shoulder width, alter neck width, add fabric to back, shorten bodice,  modify design lines. Make facings. Quite a number of changes!  


After the class, I had a telephone discussion with Helen and I feel a lot happier - not despondent about going back to the original block. I'm visiting the girls in 3 weeks or so and hope to have a full working toile in an appropriate fabric made up by then. I have 3 sewing bees with Dan between now and then for any further advice I need.

On another note,  Helen told me that she successfully wore the tartan pleated skirt I made just before Christmas to a Burns Supper. Final blog post with photos here
Naturally she wasn't wearing her Christmas hat and slipper socks!

Okay - quick sewing room tidy (I have been working on it, honest!) then I need to get things ready for golf tomorrow - I'm feeling better enough to try a few holes, I hope (and maybe a few on Saturday if I survive!) - then a teams bridge match at my house tomorrow afternoon. I'm back at college on Thursday evening but hopefully might get some sewing done on Friday - unless we go to Bowes Museum to see a couple of exhibitions there - we postponed from a couple of weeks ago as I was ill. This weekend can be sewing, certainly


How Do You Read Blogs?

It's a while since I've posted a blog,  lots of reasons. I'm thinking of starting again. However,  I used to read the blogs I fo...