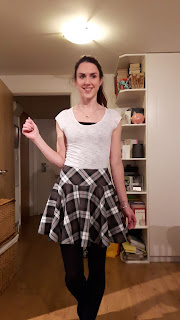
Pleated skirt for Helen
 |
| On Missy |
Some of you may remember
that for last Christmas I was going to make Helen a full pleated skirt from our
family tartan, at her request. I ran into problems with time and with the rendition
of the skirt. I didn't use a pattern. I made a full pleated toile using another plaid, not our own tartan, which looked quite nice but I felt
had problems with the closure. No, I didn't just feel that - it had. I didn't
get the opportunity at that stage to move on from that version of the toile. These photos are from Christmas 2015.
I also had the skirt quite
long as I felt that a traditional pleated skirt should be around knee length. Helen
didn't really want a traditional pleated skirt, simply a skirt made of tartan. Unspecified design.
 |
This is DH wearing his kilt in our tartan.
|
I started to think about it
again this year after the wedding, some recovery time and the PR Sewing Bee. I planned to make it either
for Helen's birthday or for her Christmas. I spoke with Helen a while back.
I felt that, apart from the
side zip closure on the full pleated toile, there were issues with weight - a
full pleated skirt is very heavy, particularly in a medium weight wool tartan.
Another major issue was that the waistline was too big. To create a smaller
waistline, it's necessary to fold over the pleat more at the top than at the
bottom. If there are enough pleats, as there are in a full pleated skirt, this
is scarcely noticeable. If we reduced the number of pleats to lighten the
skirt, it could be very noticeable.
 |
Still under construction here - you can see that the pleats are deeper at the top to create a smaller waist.
This is the side closure that gave me so many problems |
We discussed styles but
didn't really come up with a clear plan - discussion time was limited. I did show Helen two
patterns. On the basis of our discussion, I went ahead and made a toile from
McCall's 7022 in the version shown here - view B.
 |
| McCall's 7022, view B - I like this view and bought the pattern after seeing it |
This is the toile, below, worn by someone else in my class. It's made of medium weight calico. I thought it was pretty good and sent it off
by post to Helen for fitting and pinning (I thought it unlikely that it would
fit perfectly and I can't use Missy for fitting any more; I reckoned it would be too big) I heard nothing, so chased her up and learned that the
skirt was too long and too loose at the waist, as expected, amount unspecified.
 |
| Sewing class side view on classmate |
 |
| Sewing class back view on classmate |
 |
| Sewing class side view on classmate |
 |
| Sewing class front view on classmate |
In my Thursday sewing bee, I
explored how I would develop the pattern, using the width of a tartan set to determine
the pleat width. I noticed that the pleat markings are not parallel all the way
down. Lyn said this is to create waist shaping (so rather like the pleat issue on the earlier tartan full pleated toile). I was surprised how much waist
shaping there was as there is a yoke, which already has any darts built into
it. I was worried about trying to make the skirt as is (well, a smaller size) because
of this issue - I didn't want my pleats to be uneven.
I also considered changing
the two knife pleats into an inverted pleat and sent Helen a sample (the other
side was a box pleat, of course)
The pattern comes with two
other versions. An A-line skirt without pleats (versions C and D) and a full circle skirt (versions E and F), both on
the same yoke.
I originally planned to alter the pleat position, size and orientation but use the original skirt version, in a smaller size and shorter. I puzzled over how to include my pleats at the width I
wanted. The original pattern front is cut in two pieces - presumably that's
even more shaping. I had decided by this time that I wanted to have the
inverted pleat rather than the knife pleats. So I looked at how I would do
that. I struggled. I couldn't see how to do it and decided that it was probably easier to add the pleats to the plain A-line version. Lyn agreed.
Then I remembered that in a
telephone conversation, Helen had mentioned the possibility of a circular skirt.
I hadn't been sure because of the way a plaid would lie in a circle skirt. I
decided in class that I would indeed make the circular skirt version of the
pattern, in a shorter length, one size smaller.
I decided, however, that the
full circle was too much for a wool plaid and proceeded to remove some of the
circle, following advice from Lyn. I guess I took out about 6" from each
quarter of the skirt - so about 24" from the total circumference - that is wedges starting at the hem and tapering out at the yoke seam. The seam
length to be attached to the yoke was unchanged.
The pattern comes in two lengths
and I had previously made the longer one. This time, I split the difference, shortening from the longer pattern length by approx 5 cms.
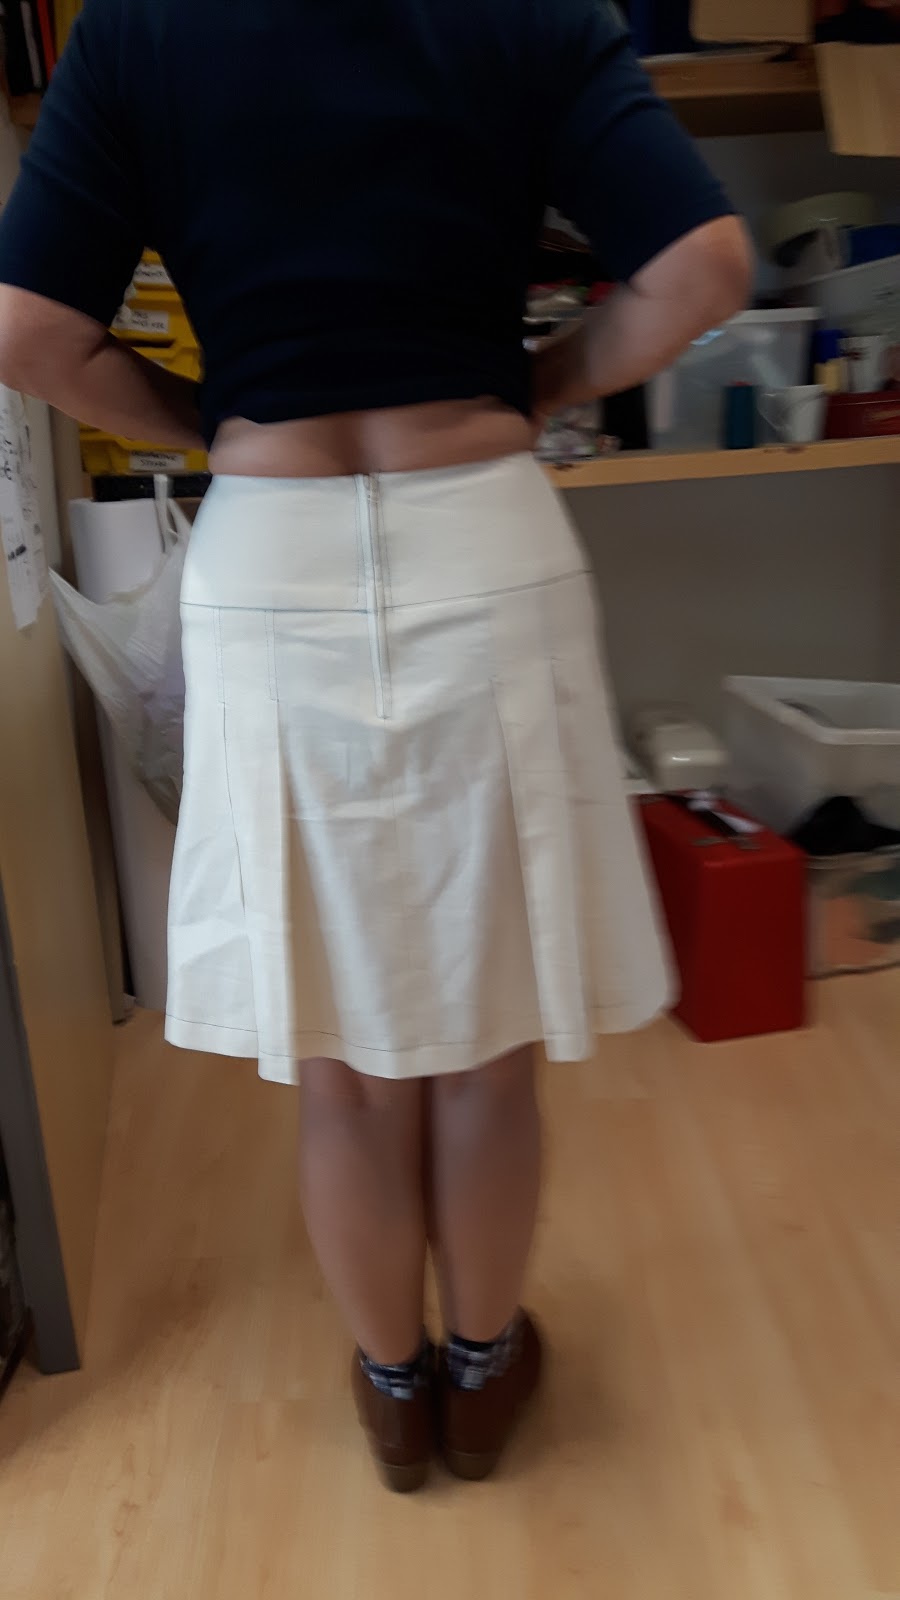
So I made up a standard size
10 yoke. The skirt was between lengths and had a slightly reduced width at the
hem. I made this up as a rather fancy toile, using a remnant of a lighter
weight wool plaid I had in my stash. I took it to class to make a pleated version
and there would have been enough fabric to make a skirt. However, because I decided
to make a circular skirt, I was very short of fabric. I was unable to match the
fabric pattern at the sides. Nor did I have enough for the yoke facing. I decided
that I would fully line the skirt and facing, using a fairly standard type
lining material.
I had no problems making up
the skirt. I didn't entirely follow the instruction order because I was lining
the skirt. Another slight change was that the pattern had the back on the cross grain, the front on the straight of grain but Lyn advised me to keep the back on the straight of grain too.
The following photos are on Missy. She's okay for modelling but not for fitting as Helen changed quite a bit running up to her wedding.
 |
| Finished skirt front - on straight of grain |
 |
| An idea of the circle shape, one side held out |
 |
| The skirt back, on straight of grain |
I made up the skirt, made up
the lining 1" shorter, joined the lining to the skirt at the top,
understitched etc, inserted the centred zip, stitched the lining to the zip
tapes at the sides and then stitched the lining yoke seam to the skirt yoke seam,
hidden above the junction. I did the zip and the yoke seam by hand. All seam
allowances were overlocked to reduce fray.
 |
| Inside of skirt, back |
I then hung the skirt up for two days to allow the hem to drop - and it did drop rather unevenly. I measured and cut off down to the same length all around. I had to do this from measurements on the fabric as of course I had no live model to allow me to measure from the floor.
 |
| Very little to be removed at back seam, on straight grain |
 |
| Rather more to be removed where skirt was on bias |
I double turned the hem and
hand stitched.
 |
| Showing double turned skirt hem. Yes, and simple overlocked lining hem! |
The lining was now too long
so I measured and then decided to trim off using the overlocker rather than
make a proper hem. Lazy I know - but then, this is a fancy toile and by
this time I had feedback from Helen that she wasn't sure what style she wanted
and didn't really like the yoke, she'd prefer a narrow waistband...
I didn't lose heart, though.
I have had loads of admiring comments about the finished skirt. It is eminently
wearable. My original class model is currently making up the knife pleated
version of the skirt for herself and declared it to be her favourite pattern.
She's doing it in denim and it looks very good.
I'm giving the skirt (as is)
to Helen as part of her birthday present (next week) - it would be fairly easy to reduce the
waist and yoke at the side seam if necessary though I don't think it should be.
It's a nice skirt. Although it is a toile, I think this is truly a 'wearable toile' or 'wearable muslin' - it is finished in every respect. I've also bought a grey ribbed polo neck to go with it.
Others have pointed out that the hem of the polo neck will cover the yoke, anyway.
 |
| The ribbed polo neck looks tiny compared to skirt! Perspective to get everything in photo. |
Helen has asked me to 'hack'
and slightly modify her favourite red sand-washed silk dress, which is worn out past
the point of acceptability, for her Christmas (instead of the tartan skirt - no
way can I manage both!). She was going to do it herself in emerald green velvet
(she looks fabulous in green). Helen's dressmaking skills aren't quite there yet. I've agreed to do the pattern if she gives me
the dress home with me, or we might have time to do it when I visit. I'd like to make it up in red sand-washed silk for her. Does
anyone have any idea where I could buy sand-washed silk in the UK? Yes, I know I
could get the same stuff as I used for the wedding dress but that is ivory or
white and would need dyed and is mega-bucks (that was from Soho). It doesn't
need to be of such high quality. Preferably red or dark green or dyable (my spellchecker doesn't accept that as a word - should it be 'able to be dyed'?).
I wrote this up with no
plans to publish it until after Helen had seen the skirt, tried it on and commented
- I'm visiting her next week. I don't think she'll see this blog post - but I have already sent her a photo of the skirt so that's not new to her. However, I have decided to publish the post in the hope that someone can give me a source for the silk. I can buy in London (assuming a London source, I know - otherwise mail order) when I visit as I have a little free time.
I'd be grateful for your comments and possible silk sources, TIA


I love this post in every way. The pattern cutting and fitting information, but also the dynamics of sewing for the family. Funny, and familiar. In terms of sandwashed silk I have found the best suppliers are in Goldhawk road. You should be able to get what you want there. I can't remember the actual shop, although I could take you there. But if you walk along comparing quality, colour and price I am sure you will find what you need.
ReplyDeleteThanks, Kate. I have to confess I thought of you as I wrote this!
DeleteGoldhawk Road it is!!