I’ve been busy with a
lot of non-sewing-related items and haven’t felt it appropriate to post about
them. I'm continuing to attend a summer class on using Lightroom and hope that when the photography club re-convenes in September I will be able to participate more fully. There has been some sewing too, though, though more machine embroidery
than sewing.
 |
| Small scissor case. Free pattern on signing up to newsletter. |
My sewing includes
repairs and alterations to several garments to make them wearable. I’ve lost a
bit of weight (not enough) and my trousers in particular are all too big so
I’ve done what I can to make them fit. Hopefully they’ll get too big again! I still find it amazing that trousers appear to get longer as I slim! Even at 5'11", I'm having to take up trouser legs or risk tripping on them or getting wet legs from the wicking. Sadly, a lot of things I had in storage don’t quite yet fit again. I see that August is a time for alterations - I’m sure I have many more to do so I might
post about those on IG.
I haven’t finished
the garments I was making - I planned to use my coverstitch machine for bands. I need an
uninterrupted period to get to grips with the machine. Now is not the time. One
of the tops I had finished definitely needs altered as I don’t like the
neckband - hubby says he thinks it’s fine.
I started an In the
Hoop (ITH) embroidery course online from Sweet Pea in Australia. There will be
12 lessons at fortnightly intervals. Each lesson has the appropriate pattern to
download plus written and video instructions. I really like the videos. It’s
amazing how much useful and interesting information is given off the cuff.
I’ve completed the
first three lessons and think I’m learning a lot. The first lesson was an appliqued
coaster, the second a luggage tag (there were 3 different designs but I
only did one; I will have to get around to the other two as they are all cute) and the third a purse, which I finished last week (I confess
I completed the other two just in time for the third lesson
to come out! Still, you can go at your own pce so that's fine)
#1 Here is my
coaster:
I could have made it
much more colourful but decided to go subtle and not change the thread colours
as I just wanted to learn the techniques. I realise I’m not very good at
putting colour schemes together.
 |
| It doesn't look square because of the way the photo was taken - it is square! |
The coaster is sewn
right sides together (on the embroidery machine - it’s much more accurate than
I am!) turned through a gap and the gap slip stitched closed.
#2 Here is my sun
luggage label:
The label is done
with back and front wrong sides together and is finished with satin stitch
around the edges. I had done this before with black thread and black in the
bobbin - my bobbins are either black or white. This time I had to wind the
bobbin with the embroidery thread so each side would match.
In addition to the
sun design there were another couple of seaside themed designs which I’d do if
I had a holiday coming up.
I had lost my
embroidery supplies, needles and so on and used a different needle which I
thought would be okay - but I don’t think it worked; I’m putting the irregularities
down to that. Fortunately, I did find the correct needles for the 3rd project.
#3 Here is my purse:
I really like it.
There were 4 sizes and I did the 150x150 one. I didn’t realise until now that
the 150x150 hoop is smaller than the 6x6 hoop - they need a different pattern
to fit properly. You live and learn! I might have wondered why there was both a
6x6 and a 150x150 design but someone else pointed this out on the useful FB
group.
The purse is fully
lined. It was done in the hoop other than the strap (on the sewing machine) and
closing the internal lining with slip stitch (by hand). I was so glad of the
helpful video as the purse had to be turned through in two stages.
I didn’t have small D
rings or clasps etc so just used what I had.
I’ve really enjoyed
what I’ve done so far. One project every two weeks (with no fitting involved -
yay!) is fine for me. There are a couple of projects I’m particularly looking
forward to.
#4 coming up!
Next week is a ‘flip
and turn’ cushion - this will be the closest I’ve ever been to real
patchwork or quilting. Looking through the materials required for the lessons,
I will need to order a few things. I’ll try local first and if that doesn’t
work, I’ll go online. I do need some pieces of quilting fabric that go
together. I’m not so good at matching or putting patterns together. I also need
some decent soluble stabiliser and some tear away stabiliser plus smaller D
rings and clip loops (sorry I forget what they’re called).
I have found the patterns produced by Sweet Pea to be excellent and the satin covering stitches actually cover what they're supposed to. The designs are pricier than many others found on the internet but I'm prepared to pay for quality and support. I haven't completely given up ideas of digitising my own designs, as I did with the Celtic design for the pocket of David's jeans, but that's not on the cards for the time being. I did try to digitise one of my flower photos - what a disaster!
Why now?
So why now? David
gave me the embroidery machine for my birthday last year or was it the year
before hoping I’d get some fun from it. I’m beginning to now that I realise my
limitations - I started too advanced for me. I didn’t really previously see
myself as someone who used lots of handmade items, bags and so on though I love
textiles embroidery and quilting - to look at, I mean, never having attempted
it myself. I enjoyed the few items I made at Christmas past (with the possible
exception of the one that did not have an accurately rendered pattern - though
even that was fun in its way) which are on my blog if you want to look at them.
Also, my youngest
daughter is expecting, due January 2020 and I’d really like to make some things
for the baby - a baby quilt, a bib etc. She’s keen for that too. She and her
husband don’t want to know the baby's gender.
One of the lessons on
the course is for a stuffed toy and another is for a jungle themed bib.
Jungle/Africa is the theme she wants to go with so it couldn’t be more perfect.
Sure, I’ve got quite a way to go before I can try a quilt/wall hanging/floor
mat - apparently babies shouldn’t use a quilt as a piece of bedding. I’ve found
somewhere I can go for an individual lesson, participate in a quilting bee
(don’t know if that’s what they’re called) with help if needed and go to
specific workshops. This is doable! I have quite a while in which to do it,
too.
The Sweet Pea website
has a free design for two sizes of scissor cases. I have been meaning to make
some cases for my scissors so this seemed ideal to give me a bit of extra
practice and be useful at the same time. I decided to start with the small
case. I think this was pretty successful. The only problem is not being able to
adjust the size for different scissors. I’ll have a go at the larger case next.
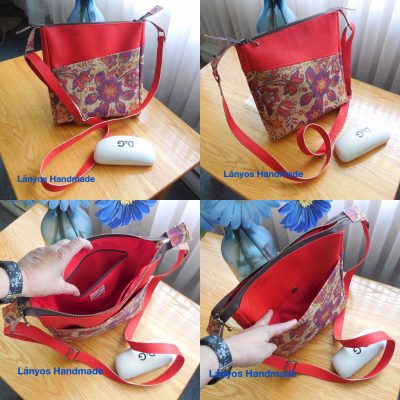
Gemma Bag - a
cross-body bag
When I went to post about the course, I realised that I had never posted about the bag I tested - so here is the post, written a while back and just waiting for decent photos - there still aren't decent photos as I gave the bag away before I had the chance to take more. My bag has already appeared on Linda's IG and FB pages so I hadn't felt any great need to post my own. The other testers made some gorgeous bags - go have a look.
I’m not normally a
bag maker though I have admired from a distance. One of the other sewers at my
Thursday sewing bee is a bag maker and makes some terrific items. She uses
beautiful fabrics but I’m not keen on unicorns, floral skulls etc, which are
very popular with others. I love handbags and have many of them, but they tend
to be on the boring side when compared to the beautiful handcrafted ones - mine
are often leather and often a plain colour.
When I saw a call for
testers for the Gemma bag, I put my name forward, identifying myself as a
novice. Linda of Lanyos Handmade and Nice Dress Thanks I Made It wanted all levels to test the bag.
I had admired her
original bag when I saw it on her social media. It was made with plain and
patterned cork. I thought it looked very classy and was one I could use. I was
pleased when I was chosen to test the bag.
I had most of the
things I needed. I found it difficult to get cork at a reasonable price and
couldn’t find a similar patterned cork, but Linda suggested that as a beginner
I’d be better with a test bag made from cotton. I identified the UK equivalent
of the recommended interfacing for the cotton lining. I had most of the
hardware though it turned out that I didn’t have the correct slider. I did have
D rings, magnetic closures etc and purchased zippers of the required length. I
have LOTS of zips now!
I’m going to skip
over some of the problems I had with printing the pattern and making up the bag
since these issues have been resolved, I was using the Beta ie tester version!
Briefly, the issue was that the pattern wasn’t originally optimised for
printing on A4 and this led to some size problems. Many bag patterns simply
give sizes that need to be drawn and cut out so this was really no biggy -
except that I did draw out the lining, which eventually proved to be too big
for the outside. I was able to resolve this. Obviously, the bag will be much
easier to make when all the sizes are optimised.
My cork (one plain
sheet and one slightly patterned but not the gorgeous floral Linda used)
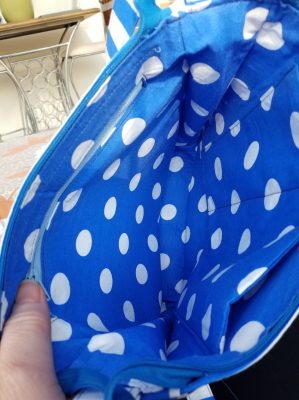
arrived earlier than I had anticipated but I decided to use cotton for my bag,
anyway. I used cotton that I had in my ‘collection’ (aka stash!) I didn’t want
multiple patterns so decided to go with stripes two ways on the outside and
polka dots for the lining. I didn’t like the interfacing I used for the
cotton .The original bag is cork on the outside - Linda’s later recommendation
for interfacing a cotton exterior would have been much better than what I used
but I had already made it up. Never mind - this was effectively a toile!
I had no problems
following the instructions. I used quilter’s double-sided tape to place the
zippers - my first use but certainly not my last! I was rather pleased with my
letterbox zip on the inside. I have practiced these in the past (jetted pockets
etc) and know that it is important to cut right up to the corner. I originally
went for curved corners on the lining but decided to box the corners on the
outside. I have done that previously and don’t find it difficult (though you
would be forgiven for thinking otherwise considering how long I have been
putting off the boxed cushion cover for my goose box!). Sadly, I realised that
I failed to match my stripes across gusset and bag!
I found that the
slider I had wasn’t the right kind so omitted that altogether.
I rather like the
finished bag though the fabric makes it very casual in my view and the colours
are very summery. Great for use with a summer dress - not the wintery clothes I
was wearing when I took the photos!
Our weather has been all over the shop.
Today David and I were supposed to be on a photoshoot on Holy Island
(Lindisfarne) but it was cancelled because of inclement weather. I was glad, as
my mouth is still painful following dental surgery and gum graft last week and
I didn’t fancy getting soaked.
Now that I have the
finalised pattern, I might make another in the cork I have bought. I’d really
like to make a leather bag with all the pieces of leather I have but I wonder
if that’s too thick for my machines.
I feel, though, that
I am facing too many learning curves at the moment so bag making will take a
step backwards. I have a new camera, more complex than my previous one, have
newly purchased Lightroom and Photoshop and need to move forward with my
coverstitch machine. I’m attending a summer school on the use of flash
photography (well, they call them speedlights or speedlites) and in a couple of
weeks will be able to really tackle my photo editing software when the summer
school moves onto that.