Thursday 29 January 2015

Jeans class 2 - pockets; DD's dress repair update

I posted my first jeans' class a bit too early; I meant to save and put in some more photos before publishing. Never mind.

Here are photos to end of stage 4. Plus how I think stage 5 is going to go.  I didn't' even know my phone could do that trick with the small insert and I couldn't work out how to switch it off. I eventually managed by switching off whole phone - there must be an easier way, though.

 I've seen a few posts on jeans sew-a-longs e.g. for the Ginger jeans. It strikes me that I might find it useful to read those. I don't have a jeans' pattern and I'm not sure what I would go for. I have seen reviews of Jalie jeans, Jamie jeans, Ginger jeans and possibly some others.  Any recommendations?  I do not want skinny jeans and would prefer a high rise. Another option is self drafting using the Sure Fit Designs system and modifying for jeans. I'm slightly concerned that they would look too grannyish as I don't have the necessary style knowledge - I am a grandmother and I'm not a fan of high fashion (on me that is) but I do like to give a nod to the current century! They would certainly fit better. Maybe skinny jeans that actually fitted my not-skinny legs would look okay; when I've tried on RTW, they look awful.

It might still be better to get trousers to fit well then go on to jeans later. I do have fabric for trousers but not jeans; I'm not sure if the best fabric to go for - should there be some stretch in it?

The weather held up and I got to the class last night. Since then, it has deteriorated. Unfortunately, as have I! Normally, I go to my weekly sewing class today but the combination of the roads, a nasty cough and the lack of a specific project made me decide to stay at home. I'll do this post and finish the waistband lining on the grey wool skirt I needed to modify - that's what I would have been doing in class. I had already deconstructed the skirt to take in the yoke, yoke lining, skirt and lining and last week I stitched them all up again but L, my tutor, suggested that handstitching the lining down would give a better finish than the stitch-in-the-ditch I did the first time around. I also have a couple of pairs of trousers to add faux hems to in order to lengthen. Hopefully, next week I'll start a specific project - though it's been very useful in January to catch up with some repairs.


I didn't take finished pictures of the green dress I was mending for my daughter. It was quite a puzzle.


In this picture, you can't quite see that the rear of the other strap is wide

This loop allowed the thin strap to be lengthened; the torn area was repaired with a patch from the flap. It really disintegrated when the stitching was unpicked.

This rear flap was completely removed

There's no change from the front.
 However, I deconstructed the dress and removed the extraneous and unwanted flap. There was quite a bit of unpicking as the whole area had been understitched too. Where the strap had previously been attached had disintegrated so I had to patch in a piece of fabric on the inside of the yoke, pulling in the remaining fabric to the correct size. - the flap supplied the fabric. Inside the layers, there was clear elastic but I decided not to replace this; I sewed it by machine to the inside layer.  I added to the length of the thin strap using the redundant loop. I decided to leave the strap external rather than sewing it into the yoke in case it needed adjusted. Most of the dress then had to be put together using hand sewing as I couldn't have stitches showing on the correct side only in my repaired part. Where I had stitched the elastic mimicked the understitching in the original. I then skip stitched the tattoo layers together. It was slightly tricky and when I was finished I was glad to post it off to my daughter post haste, which is why I don't have photos. She has told me she's very pleased with the dress; she likes it much better without the flap and says the strap fits perfectly. Job well done!


Anyway, last night's jeans class. A fellow student, Linda, and I were the only two to have completed to stage 4. We had both looked at the next stage and interpreted it differently. We were able to work out that I was correct in pinning wrong side of the pocket to wrong side - she had done right sides - but she was correct in the amount of fabric to be pinned. I had thought it was the whole pocket. She realised the front was taken up in the fly and the side in the side seam. The tutor, D, was busy with other students but was able to confirm our conclusions. It's quite satisfactory when you work something out yourself.

After that, it was fairly straightforward. Seamed wrong sides together, turned, pressed and seamed right sides together to make a French seam. Then the layers were stay stitched together.
1st stitch line


Preparing to stich 2nd stitch line

Layers pinned together ready for stay stitching

View of front before basting together

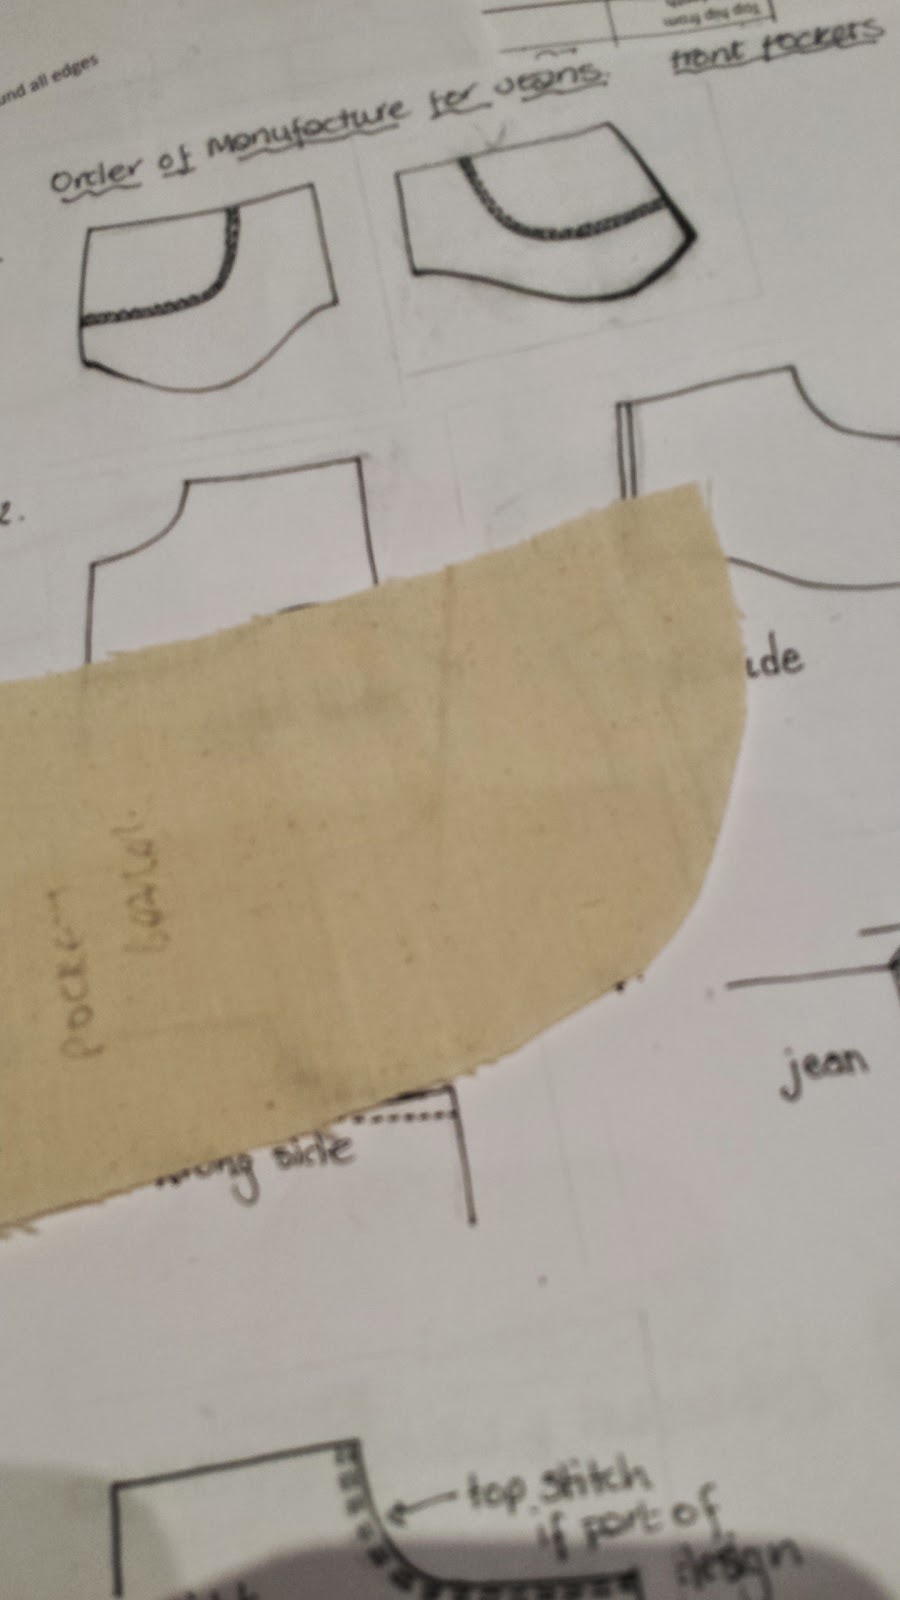
Then onto the back pockets. D showed us how to make a cardboard template of a pocket so that our two pockets would be identical. I chose a straightforward shape and used the tutor's sizes. We then drew onto calico, adding a 1cm seam allowance all around except at the top of the pocket where it was 2 cms. After cutting the pocket out, we pressed using the template for accuracy. We had a choice for the top of the pocket. The top would be turned over twice and stitched down. However, the choice was in what to do with the side seam. Linda and I both chose to turn in the side seams first so that our top hems would look smooth from the top.

Edges were folded and pressed over template
We were going to have to wait for the rest of the class to catch up. This gave Linda and me a chance to try some decorative stitching on the pocket. I don't like what I did. Fortunately it's just a practice piece. I couldn't see the mark of my white dressmaker pencil and hadn't wanted to risk a darker colour so kept it ultra simple. Linda found a pencil worked well and she could rub out the marks. We were both using regular thread. I know that the pocket stitching and topstitching will be done in thicker thread. I need to give some thought to the eventual design - I like the look of two parallel curvy scrolls. I don't have smartphone photos from class of my pocket stitching - will take photos next week when it's time to sew on to the jeans.

That's where the class ended. Our sample jeans had not been marked with pocket position. So next week, we will start with D showing us how to position the pockets.

It's already evening and I didn't get the skirt yoke started. That's the danger of staying at home - other things always seem to take priority, even when you're not feeling well!

Monday 26 January 2015

Dressmaking class - jeans making

First dressmaking techniques class of new term

This term is trouser making skills for 5 weeks then we can choose to make an item of our choice, not necessarily trousers, though my choice will be that (or should it be jeans now?)
Interestingly, we are actually making up a size 12 model, short legs to save fabric, in a jeans style.
On Wednesday, the first night of the term, after introductions, we had to pair up and cut out our pattern from heavy calico, and the pocket backs from lighter weight cotton.

It took quite a while to cut out all those pieces. Then we started to assemble the front pocket and pocket bearer - this was a new term for me.
Our tutor demonstrated
Step 1 - overlock curved edges of pocket bearer. Place on top of pocket bag 2mm edge stitch around all edges
Step 2 - seam scooped pocket edge only
Step 3 - grade pocket curved seam to 5mm
Srep 4 - 2mm edge stitch with seam towards pocket bag. Press. Edge stitch will keep pocket bag from rolling out  OR press and edge stitch.

This was as far as we got. I didn't manage to do these steps in class as I hadn't taken my machine with me. As it was near the end of class, I decided I would finish these steps at home. 

Which I did do. No problems as this was fairly straightforward but I can't see the whole thing. 

I decided not to topstitch the pocket front, though of course in the final jeans,  the pocket would usually have two parallel rows of topstitching. To be honest,  I looked at trying a fancy stitch but that didn't work out. I thought it'd find out in class next time the best way to do it. 

The next step is step 5 which is sewing the pocket bags together. There isn't a diagram for this (apparently it was so difficult to draw and make sense that it was abandoned) and while I have some idea of what to do, I don't know where to stop and start the stitching. On Wednesday,  we will be getting a demonstration. There is bad weather forecast for Wednesday onwards,  but hopefully I'll make it. 

On Saturday, we will be attending a funeral in Scotland provided the roads aren't too bad. DH didn't see much snow growing up because of the influence of the Gulf Stream but the roads between here and there can be bad. 


Friday 23 January 2015

Moral - check and double check, then check again!! Pattern drafting new term

Monday was the first class in the new term of pattern drafting - and we were doing a skirt. A skirt is the easiest thing to draft, so this term is skirt and then the sleeve for the bodice drafted last term.

This time, we weren't draping, but rather using measurements to draw up the block. My tutor wasn't using the Winifred Aldrich figures as she doesn't like them, but I'm sorry to say I didn't pick up whose we were using.
We had to take our waist and hip measurements plus hip depth (though that wasn't essential, apparently)  and work from there.

We first drew a horizontal line the width of the hips plus 1cm total for ease. That's not a lot of ease but ease is essential if we're going to be able to try this on. as little as is feasible to make a proper block.

Then, we divided front and back skirt - this was not an equal division as the side-seam-to-be was 1cm forward of the midline. Presumably, this is because most women are wider in the back skirt than the front. I certainly am, though my tummy is trying to get some words in!
We had to follow instructions given on a sheet. Some of the measurements e.g. hip depth (mine matched exactly), dart length, etc were standard measurements. This was a little worrying for me as I am far from standard! A few sizes bigger, a few inches taller - well, it's between friends isn't it?
So, I finished drawing my block, the next step being to transfer this onto  another piece of pattern paper so that we could add 1cm seam allowances and make up to test the fit.

I thought my darts looked rather bigger than the diagram we were given - though granted it was only a diagram. However, I surmised that I could measure the space between each dart to work out how much fabric would be available to go around my waist. You can, of course!
Out of focus photo of block in instructions. Too late to change. Too ill.
I did this and came up 10cms short!
My measuring co-conspirator checked all my measurements and calculations and agreed that I hadn't made a mistake. However, her darts looked like the diagram's darts.

We were near the end of the class by this time and my tutor suggested that as fit needed to be checked on the body, anyway, I just draw everything out as it was onto a new piece of pattern paper, separating out the front and the back. I started to do that, managing only one before the end of class. I'm sure we would have worked out the problem had we had a little longer. Maybe not though!
At home, I bemoaned the problem to my DH. I'm not sure what he said, but whatever it was suddenly made me see the light!!

I was 10 cm short.
My darts, other than the side waist shaping, which was standard, added up to 20cm.

I had accidentally doubled the size of each dart! How had I done that?  I had clearly misread a section - now that I know what it should have said, I can't understand how I could read it wrongly. I realise that the sentence for the front is spelled out fully, but not so the back (I obviously didn't read that properly, either!)
The sentence is:
Subtract a 1/4 of the waist measurement + 0.6cm tolerance from points 4 from 10
Example given
I.e. 4 from 10                                     = 22.8cm
1/4 of waist + 0.6 cm tolerance     =16.8cm
Difference                                          = 6.0 cm

Place a 1/2 of the difference either side of 13 and 14. (3cm)
My darts were substantially the same size as the examples, so I put 3cm on each side of each of dart tops 13 and 14. Wrong!! Of course, what I should have done was half the 6 cms to make 3cm (as in fact is given in the example) and put 1.5cm at each side of the dart ends. It seems obvious now!
If I take into account the extra 4cm that I created in the darts on the front, the whole 10cm is accounted for.
I have a stinking cold and my photos are quick snaps on my Smartphone - but why? oh why? can't I see them? They're there on the phone gallery but not on blogger. Grrr. I'm ready to post this brief blog but can't with no photos. The only photo that shows, even though I took more, is blurred. Well, I'll save as a draft and go to bed with a hot toddy - everything might look better in the morning!
Darts nearest are wrong, darts behind - I have marked in narrower darts and rubbed out outer markings
I have modified the basic drawing. See the difference between that and the original? Equals one far too tight skirt if I hadn't modified!

Can you see the difference?

Moral - check and double check, then check again!!


Sunday 18 January 2015

7 Steps to Style

As I have already posted, I set a number of goals and made some resolutions this year. So far I'm doing okay, but then we're only halfway through January!

I'm a RTW Faster


I resolved not to buy any ready to wear (RTW) clothes in 2015. This had a multi fold purpose
  • I have too many clothes already. My wardrobes are full. With weight gain and loss, I have wardrobes of different sizes. I do need to lose the weight I've put on in the last year, but I also need to alter or discard clothes which don't fit.
  • I actually find it impossible to buy well fitting clothes. I'm tall but even tall-specific outlets don't cater to the combination of my height, age, style choices etc.
  • If I find gaps, then I'm going to fill them with self made garments and therefore increase my skills. I'm continuing with my dressmaking and pattern cutting classes.
MAGAM and Pattern Review Forums

I signed up to MAGAM to encourage me to make one garment per month for myself. Again to help increase skills - and speed.  I'm very slow. I've also resolved to make garments with a plan, not just for the sake of it and apart from trousers, I haven't yet decided what the next item will be. So far this month, I've been dealing with UFOs.

I also joined two forums on PR, as also already blogged. One to encourage regular commitment to sewing and sewing related activity, of any kind and the other to encourage looking at our style. Like many, I started with organisation - of fabric, sewing books and then wardrobe. I'm still in the middle of that.

Through that forum, I began to read a lot of blogs suggested by others.  I particularly enjoy The Vivienne Files and Inside Out Style.

The Vivienne Files has a section, 'Starting from Scratch', where she recommends building a wardrobe starting with one pair of trousers and building up from there. This appealed to me as the biggest gap in my wardrobe is that well fitting, slim legged trouser. I'm going to have to make the trousers but fortunately this term, starting next week, my dressmaking class is covering trousers and trouser making techniques. I'm likely to have most of the items recommended from that point.

My reasons for starting to read these blogs

Many years ago I had my colours 'done' - I knew categories had changed and also knew that with increased age and grey hair I was finding that some colours which suited before didn't any more. I wondered if I had become a 'Winter' rather than a 'Summer'. I should say, I do feel I have a reasonable idea of what suits me.
 
I tried to insert some old photos that we had scanned into the computer, but Blogger wasn't having any of them, for some reason. Some from my own wedding and graduation and some from around the time I had my colours done just a few years later. So, instead, I've inserted a photo of me at my oldest daughter's wedding, with my other two daughters who were bridesmaids, and my mother. 2010
 
 
However, with colour change and maturing figure change, I began to feel fat, frumpy and dowdy. Also, with my difficulty in buying clothes, not everything fitted as well as I would have liked and some items were bought because they did fit but colour or style might not have been ideal. In addition, the change in my lifestyle brought about by retirement clearly had a significant impact on my garment needs. Physically, I have some problems and can no longer wear higher heels. This meant that some skirt lengths are now just 'wrong'. My hourglass figure was changing to something else with weight gain. So the time was ripe.
 
'7 Steps to Style' by Imogen Lamport

I signed up for '7 Steps to Style' by Imogen Lamport from Inside Out Style.  I thought I would briefly blog about each step as I went through it, as suggested by some others on the programme. There is a very active Facebook Group for this programme. I can't actually put photos on as that would infringe copyright etc, though in the next post I am willing to post my own pictures.


Step 1 - Personality

This step involved thinking about why you were doing this programme,  what you wanted to achieve,  how you are seen and how you would like to be seen and considered some of the clothes styles in various categories. I liked that there was no putting someone in a category box. It was perfectly permissible to have elements from a number of categories. Imogen also gave a number of examples and this was very helpful.

I've felt for a long time that the element missing in my wardrobe was 'smart casual' - not actually a category in 7 steps but this was very helpful in considering what I meant by that.

My main style was 'classic', my second element was 'elegant chic'. Interestingly, my husband identified a feminine element that I hadn't really considered and there was a relaxed element. In my style recipe, there was no real drama, rebellion or creativity, although I recognise that I was more inclined to the dramatic when younger.

I must admit that I was disappointed at first as I initially felt this was just confirming me, continuing me in the same direction I was in previously, with my clothes always a bit too formal, occasionally sophisticated, for my needs. In other words, a wardrobe that was too smart and not casual enough. However, the examples given show how I can move this to where I want to be. I'm definitely going to increase some of the casual elements and some of the elements from the other categories are not quite as formal as I previously thought - it appears you can be elegant yet relaxed and casual. I guess that's where I want to be.

Does my wardrobe meet my needs? That's a later step

Next step is body and face shape.
 

Tuesday 13 January 2015

Please help with fitting issues; large FBA needed


I made a blouse for my daughter for Christmas, without her having the opportunity to try it while under construction, and without the benefit of either accurate measurements or a muslin. See my earlier blog entry, on Christmas Day.


I saw this first blouse, version A, for her as hopefully a wearable muslin, so I didn't use the fabric she initially chose.
I  used size 12 based on upper bust measurement and made a FBA of about 4cms, hoping that this, in addition to the quoted 10cms ease, would allow enough room for her 32F/G bust.
This is the finished blouse on my model.


She was ill at Christmas so I didn't see her but she sent me a photo and comments:

 
My daughter initially said about blouse:
The blouse was slightly too short at sides - where curved hem slopes up.
Too low in neckline - would need to wear camisole or vest.
Liked blouse overall.

My initial conclusions
I thought that the blouse was too big (because she had room to wear a vest) and that I could perhaps make a size smaller and maybe raise the neck at front, as well as lengthen at sides. I hadn't seen the blouse other than in a photo she took while ill.

 
Update on blouse for daughter

However, I visited my daughter last weekend. She told me that her husband really likes the blouse and she was intending to wear it to an interview the next day. Even after my comments, this was still her intention though she said she'd wear a jacket.

I didn't have much time and no pins etc (my daughter doesn't, yet, sew) though she did have a tape measure, labelled centimetres on both sides.

Sewing is peculiar as there is a mix between centimetres and inches all over the place. Here we buy fabric in metres. We use a lot of American patterns in inches. European patterns are in cms. Although both have conversions. In the UK, we buy fuel for our cars in litres but our road signs are in miles and yards and fuel consumption is calculated as miles per gallon. I'm afraid that while I can use metric measurements and did when I was working - always having to convert to imperial for my patients, I actually think in imperial. I'm not sure how much sewing a seam allowance at 5/8" or 1.5cm makes the overall size different - 1.5cm and 5/8" are not direct equivalents. In my sewing classes we use metric. As it happens, I use 1.5cm seam allowances and try to use metric.

Anyway, I digress. I measured my daughter and took a note of all the sizes. Because I think in inches, I'm less likely to alter a measurement to what I think it 'should' be or to what I think sounds better! I therefore recommend a centimetre tape measure to those in the US! The sizes I used to sew her blouse were not very accurate as they had changed since I last measured her and her recent measurements were self taken which can't be accurate.

What about the blouse itself?
She tried on the blouse for me and there a couple of quickly snatched photos- having young children around isn't conducive to lengthy consultation!
It was too tight across the bust. She was wearing it with a camisole but there was little or no ease, certainly not the 10cms quoted in the design, though of course I knew that was going to be reduced by my probably smaller than required FBA. The diagonal lines are obvious.

The shoulder width was slightly too much, but probably not a big issue.


The blouse was also tight across the back, while wearing it with the camisole. Interestingly, my daughter didn't find it tight. And it doesn't really look tight in this photo - maybe it's all about the level of ease we like. It felt tight when I pulled it to see how much ease there was.


There was gaping at the neckline.  What she meant by too low, is that as she bent forwards, everything under the blouse would be visible.

 
 The darts were not pointing to the correct place.  The vertical darts were a good 5 cms (2") out from where they should have been and were too long. The bust dart was slightly too high.


What I think I have to modify to get it to fit (will make a new blouse):
  • The key thing is to do a bigger bust adjustment, I think. Unfortunately, the dart was already very big so I wonder if this means that an additional dart is required? Or am I better to change styles and go for Princess seams?
  • In addition, the dart placements and length need altered. I need to move in vertical waist darts and shorten by about 1.5cm (5/8"). I need to drop bust dart by about 1cm but don't know what I need to do about length as bust point is further over.
  • If the bust fullness is altered to be in the correct place, does this mean I will need less increase in bust fullness than it seems at the moment? There was distinct bagginess at the dart tips - I'm not sure how much this was due to faulty technique.
  • If the bust fullness is in the right place, then presumably the blouse would sit down better? Would this reduce the gapiness of the neckline or would it still need altered? The two alterations I'm thinking of are either putting in a gap dart and/or raising neckline slightly.
  • I don't think I should do a size smaller even though shoulder is marginally too wide. If I did, sleeve would also need lengthened. Open to advice.
  • The back is too tight - do I need to do a wide back adjustment?  If I did, which pieces would that affect - just collar?
  • Obviously, at the moment the bust is not sitting in the area created for it so that means the whole thing is rather tight and, I'm assuming, cannot sit down properly.
 Questions for you
  • I will alter the tissue pattern. Is this the best route to go or start with a completely new pattern? Say a Princess seamed top?
  • This size? Or size smaller?
  • Is there a best order to do the adjustments?
This time around, I will make a muslin/toile. There is no hurry. I'm just keen to get it right.

When I finally get around to making up again, I'm planning to use a slightly crisper shirting rather than this soft medium weight cotton
  • I'm determined that my inside finish will be lovely,  so I'm considering French seams or lapped seams - which of these would be better or is there a better technique I haven't considered?
     
I would very much welcome your opinion. Thank you.

Wednesday 7 January 2015

The best laid schemes...

I was at a funeral today. An old golfing friend and her husband, both in their 80s, died within a couple of days of each other and this was their double funeral. I haven't been to many funerals. The last I went to was my father's 18 months ago.

Fortunately, I looked out my clothes the night before the funeral. I decided to wear a dark plum suit which I have always liked. Unfortunately, the skirt was way too tight - a reminder of all the weight I have put on. I also didn't have a suitable top to wear with it. I looked through my wardrobe - I used to have a top with lilacs and plum in it which went well but that was thrown out on a previous wardrobe overhaul as it really didn't fit or flatter. I finally found a solid 'flesh' top which toned nicely while still being suitable for a funeral - but no matter, I couldn't wear it because of the skirt

I thought I had discarded the suit I wore to my father's funeral, but in fact I still had it. The reason I thought I had discarded it is that I had felt the jacket was too 'neat' ie bordering on tight and not comfortable. I've always liked this kind of fabric - a soft almost velour like material - I'm really not sure what it's called. The plum suit is the same material and I have a couple of jackets in the same. I really like it. It also seems to wear well - I've had these forever - and doesn't crush readily.

So I wore the suit, a 'soft' suit. This is what I looked like: I've tried to lighten to show more detail but black's not easy.


The jacket is too tight in the sleeves, and when the jacket is buttoned, there are obvious and unpleasant oblique folds. I know that these are saying I need more bust room. It's far too tight. I can't stretch forward without feeling I'm going to burst out. You can't see anything in the photos even though I tried to lighten the picture to show. The jacket is more comfortable when not buttoned, but you can see there is a substantial gap between the two edges when the suit is relaxed. My bust cup is at its fullest at present, probably, but this has clearly always been an issue. I take a D cup. Also the shoulders are perhaps rather 70s/80s.

 The skirt, I quite like. I've tended to wear my skirts shorter and more close fitting, which I think is more flattering, though. This skirt is comfortable - it actually has an elasticated waistband which is not at all noticeable until you come to put it on - I was looking for a zip. The length is quite awkward - I never know what type of shoe to wear with it. Perhaps a boot would have been appropriate. I can't manage heels of any height nowadays.
A detail I like on both the jacket and the skirt is the series of 3 pintucks across the skirt above the hem. Again, I was unable to show these on the photo. These are mirrored in the jacket.

This 'suit' was bought as separates. I remember there was also a pair of trousers but these were no use for me as they were way too short and there was no fabric to allow any lengthening.


I have been looking at the 'Vivienne Files' Starting from Scratch. Ideally with that, I start with a pair of trousers - probably grey, possibly navy. These cannot be finished for another couple of months as I will keep to the pace of my class - next term is trousers. I have suitable fabric, both wool and other.

I have navy wool, black wool and grey wool plus a black, grey and white plaid and another plaid with the same tones but some blue through it. They're still packed away so I can't photograph but the black, navy and grey are absolutely plain. Eventually, I would like to have a pair of trousers, a jacket and a skirt , at least one of each, that I can mix and match and that I can wear with other items. I have a work suit jacket in the wardrobe, which is a grey stripe, and might have fitted in but I don't think so - I cringed when I saw it again. I don't think I could wear it; it has a very unflattering fit. It's a typical men's suit like jacket. I don't feel it really goes with anything other than the trousers it was bought with (and the trousers don't fit properly, either). The fabric looks 'cheap'.

So, I reckon I need to push up a jacket in my sewing priorities. I'm not sure what to do, though - and would appreciate your advice. My husband thought I looked 'fine' by the way and felt that any tightness would be taken care of by the weight loss that is so desperately needed. Again, I'm not so sure. I don't believe the black jacket ever fitted properly. I remember trying it on with other things and always discarding. That's probably why it's lasted so long.
Any way, I have a few patterns to consider.
Simplicity 1542.


This is the most recent of the three. I have made the skirt a few times for DD2. I like view A, which has an overall silhouette similar to the black jacket I wore today. I wouldn't add the buttons. The skirt is an easy make, but the length here is too short by far for me and I'm not sure if a longer, knee length or longer, skirt would have the correct proportion. View C would also be a possibility. Definitely not B. I'm not a ruffly, frilly person.
Vogue 7668

Very Easy Very Vogue. This pattern isn't listed on Pattern Review etc - another pattern has the same number. I like this. The jacket cannot be made in a plaid or check. I had considered a plain dress maybe in grey and a checked jacket plus maybe a black or darker grey skirt. I don't have any patterned wool fabric other than the checks at present, though I could buy some. This is for lighter weight wool than I have, perhaps, too.

 McCall's 5761

Again, not listed on PR which has another pattern usurping its place. The jacket has a nice simplicity about it, but is 'not suitable for large checks, stripes or plaids'. There is no line drawing. I'm not sure how big a large check is. The skirt, of course, is too short at this length. Again, would the silhouette and proportion work if I lengthened this - or more likely used a different pattern
Are these last two too 80s?

Another possibility is a Chanel type jacket with straight skirt. I have Vogue 7975, but it's in the wrong size for me.
 
I also have various 'blazer' patterns
I'd like help in considering what to do. The trousers have to wait. The jacket needs to be fairly simple, though I have a couple of Craftsy jacket classes

If another funeral came up, I could still wear today's black outfit - and in a few months I should be able to fit back into the plum suit. So I don't need to create a 'funeral outfit'. I want a set of clothes that will work much harder than attending the occasional funeral.
So - HELP! Do you have any advice for me?

My heading today is of course the start of a line from our national poet, Rabbie Burns - and Burns' Night is coming up now very soon. The poem is 'To a Mouse' and the penultimate verse ends:
...
The best laid schemes o' Mice an' Men,
Gang aft agley,
An' lea'e us nought but grief an' pain,
For promis'd joy!
Today, one of my plans took a step forward, however.  I found the mill which previously wove the tartan for my husband's kilt - and it's still in existence and still weaving! And is pretty busy, too. Apparently , each mill has the 'rights' to weave only certain tartans - there is very complex ownership. As this mill previously wove our tartan (in the ancient, hunting version) - probably for the first and certainly for the last time in 2004 - it is able to do so again. There was a choice of 10oz, 13 oz or 16 oz fabric - we already have the latter. As we had to order a minimum quantity of 24 metres (!!), I had to consider carefully which weight would be best. Eventually, and after discussing with the helpful mill manager, I chose to order the medium weight. The tartan will take 12 weeks, so my daughter might have her skirt for Burns Night 2016! She's really excited. My husband pointed out to her that we will become the world repository for this tartan!

How Do You Read Blogs?

It's a while since I've posted a blog,  lots of reasons. I'm thinking of starting again. However,  I used to read the blogs I fo...