The pressure of the wedding sewing is starting to get to me. To be honest, it's more the pattern making than the thought of the construction. I'd be more than happy to take a pattern and make it up. No decisions. No problems. Certainly no designing. I don't mind the minor alterations required - not even FBAs!
I've been struggling with the design of the bridesmaids’ dresses. We have an inspiration photo, which I can't show here, but it has a pretty open back. That itself causes issues as there just isn't the fabric available to provide support so the open parts gape.
Worse, the girls were keen to have a boat neck at the front.
Boat neck plus open back = disaster! There is just no support available and the shoulders fall off the sides.
I have Suzy Furrer's classes and her book, 'Building Patterns, The Architecture of Women’s Clothing', which I like and use. I carefully watched her video on how to create a boat neck and carried out the steps on my pattern. The video was more detailed and I have included a photo of my pattern alterations on one of the patterns (Joanne's). The diagrams below are from the book, not specifically about boat necks, though the video section was.
 |
| Showing front neckline |

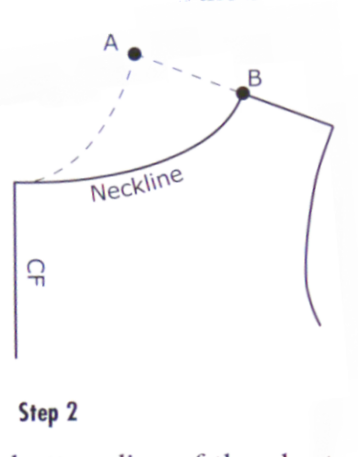

At Christmas, I had the first basic toiles and a front boat neck version for the two bridesmaids to try; the back was a standard back. Reasonably successful and I marked the changes required.
I attend a Sewing Bee with Dan and she is helping me think about the dresses now, for which I'm extremely grateful as I was really struggling.
Joanne, my middle daughter, visited last week. I was able to take her briefly to the class and Dan fitted the toile. There were a number of issues related to the boat neck and the open back, which I had now created for Joanne’s visit. Helpfully, Dan pointed out that the bodice was too long - it looked much better when pinned shorter. I thought I knew where I was going.
I had made a sleeve but found it took full and puffed and we didn’t like it. This was a sleeve from a pattern I'd made previously - Simplicity 1418 - which I thought would have worked. It didn’t. So Dan also went through how to create two types of cap sleeves and roughly pinned one on one side, using the sleeve I had created. The other side was sleeveless and finished. I rather liked the sleeve she pinned and so decided to make a ‘proper’ version later - I haven’t got around to this as yet! Dan says that a cap sleeve can be added later, so I don’t need to worry about that at the moment, particularly as we’re thinking sleeveless at present. That could change! So many things have changed already.
 |
| We originally preferred the sleeve on the left |
I have some photos of the toile, which I'm not publishing. As Joanne has returned south, that's what I have to work with.
As I can’t show any photos, I'm including the step diagrams instead.
Alison, my oldest daughter, visited over the weekend (nice to see my grandsons). As I've been pretty ill, I hadn't had a chance to make the alterations to the toile she tried at Christmas. I did some quick pinning and hacking when she retried it! We identified some serious flaws and I realised I’d have to completely redraw the pattern
I also read about how to contour for a low back in Suzy Furrer's book and while Alison was attending a function on Saturday, redrew the pattern and made up a new toile. I quote here from Suzy Furrer and show her diagrams:
“If the back neckline depth is level with or lower than the base of the armhole an adjustment needs to be made to the back bust ease. If the back neckline depth is level with the depth of the armhole, bring the back underarm/bust seam in 3/8". If the neckline is midway between the armhole and the waist, bring the back underarm/bust seam in 5/8". If the neckline depth is at the waist, bring the back underarm/bust seam in 7/8".
This adjustment will prevent the back from gaping and wrinkling. The more skin exposed, the tighter the garment should be. This is a negative ease situation. This adjustment is only done to the back, not the front. The adjustment is in addition to the 1/4" taken off the sloper to reduce ease at the bust.”

In addition, I decided to follow instructions on how to make a cut on cap sleeve using Tanya Whelan’s book Sew Many Dresses sew little time; the ultimate dressmaking guide. I haven’t used this book as yet but have read through and it seems interesting but I can’t review it as yet. I have other sewing instructional books but wanted to use this one as it is modern and I thought more suitable for these dresses! The all in one cap sleeve was a suggestion from Alison who likes this type of sleeve. It didn’t work - my fault entirely. Perhaps the problem here was that the sleeve pattern I used wasn't one of the ones in the book (the book comes with patterns). I used the sleeve pattern from my original block for Alison - worse, I hadn’t altered the sleeve pattern in line with the bodice alterations - the armscye had been altered because of the contouring required. Anyway, the back part of the sleeve looked okay, just like the diagram. I wasn't at all sure about the front as it didn't look at all as per photo in the book, no matter how hard I tried. I sewed it up. The armhole was so tiny that Alison said even if she lost so much weight that she became skeletal it still wouldn't fit!


 |
| This is where I went wrong! The back was fine but the front awful. |

I’m including the diagrams from the book to show the process. I haven’t included the actual instructions - you know that this isn't intended as any kind of tutorial (perish the thought!) but rather to make up for my lack of photos! The one instruction I realise that I didn't follow as I didn't fully understand the way it was written was to make the top of the sleeve front match the back front. Mine didn't.
 |
| Looking from the front. front/back shoulder seam along the top. Additional fabric inserted measures nearly 2" at sleeve edge |
I wasn't happy at all with the toile fit. I have a number of photos - though it turned out I didn't have all the necessary photos - no photo of how the side seams lay.
I sent a lot of photos to Helen. I indicated the problems I was having and suggested changes - largely providing more fabric and therefore more support. I think I anticipated some objection to my suggested changes. That didn't happen.
I came to some decisions and can’t afford to change direction now. I have to get on with it! No more procrastinating by writing blog posts!!
Last night, I went to Dan’s sewing bee. Of course, no Alison but I was able to take the photos.
I was keen to get advice on how to deal with the problems. Interestingly, once again the bodice waistline was a bit low - I seem to have difficulty working out where the waistline should be.
The shoulders were falling off the shoulder line and I thought this was entirely due to lack of support - however, Dan showed me that the shoulder was too wide in the first place. She also recommended a change in the design lines.
We also discussed how to construct the facings and generally make up the dress.
So, I'm going back to the original toile - it was too difficult to start to work with a partly altered one. I got confused almost instantly. Despite having to remake all the alterations made previously, it's worth it. So - alter shoulder width, alter neck width, add fabric to back, shorten bodice, modify design lines. Make facings. Quite a number of changes!
After the class, I had a telephone discussion with Helen and I feel a lot happier - not despondent about going back to the original block. I'm visiting the girls in 3 weeks or so and hope to have a full working toile in an appropriate fabric made up by then. I have 3 sewing bees with Dan between now and then for any further advice I need.
On another note, Helen told me that she successfully wore the tartan pleated skirt I made just before Christmas to a Burns Supper. Final blog post with photos here
 |
| Naturally she wasn't wearing her Christmas hat and slipper socks! |
Okay - quick sewing room tidy (I have been working on it, honest!) then I need to get things ready for golf tomorrow - I'm feeling better enough to try a few holes, I hope (and maybe a few on Saturday if I survive!) - then a teams bridge match at my house tomorrow afternoon. I'm back at college on Thursday evening but hopefully might get some sewing done on Friday - unless we go to Bowes Museum to see a couple of exhibitions there - we postponed from a couple of weeks ago as I was ill. This weekend can be sewing, certainly


Good luck with your patterning. Sounds like you are making great progress on designing the dresses. You might consider nude tone stretch mesh to support the open backed version. It will prevent the shoulders from falling off, needs no edge finish and will be virtually invisible. Nice to hear you are back to golf. My game is rained/thunder stormed out today.
ReplyDeleteThank you, Mary. The next few days should tell. I need to buy some Illusion tulle (is that what you mean here?) and experiment with it. My first attempt using a similar type fabric was not good!
DeleteI ended up not playing golf today, just pressures of time (we lost the bridge teams match by a lot) which was sad, but hope to play a few holes on Saturday unless we're blown off the course. Wind++ and rain forecast. If I don't get to golf, I'll have a coffee there and then sew instead.
Bridal illusion or tulle doesn't have enough stretch. You need sheer mesh fabric with Lycra It needs to be cut smaller than the body so that its snug and holds everything in place when worn.
DeleteThank you. I'll have a look out for that.
DeleteGoodness. I don't know how you have kept it all together. It sounds exhausting! Have you long to go until the wedding?
ReplyDeleteThank you. I'm not sure how well I am keeping it together! The wedding is on 4 June. That now seems far too close for comfort.
DeleteI'm glad you are on the road to recovery again. And what a stressful time you are having, learning to make these dresses. I am sure you will pull it off with Dan's help, but it is going to be quite a learning experience.
ReplyDeleteThank you, Sarah Liz. A little health blip again but the road to recovery doesn't run smoothly. As soon as I'm clear of coughs and colds I can try another medication. As you know, they affect immune system.
DeleteIt's certainly a steep learning curve. Fingers crossed that I will get there! Without too many bad dreams!
Glad you are feeling better, but you have taken on so much work here. I make my own patterns but a) for me, and b) one at a time. I like the freedom, but there is something so nice about following a commercial pattern. I find the mental challenge of designing and making quite hard actually.
ReplyDeleteI really appreciate all the information you are giving and I, for one, am learning a great deal.
The challenge is hard mentally and physically; it's perhaps no coincidence that my joints flared up when they did. I would rather have been following a commercial pattern. On the plus side, I am keeping my mind alert, will produce exactly what the girls want, am getting help and hopefully will feel a great sense of achievement. And in the process I am learning a lot which will help me improve my skills.
Delete