 |
| Book cushions and notebook covers together |
Immediately after the YouTube video I watched to find out how to
make a book cushion (see previous post and photo above) was another which gave instructions to
make an embroidered notebook cover with a zipped pocket on the front. I decided
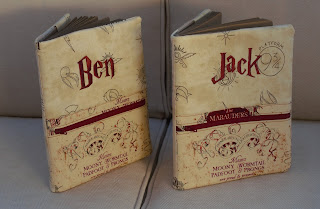
to make a couple of covered notebooks using the leftover Harry Potter fabric.
First, I had the problem of finding notebooks of the right size… In the UK we
use A4, A5 and A6 sizes but I required different from what was widely
available. While I saw the right size and type online, they were expensive as they had to be imported. Eventually I managed to buy a
drawing pad (? - it has plain brown pages) of the right size and a lined
notebook of almost the right size (a quarter of an inch taller but I felt that
was manageable). In the end, I didn't use the lined notepads, only the brown
drawing pad which looks a great colour inside the notebook covers.
 |
| I really like the lined zipped pocket - I'm going to do one for myself (not Harry Potter themed, though!) |
 |
| I think the colour of the zips and the font look great with the fabric - and a very suitable Harry Potter colour |
So I now had all
the materials (fabric, fusible fleece, lining, zip) and decided to make these
at sewing bee in my first visit for quite a while. I'd drawn out the right
sizes for my cutting out onto dot and cross paper.
I was able to construct the notebook covers as instructed on the video. First steps include the zip, the pocket, joining front to back and covering everything with fusible fleece. No problems, though I had to make a trip to get fusible fleece. I do have some but couldn’t find it. Sadly that statement says a lot about my organisation and points to what I need to do in the New Year once I’m properly mobile.
At this stage on the video, the embroidery is done. As with the book cushion, I wasn’t using plain fabric but the less patterned Harry Potter fabric. I’m a novice with machine embroidery and was concerned about placing their names (again using the Harry Potter font) in the right place as I wasn’t going to be able to hoop the fabric. However, I went ahead, using spray adhesive on the tearaway stabilizer and pinned the fabric on top to the stabilizer at the edges of the hoop as advised. I had marked the fabric I was sewing with a pressure line rather than pencil etc to ensure my embroidery would be straight. I’m glad to say that it worked out well.
After that, it was straightforward. I placed the book-cover
sleeves on the face of the fabric, sandwiching them between the fabric and
lining. I sewed around 3 sides then turned the fabric through with the sleeve
on the front of the book properly positioned. The sleeve on the back of the
fabric was left not turned to the other side. The remaining open edge was then sewn,
and the sleeve turned through to the correct position. I thought this part was
rather clever as there is no hand sewing and no external sewing - everything is
inside the back pocket. This was really a bit of magic as far as I was
concerned! A bit of pressing and then I put the notebooks I had purchased in.
This bit was slightly tricky, and I thought that I had made the covers too small,
but I managed.
Although I had
carefully cut all my pieces to the correct size, I do think that a) fusing the
fleece and b) adding the embroidery ‘shrank’ the main fabric - I found I had to
trim a bit off the sleeves. My edges weren’t level with each other as they
should have been and this has led to a bit of inaccuracy in my sewing. I don’t
think my grandsons will be examining my stitching in that detail, though!
 |
| I like the brown notebooks with the colour of the fabric cover |


Lucky boys! Stunning gifts!
ReplyDeleteThanks, Marianne
Delete