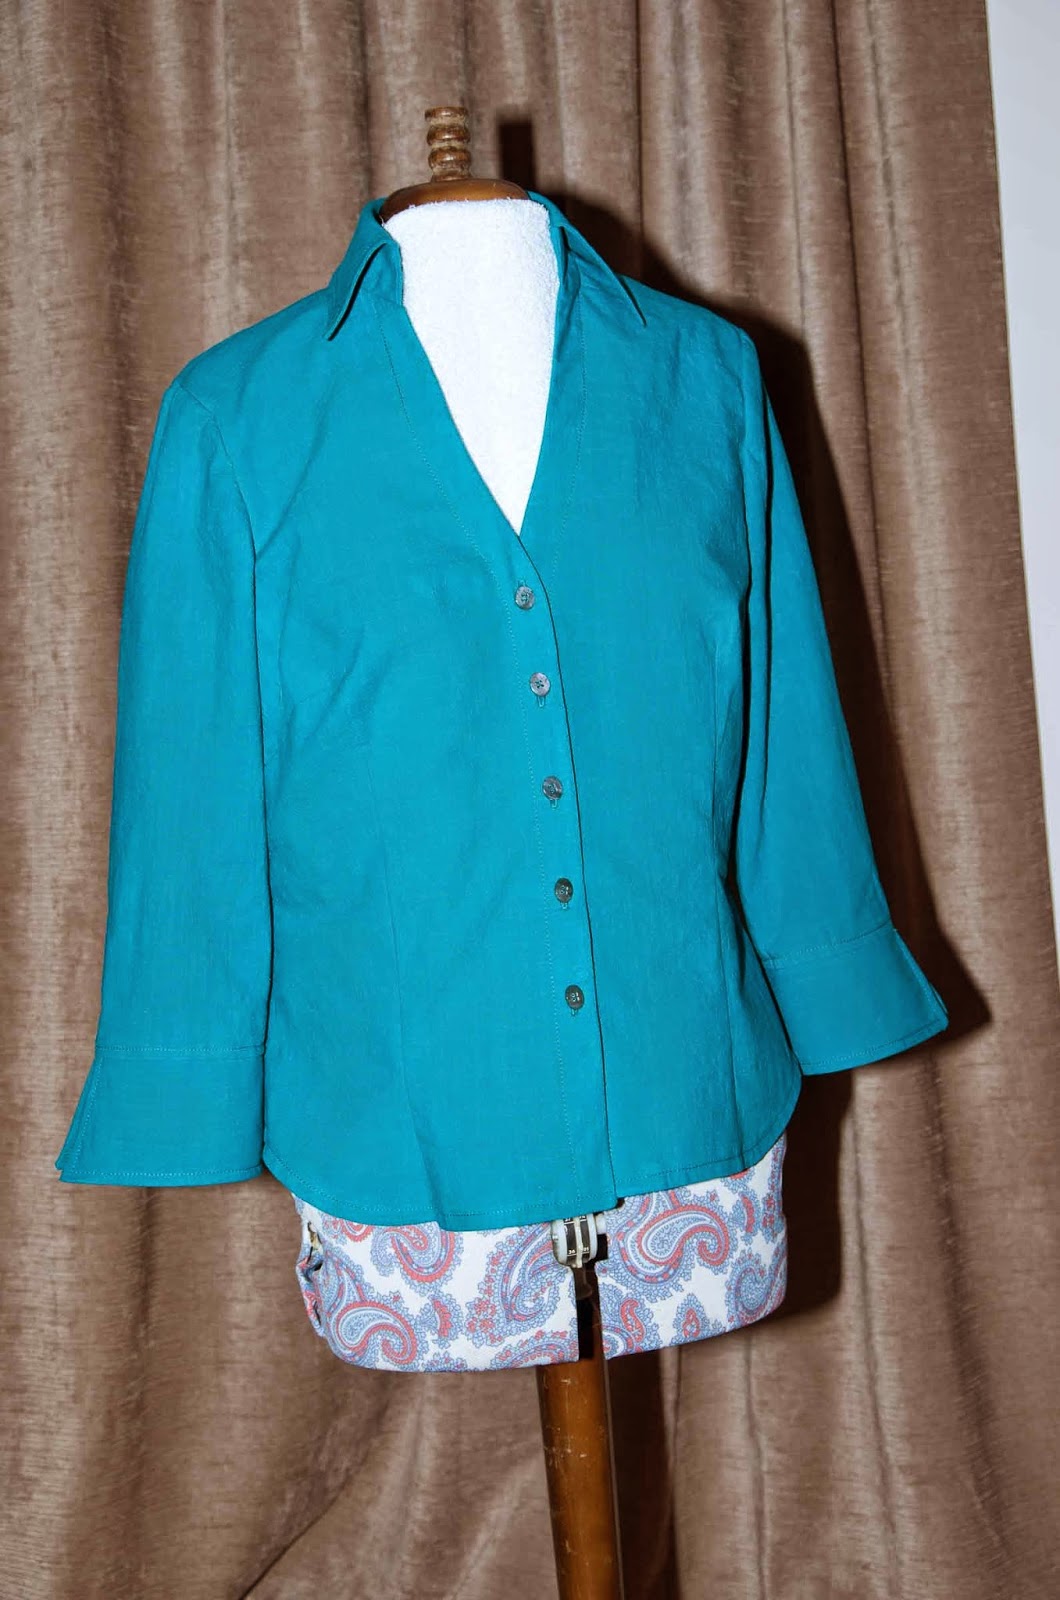
I'm making a blouse. This was on my plans earlier in the year: I wanted to make a garment using excellent technique in the last term of the year and Lyn, my sewing tutor, suggested a blouse.
Then, I decided to enter the PR competition for beginners. One of the criteria is that you have you use a technique that's new for you. I originally thought I'd use French seams but on the discussion board it was suggested that was usually for finer material; I'm using medium weight cotton. In addition, there was discussion about the need for seam finishes, at all. There was a reminder that seams are utilitarian things and that many finishes add unnecessary bulk, when usually the inside of a garment like this isn't seen. I thought about it.
I then thought about felling the seams as per men's wear. Some other contributors dislike this type of seam finish. It's not usually found in a women's blouse. I was a bit concerned about how it would look on the outside in a blouse, rather than a shirt, and how easy or difficult it would be to do over bust dart ends. I wasn't sure I'd like the extra line of stitching on the outside.
In the end, I decided I would plain seam and finish the allowances using my overlocker. The fabric is cotton and frays so I feel it does need a seam finish. Overlocking may be commonplace in RTW but that won't deter me (I haven't yet achieved the standard of cheaper end RTW, after all) and I think this is the finish I'll use. I'll use for the seam finishing, not to construct my seams, though - I prefer my sewing machine for that. I'll press the seams open.
I decided my 'new to me technique' would be to insert piping in the seam between bodice and facing and between sleeve and cuff. I've received lots of very helpful advice via the competition discussion board. I think PR is a wonderful resource with very helpful sewers willing to advise.


I've made this particular blouse before - for my oldest daughter. She wasn't around when I was making it, as she lives nearly 250 miles from me, so there was no opportunity to fit it properly. I did try to make adjustments - mainly for her large bra cup size in a slight frame. I've posted about it previously; suffice it to say when I saw it in her I wasn't happy - well with anything, really. There was insufficient room for her bust, waist dart position was in the wrong place by quite a bit etc.
I thought these were probably fairly simple fit issues - is there ever such a thing?
I struggled with the collar; I followed the instructions to the letter, I believe. The finish outside was acceptable but I thought it was very messy inside. I need to check out various collar tutorials. I need to achieve a better collar finish.
Initial changes on pattern:
I lowered bust dart as my apex was quite a bit lower. I did this by adding 2" to the length between the armhole and the bust dart.
I had to do this front and back.
In retrospect, while I needed the extra overall length, I needed less than half that at that position. Had I made a smaller change in the first place, I think my subsequent changes would have been easier. My final apex position isn't much lower than the original as I had to raise it again. I also had to raise the waist position in front and more on the back.
First Toile:
The whole thing was too tight and I took out all the vertical darts, which felt much better but was much less shapely of course. DH felt that shaping was required and pinned some smaller and longer darts for me. He recognised some problems but wasn't sure what to do about them.
My husband very much disliked the bust darts - he felt they started much too low at the side. Indeed, they were almost like French darts, except they're attractive and intended and these weren't.

Second toile:
I asked Lyn at class to look at my first muslin/toile (I suppose really to check that DH was making reasonable changes!) but I forgot to take it to class. I did have the pattern (I hadn't transferred the changed info to it) so I made up a new muslin incorporating the changes to the dart lengths as far as I could remember, or could work out, and I rotated the bust dart so it was less vertical.
I have a sway back or at least my back length is relatively short for a tall person like me, though longer than the norm, together with a rather large derriere, so my waist darts had to be altered. The area of maximum dart intake had to be raised (equivalent to shortening bodice but no waist seam here). In addition, the darts were too far lateral and had to be brought in by over an inch - plus, they had to be extended quite a bit up towards my shoulder blades (3 - 4"), and shortened so they stopped short of the hem. DH hasn't moved lateral position but had worked out the rest.
In addition to my previous changes, Lyn suggested adding an additional seam allowance ie 1.5cm/⅝" to the sides as it was rather tight. Lyn could see what my husband disliked about the bust darts and suggested moving the dart even more towards the horizontal. Further, I thought I needed a bit extra room in the bust area and deepened the dart slightly at the same time. Unfortunately, I forgot to add that extra length to the side seam - I only noticed when stitching toile number 3. It wasn't a full FBA, but maybe I'd have been better doing that! Or I've just read Louise Cutting's cheat FBA and if I'd read that before doing my changes, I think this could have worked well.
I had also set in sleeve version 2 (number 1 was far too tight) and this one was a good bit wider over the biceps - I added 1.5cm/⅝" to each side, but didn't alter the sleeve head. I had severe restriction moving arms forward and we decided that the back armhole was too wide. Taking a fraction off improved that. I wasn't sure if I should add what I'd taken off the bodice to the sleeve but at the time Lynn suggesting waiting to see how it turned out when made up.

Third toile:
So, at home, I stitched up toile number 3 with one side of the 'band' attached to each front bodice to get a better idea of finished fit.
I detested the fabric I used, which I bought cheaply for toile making. It moved and squirmed and the needles didn't like it one bit, as they made a crunching noise when going through it (I think it's polyester and quite silky) and there are a number of snags in the fabric from the seam stitching. Not worth it - I prefer to pay more for a better quality fabric. I reckon it has probably destroyed my needle after just a few seams.


What I found:
There was now enough overall width at the hip.
I still didn't think there was enough space for my bust.
I couldn't see the back but thought it was probably okay.
The back side seams were longer than the front. I checked the pattern just to make sure it wasn't due to slippery cutting but it was there too - I forgot to lengthen by the amount I'd increased the bust dart. So I realised I needed to lengthen the front.
There was some gaping in the front armholes - I thought this might be an indication of a need for more FBA. The fold formed at the a armscye was pointing right to my apex. This confirmed what I was thinking.
The front vertical darts seemed much too far out. This, I think, was now more obvious because of the addition of the 'band'. I looked at the instructions again, because what was labelled 'centre front ' didn't seem to be central. I had been thinking 'band' but actually it's not - it's a facing which turns under. (I had forgotten) So in fact, turning it under, and stitching where centre front would be made the bust darts lie in a better position, but then it seemed tighter across the bust and lower hips.
On Thursday past at class I asked Lyn to look at the fit again. This is allowed, as far as I understand, just so long as she doesn't do any of the work, which she won't do, of course.
I had already decided that I needed more bust space so had made a Full Bust Adjustment to the pattern at home the night before and moved the waist darts slightly. I took the opportunity to raise the pattern bust apex as I thought it was now too low. When I drew up the pattern, I took the opportunity to ensure that the front length matched the back length at the side. However, I got Lyn to look at the muslin I had made before that correction. At first she thought the changes I had made worked well, despite me having said about the FBA but as I moved she agreed it looked tight. I went ahead and cut out a new front piece with the FBA and sewed this in place. One advantage of the FBA was that it gave just a little extra space at the hips.


Toile 3.5
So I then cut out a new front piece (muslin three and a half!) and attached that. Then I sewed on the facing.
Lyn agreed it looked much better.
Only two more changes were made at this point
Further shorten bust dart by a half inch
I wanted to raise neckline slightly - by 1 inch.
These changes have all been transferred to the pattern. I also cut out a new facing piece.
Then I set in the sleeve piece from the previous muslin. Reaching forward showed it was too tight, still. I needed to add extra to the sleeve rather than the bodice, and have now done so. I've decided that enough is enough as far as the muslins are concerned and next I'll do in fashion fabric. I think, though, that I'll add extra across the whole of the sleeve head. It's easier to cut back than add.
The pattern was by this time such a mess that I transferred everything over to pattern cross and dot paper. I found that I'd forgotten my tracing/ carbon paper and borrowed some from another student. Not all tracing paper is created equal! I used my tracing wheel and the tracing paper to transfer all markings but had great difficulty reading the marks which were in pale yellow.
 |
| New tracing of front bodice, with new facing piece attached. |


I was going to make bias binding (something else I've never done) and enclose fine cord - in other words, make my own piping. I was torn between a darker pink cotton polyester fabric and a striped seersucker type fabric with stretch, both from my stash. My decision was made for me - I couldn't buy fine enough cord for my own piping as everything I found it was for cushions, but the fabric store had ready made piping in dark pink. So that's what I'm going to use.
 |
| Pink cotton linen look fabric with dark pink small piping |
 |
| It's a bit out of focus, but here's my inspiration for the contrast colours. |
I have a fair bit of practice to do, but first things first.
Next, I will make up in my pink cotton. Ideally, I will cut this out at home as I can use my rotary cutter and mat , which I find so much easier than shears. I'm not sure I'll manage to do much more than cut out, though. We'll see.
I'm pretty busy at the moment with county vets' golf committee related work. Last week was the silver championship over three days but dreadful rain and flooding closed the course we were using on day one, resulting in lots of extra work and an extra day had to be added. The championship was successfully concluded just before another bout of dreadful rain. The extra day caused difficulty with those qualifying from day one due to other commitments - our captain had to postpone her ferry taking her on a cycling trip to Holland for an extra 24 hours, not so good when she was just going for a long weekend.
Tomorrow is the bronze championship, in which I'm playing as well as having committee duties. It's only over one day, though. Fingers crossed, as last year it was washed out and had to be rearranged a few weeks later. This is more difficult than it sounds especially when the field is in excess of a hundred.
I'll have to leave early to get to my evening class. (Unless I'm likely to win a prize of course!) Tomorrow we'll find out if the garment construction techniques class is going ahead in an acceptable fashion. I suspect not, as the room had already been modified to seat 20 and only one tutor is involved. Decision time approaches!


Anne, I really like the darker pink (fuschia) for your piping. This is going to look great. Piping always adds a touch of sophistication I think. You probably already know this, but sew the piping on first at 3/8, and then sew the seam at 5/8. It will keep everything tidy.
ReplyDeleteThank you for your kind comment and your advice. I know a lot about inserting piping in theory but zero in practice! Practice, of course, is what I need before I try this on the actual blouse.
DeleteNot only keeps things tidy but helps to eliminate piping puckers.
DeleteThank you
DeleteWhat a lot of work for one blouse - sometimes it goes like that, especially at the beginning.Over time you will learn your body and alterations become a little more automatic after that.
ReplyDeleteI do think earlier incorrect changes contributed to this. I've a better idea now than I did previously but I so long to create a TNT. Thank you.
DeleteI made this blouse quite some time ago straight out of the pattern and never worn it because the front neckline was too low for comfort. Seeing everything you went though to make yours fit properly, I'm going to give it another try and pay much more attention to fit.
ReplyDeleteI hope I've raised the front neckline enough - I think an inch should be about right. My daughter wears a camisole with hers. Good luck with a further attempt. I'll be able to give an idea of how mine works out in the next couple of weeks. Thanks.
Deletejings you have the patience of Job.....love the fabric - we have pink snow too....our drive is lined with cherry trees....blossom is flying in today's wind....
ReplyDeleteI have 3 lots of fabric lined up for blouses...a vogue blouse and I hope to goodness I don't have all that to go through beforehand! Will 'practice' on poly/cotton gingham and then hopefully be all set for a white dobby lawn...time will tell.
Hope your golfing goes well.
No, I don't have that much patience and am pretty near the end of mine! Fortunately, I think I'm ready to go onto the next stage. There's no way you should have to go through the same - I made work for myself! Good luck with your blouses.
DeleteThe golf went well today, thank you, though it was windy, which didn't suit everyone. A good meeting. I didn't play well but no matter.
Not long back from sewing class tonight - it is unfortunately a fiasco and several of us are withdrawing. So last one tonight.