Last day of February. I spent all day, 7.5 hours, at a Jacket Tailoring workshop run by R, my regular pattern cutting tutor, assisted by D, my dressmaking techniques tutor. They work together in their workshop which is much nearer my home than the college. D was there to help as originally more people were due to attend. In the end only Sarah, whom I know from my pattern cutting class - she's the enthusiastic, vintage inspired person I've mentioned previously, and I were there. This meant we got lots of attention. Both Sarah and I are quite slow and fairly exacting though for the purposes of the workshop we had to let some things go.
BTW, this is not intended to be a tutorial just an aide memoir for myself. As I write, I don't yet have the promised notes so I'm trying to get my thoughts in order. I'm sure I've already forgotten a number of steps. Then I remember some and add in. The notes will act as a better reminder.
On a side note, I received a letter from our local college which has a large fashion and design and textiles etc section saying my application for their 6 week pattern cutting workshop had been accepted and I should turn up on 9 March. I replied, declining. I believe I applied last year but didn't hear anything and then found R's class which although much further especially at rush hour can be for 30 weeks. I'm more than happy to stick with that. I believe the local college only does the one six weeks, making a skirt block. It's also as expensive as the year I attend for just 6 weeks.
Before I went to the class in the morning, I called in at the local fabric shop, across the road, to buy some fabric for the pockets and linings of DH's jeans. I got some satisfactory strong but lightweight cotton and R and D both approved the purchase. R showed us the inside of a jacket which had a two piece pocket - ours was folded. R said that the folded pocket is stronger. I'll have to consider this for DH's jeans.
Back to R's jacket workshop.
When I arrived, I helped fuse interfacing onto a number of pieces. This was to be a soft tailoring workshop. I'm pleased about that as I'm not into either heavy structured traditional tailoring or a lot of hand stitching - I don't mind a little, in fact it can be very relaxing.
I took some photos but towards the end we were rather rushed and I couldn't. Not all my photos worked. I just used my mobile phone as trying to use a camera in that situation would have been difficult.
I took some photos but towards the end we were rather rushed and I couldn't. Not all my photos worked. I just used my mobile phone as trying to use a camera in that situation would have been difficult.
There was fusible interfacing at the hems, top of sleeve, around neck and part of armhole.
The whole of the front piece was fused with 'body' wool and hair canvas interfacing. The front interfacing was fused with a lightweight interfacing.
Because all these pieces had been cut and fused, you might have thought we'd be quick. Not so - we're both slow and there was also chat and doughnuts and beverages. In some cases, D was working just ahead of R to get things ready. Also, many of the markings made by pencil had come off. R had a printer malfunction so we won't get her interesting looking hand-out until next week. We didn't see a finished garment or pattern picture so I wasn't altogether clear what exactly we were making.
Because all these pieces had been cut and fused, you might have thought we'd be quick. Not so - we're both slow and there was also chat and doughnuts and beverages. In some cases, D was working just ahead of R to get things ready. Also, many of the markings made by pencil had come off. R had a printer malfunction so we won't get her interesting looking hand-out until next week. We didn't see a finished garment or pattern picture so I wasn't altogether clear what exactly we were making.
The first step was sewing the dart in the front. This dart ended at the jet pocket so accuracy was important. We had to cut the dart, press open press and cut into the seamline at the end of this dart. I won't mention pressing again (much) but rest assured every step was pressed.


The reverse of this slit and the adjoining fabric were given a layer of interfacing. R helped with this and I got a slight pucker in the fabric which would cause problems later.
There is a terminology issue here. Our tutors refer to this type of pocket as a 'Jetted Pocket' and this is the language which comes naturally to them - even though D isn't 30 yet. We haven't had the class hand-out yet. All my personal reference books originate in the US and refer to this as a 'Double Welt Pocket'. My internet search reveals that these are also called 'Besom Pockets'. I found that the name for the strips is either 'Welts' - hence the alternative name, double welt pocket, or 'Jettings', which I seem to have abbreviated to 'Jets'. I go between the terms. Apologies for this. No apologies for use of centimetres. Flaps were originally designed to cover the jettings and prevent rain getting in and these were therefore tucked in while indoors. That is no longer the case and the flap is considered an accessory which completes the style, with the flap being left out. It tends to be more formal jackets which have a double welt pocket without flap.
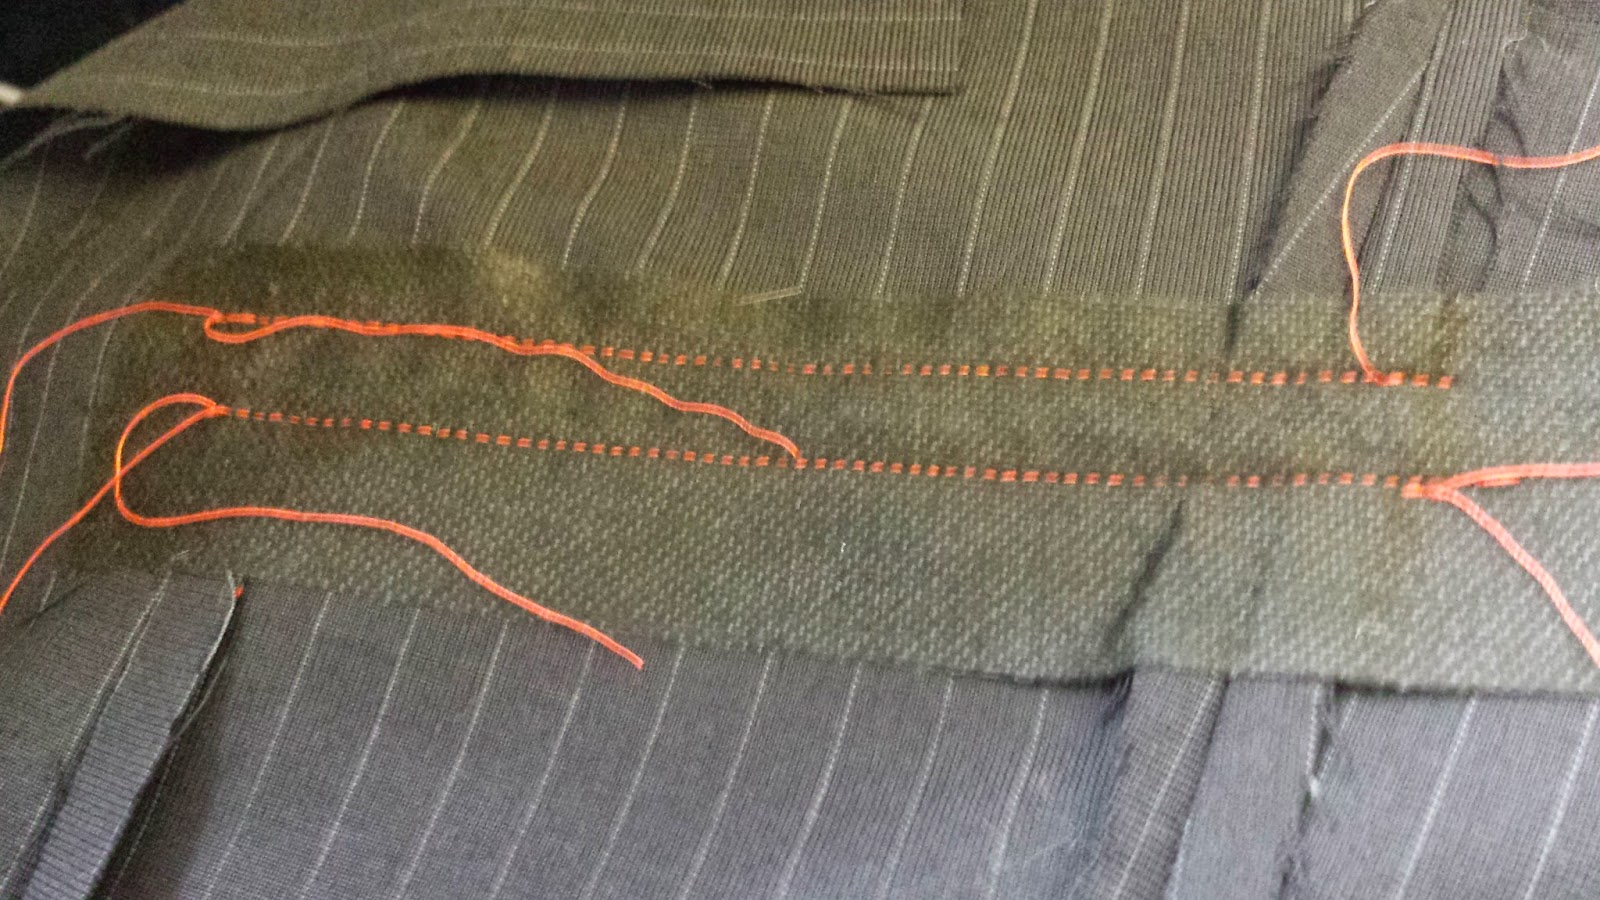
We then marked out 16cm for the jet placement, on the right side. The line was evenly spaced around the slit and ended in a clearly marked line.
We then placed one welt piece along the slit, raw edge inwards, evenly spaced on each side. We then had to carefully stitch along our marked line, starting and ending exactly at the marks originally drawn at the ends of the line marking the pocket position. Fortunately, this stitching fell just to the side of my original stitching line so it wouldn't show.
Then the second piece was applied. Raw edge to raw edge, similarly stitched. We had to check they were even - two methods I remember - firstly, the stitching was visible on the interfacing at the back and the two lines had to be parallel, 1cm apart and ending exactly at the marked end. One of mine was a stitch too long and so I had to take that back. The second method was folding up the folded ends to ensure they met each other. Mine did.


Then the second piece was applied. Raw edge to raw edge, similarly stitched. We had to check they were even - two methods I remember - firstly, the stitching was visible on the interfacing at the back and the two lines had to be parallel, 1cm apart and ending exactly at the marked end. One of mine was a stitch too long and so I had to take that back. The second method was folding up the folded ends to ensure they met each other. Mine did.


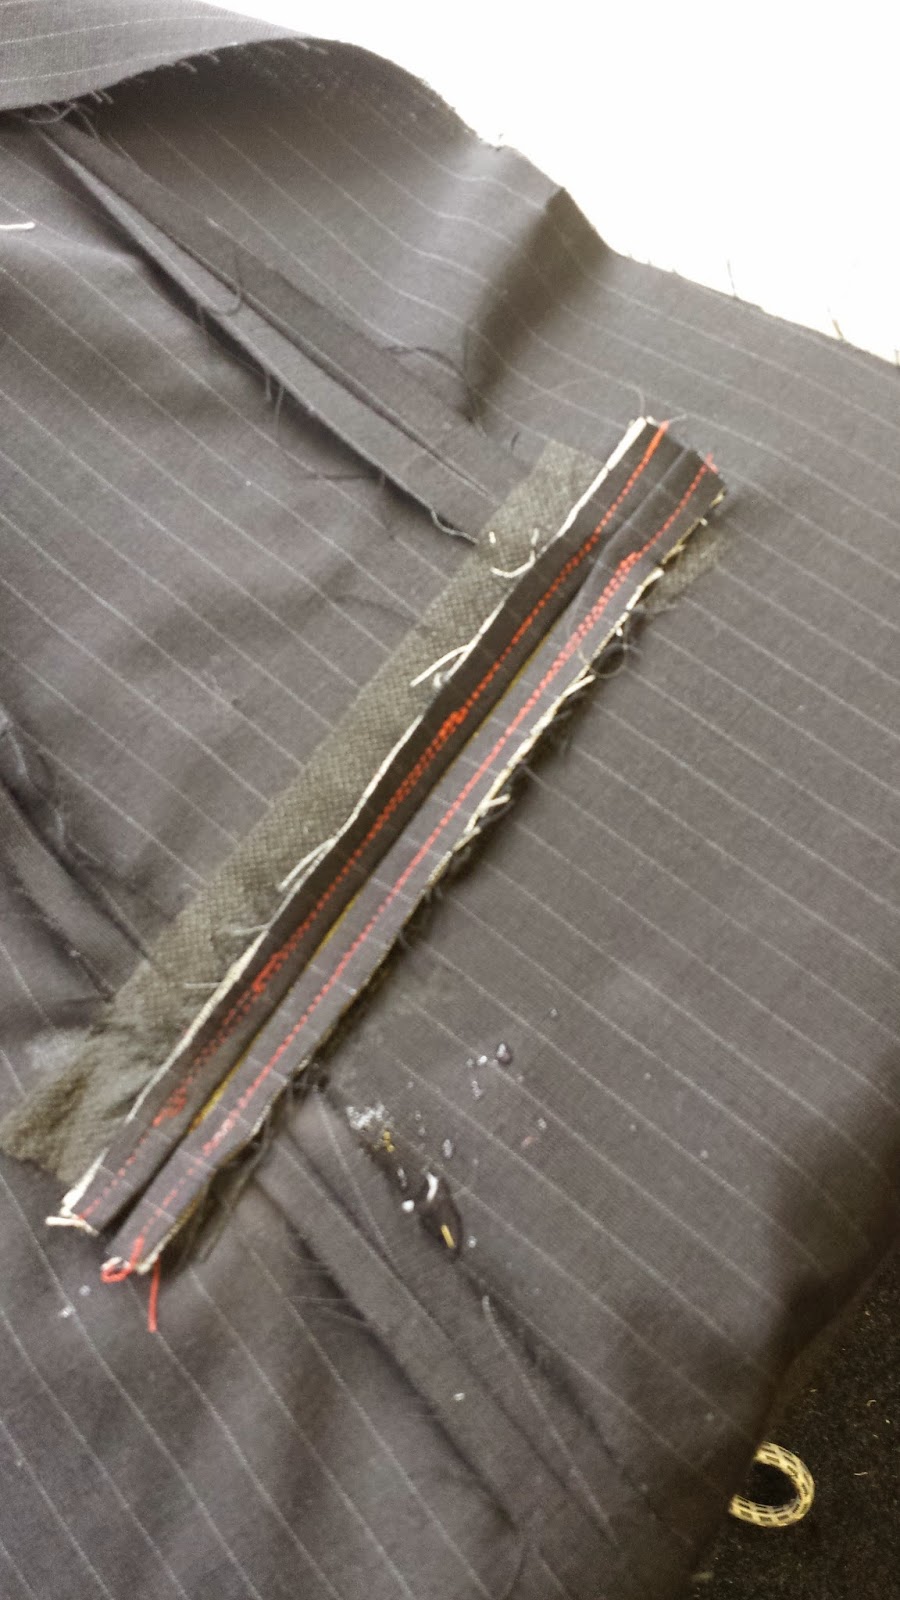
Then, from the interfacing side we had to cut into and open up the slit ensuring we didn't cut the welts. The cut had to stop 1cm short of each end. Then the cut bifurcated virtually up to the end of the stitching. I forgot that step at first so it was no surprise that I couldn't adequately turn my welts through. Even after I did get them turned through, I had some puckering and my cuts needed to be extended closer to the stitching - I hadn't been brave enough.
After the welts were turned through and deemed satisfactory - this took quite a bit of time! - we needed to secure the end of the pocket by stitching through the little triangle of fabric created by the bifurcation of the cut onto the welts, avoiding the bulk of the fabric.
We were hungry and pretty tired by this time but had to finish our pocket before lunch! We took a piece of cotton and added some of the main fabric to the top so that's what would be seen through the jets - I forget the name of this. We were rushing a bit and you know what they say - festina lente - the more hurry, the less speed. We sewed on our pocket bag to the two jets but forgot to under stitch - I asked the question too late. Lunch was calling so we ploughed on. Later I did one or two hand under stitches. R told me this would have been done by hand, though not in the industry where she worked.
Ironically, when I go to my trouser/jeans techniques class on Wednesday, we will be doing the double welt/jetted pocket as that isn't covered in jeans making but is important for trousers making! I should be pretty good at it. What do they say? See one, Do one, Teach one!! The manipulation will be easier as we will be starting with a 4cm width fabric to make a 1 cm welt/jetting. (update - we didn't actually ever get around to doing this!)
Lunch (late lunch) was a relief. Neither Sarah nor I had done this kind of pocket before and both found it quite difficult.
Ironically, when I go to my trouser/jeans techniques class on Wednesday, we will be doing the double welt/jetted pocket as that isn't covered in jeans making but is important for trousers making! I should be pretty good at it. What do they say? See one, Do one, Teach one!! The manipulation will be easier as we will be starting with a 4cm width fabric to make a 1 cm welt/jetting. (update - we didn't actually ever get around to doing this!)
R gave us a sheet at the end with interfacing samples used in the construction of the jacket which, BTW, was a small size half jacket with a two pieces sleeve, intended to be lined.
Still to come:
Still to come:
Collar


My collar isn't finished as it wasn't lying nicely. I need to have a look at that tomorrow, too.
Sleeve insertion - in fact we didn't get that finished and said we'd try to do it for Monday. I'm pretty busy tomorrow so I may not manage.
R also gave us the sleeve head, briefly telling us how to add, and a shoulder pad. Sarah and I were both brain dead by this time and I didn't really take it in!


I'm really very tired, wimp that I am, and I think I'll give up at that for tonight. I've recorded a documentary in which my youngest daughter is credited as a researcher. Her first credit. I'll watch that with a glass of wine.
Sunday - St David's Day
I didn't get to post last night after all. Better late than never? I missed the bit of the documentary where my daughter actually appears on screen so I'll have to find that!
I decided to wait to post second part until I had finished jacket sample as I can ask R at class on Monday. I'm busy after that so the second part of the post will be at least a week away.
I decided to wait to post second part until I had finished jacket sample as I can ask R at class on Monday. I'm busy after that so the second part of the post will be at least a week away.


I so enjoy reading your blog and I don't sew at all now. I like to see and read about your projects and love looking at the photos as you describe each step.
ReplyDeleteThank you. Looking at my blog this morning, on my tablet, I see I have some problems with the photos. They were fine last night! I'll try to get them sorted.
DeleteWhat a long day of learning - no wonder you were tired at the end of it. Industry seems to call these jet pockets - I knew a sample machinist once and this was the term she used. They look tricky, but really, like all things, just a series of steps. By the end of the year you will be quite an expert on things sewing :)
ReplyDeleteYes, it was too much and of course we didn't even get to the stage the tutor wanted us to be at. Yes, all these things are a series of steps. Accurate measuring, marking and sewing. Now that the steps have been demonstrated and I have tried my first, I understand better than I did when I just read it. Next pocket should be better. Thank you.
DeleteI seem to have a problem with my photos today. I don't know why. They show up fine in editing mode and were fine yesterday, though I did have this same problem with a couple of the photos (different ones!) and I ended up deleting and putting back in. I think I'll have to try that again later. Unless anyone head other ideas? I'm on my Android tablet - I suppose it's possible it's OK on PC but other posts are fine here.
ReplyDeleteI think I've sorted the photos by deleting and putting back in. I haven't put in all the captions, in case that's part of the problem
ReplyDeleteThe content and structure of this blog post are really good and informative. Thank you for the posting.
ReplyDeleteProm Dress St Albans