Wednesday, 5 September 2018

Postmortem - and wake up call!

I asked Rory at our new season sewing bee today about the top I've spoken of in a couple of posts, the most recent here.

She agreed it was better than the original I produced before the change in bias binding stitching.

She concluded it was too small from bust level upwards on the front only. The fabric was under too much tension between the breasts. There was plenty of room in the back and the reason it felt as if it was pulling when I bent forward was that it was too tight across the bust. I asked if that meant I needed a bigger dart but Rory drew a diagram showing that I needed to add length to to shoulder seams and extra width at the curve of the armscye where I feel the tightness - effectively going up a size in that area. She didn't feel my back was rounded. She dislikes terms such as 'sway back' etc because she feels this leads to body dislike and over-emphasis on negative aspects and prefers that we simply change to fit that which is in front of us. There is plenty of fabric from bust down.

One of the other ladies in the class tried to delicately phrase that as I had put on weight, it was too tight in that area but if I lost it, it would be perfect. That may be so. She felt that my first was better and that I had gained weight between drafting and producing this version. She is correct, of course.

This is the first top I made from my pattern, before making side slits and adjusting a narrowed back cross armscye area,  a style which I didn't really like. I still like and wear this top though the fabric is slightly prickly.
I reckon I do look better in this photo.

Rory didn't think that the dart position wasn't a huge issues - and yes, if I lost a bit of weight that would alter.

I was working on Joanne's culottes which I hope to finish for next week as I am seeing Joanne at the weekend.

One of the other ladies is working on seam line pockets in trousers for her daughter. I was wearing a pair of wide-ish legged trousers (pants) which fit me reasonably well and I feel quite comfortable in. One of the issues, however, is that the side seam pockets gape and show their innards when I sit. I demonstrated this to the other lady.

Rory thought that the trousers would do this if they are too tight - but these one are not too tight. That was the third component of my wake up call. I certainly must lose weight!

She then demonstrate that if a pocket is drafted basically ignoring the dart in the trouser, that the pocket won't fit well and will gape. She explained that in ready to wear (in which she has a long career) a properly drafted pocket has less 'hanger appeal' as it doesn't hang nicely than an improperly drafted pocket which will - so often it is the improperly drafted pocket which wins the day. She reminisced about how when we were all younger, in the department stores there were knowledgeable sales persons and on-site seamstresses to alter your garment to fit. This doesn't happen now. There is so little knowledge.

We have only 3 big department stores remaining in our city. Two of these sell fabric and haberdashery. Both have much smaller sections than say 20 or even 10 years ago. One of them is pulling out of selling fabric altogether, sadly. The remaining one rarely has a salesperson with any knowledge selling. It's usually a case of getting a generic salesperson to cut or whatever.

So, anyway, I will alter the pattern for the top and think about that diet.

Sunday, 2 September 2018

Last Chance Saloon?


Follow up to self-drafted top from earlier post (see here). Gosh, that was nearly a month ago.

An overall view of modified top. I think it could do with more waist shaping - but that's the least of its problems!

I took the top to sewing bee before the summer break for Rory and Dan to critique.

Both agreed that the issue was at the armhole as I thought. I thought it was too tight and needed enlarged. Rory suggested the top was unbalanced but didn't continue that theme. We looked at the possibility of further scooping the armhole at the particularly tight point only but not above that as it would show too much flesh. Also, there was enough space under the arm. I asked about the possibility of reducing the seam allowance at the shoulders which would drop the top and help both the armhole tightness and the bust dart position. Rory investigated that but demonstrated that this would cause further problems including gaposis.

We agreed that I would remove the bias binding (I know I said I wasn't going to!!). Rory wondered if this could be the problem.

I think it's relevant to highlight three points before I continue.
1 Cutting the excess fabric away left a rather acute angle rather than a more gentle curve
2 When sewing on the bias tape I attempted to correct this by taking a smaller amount of bodice fabric with the seaming ie a smaller seam allowance on the bodice. This was difficult.
3 My bias tape wasn't wide enough and I tried to make do.

I removed the bias binding (I'm getting good at this!) and tried on the top for Rory. The top did not feel tight and the bust darts were sitting okay. Rory immediately confirmed that it had been my bias binding causing the issue. She said that as I was going around the tighter curve, I had pulled the binding too tight rather than working some extra binding into it as required. This in turn pulled the fabric towards the sides and caused the tightness and distortion seen.

I was pleased to have this identified but I confess I was disappointed to realise I had put the binding on so badly! I thought I had achieved a decent finish. However, I had certainly struggled with these curves, particularly with binding that was too narrow meaning my seam allowances were small.

I found some extra fabric and cut new, wider, bias strips. They weren’t quite long enough and had to be pieced.

I planned a 1cm seam allowance as that is the seam allowance I added to the pattern. So my strips needed to be 1cm +1cm + 2x required width of exposed tape. I wanted my tape 1.3cms wide as that's the width of the neckline bias. So I needed to cut my strips 1 +1 + 2.6 = 4.6cms. The strips I used were only 3.3cms wide so it's no wonder I was having problems!

Rory said she'd show me how to put the binding on properly and she did in our last sewing bee before the summer holiday break. First she prepared the binding. She folded in two down the strip as I had done and pressed but then also folded in one side and pressed, but not the other. If I had done that, my too narrow width could have been identified.

I pin and baste to get even seam allowances - with her experience, Rory does it freehand without a single pin.

Another difference was that Rory pinned to the wrong side and the finished binding, already folded, was folded to the right side for stitching. I found this much more difficult as the stitching line was a little irregular and had to be covered. I would certainly have found it easier to stitch to the right side as I did and fold to the wrong side.

Anyway, I did the best I could. I had to join the bias binding before completing the sewing. That wasn’t without its problems, but I managed. I then first pinned and then tacked the binding to the front, ensuring the stitching was covered. Then I edgestitched.

My top was finished and I tried it on for the first time (I was wearing a dress at the last sewing bee and wasn’t willing to model the top!).

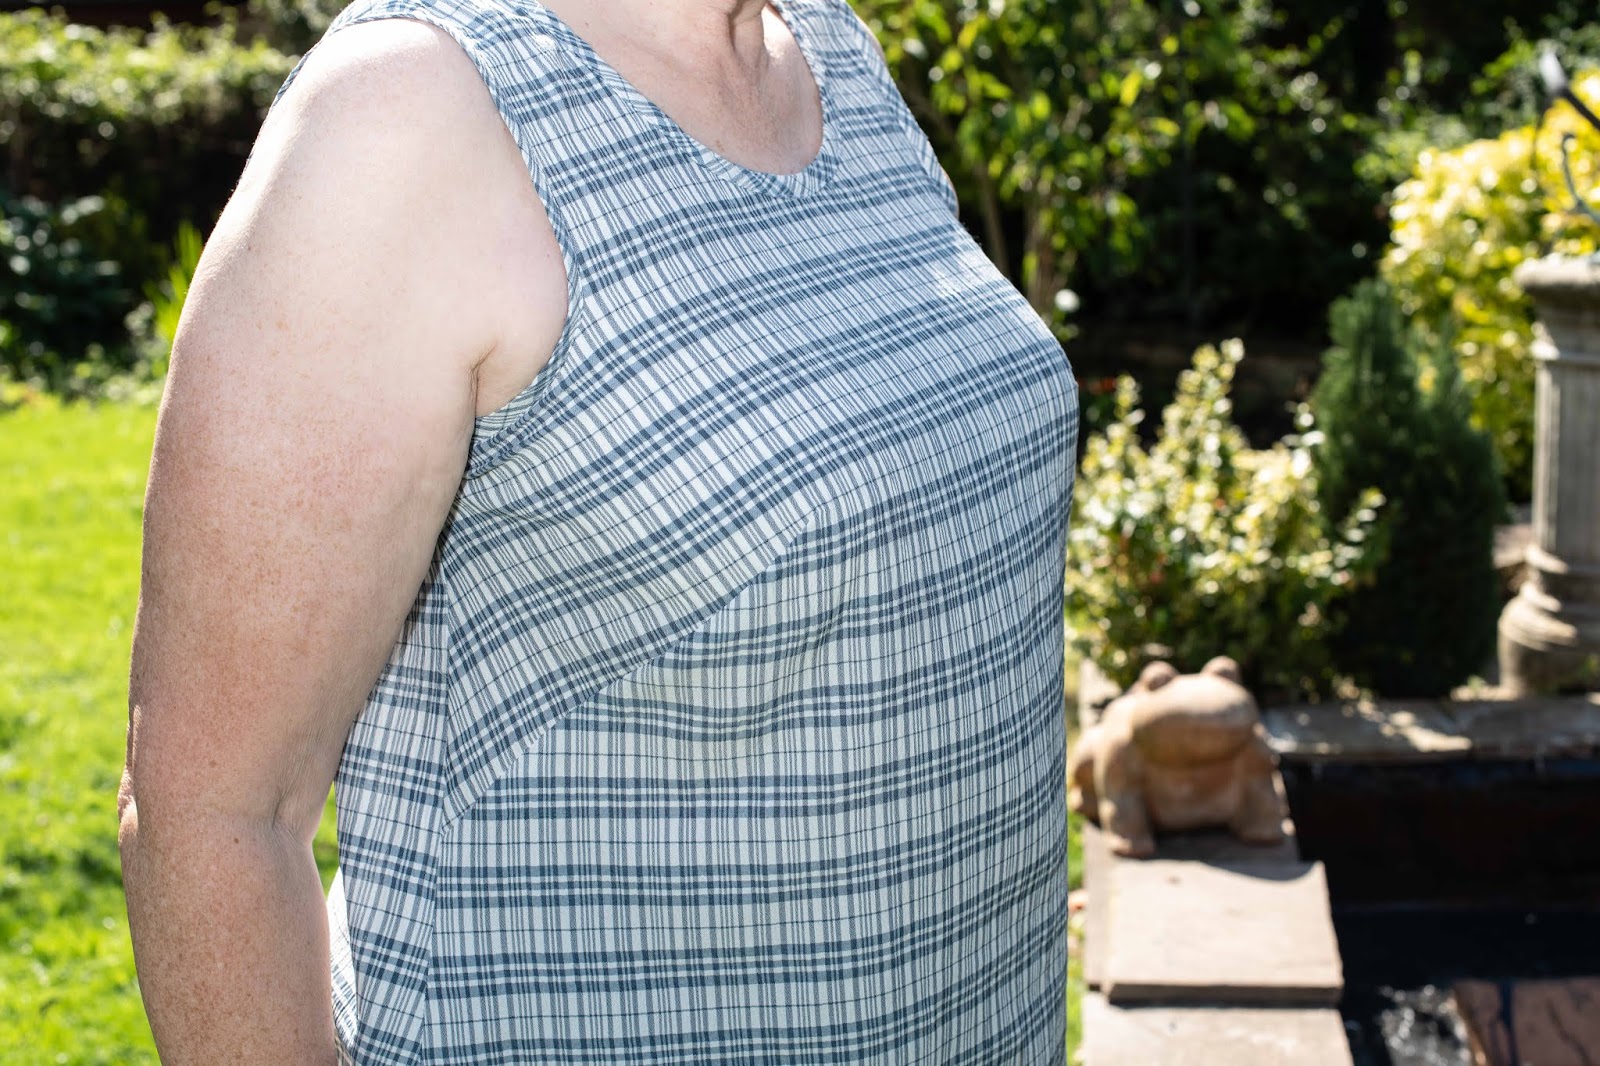
At the time I thought the pulling was sorted and that the darts lay at the right place. Since then, I have changed my mind – see photos. The darts are still too high and, I feel, a bit too long. Worse, the top feels constrictive.


To show darts. Photobombed by a large stone frog. The right side of the top is less baggy under the arms than the left.

The top still doesn’t work. I feel I am showing rather too much flesh at the sides, the armhole is too low, the curve needs to be less acute but the biggest thing is that the armhole is incredibly baggy on the left side - it would need to be taken in by quite a bit. Even at that, David felt that the bodice was still tight at the armhole at the previously tight point -  not the binding, which was no longer tight. I would say it is tight at the stitching line

My bra shows in certain positions and you can perhaps see that there is a lot of excess fabric under the arm. I think you can see that the binding is not tight but that the stitching line is.
Is this armhole too low?


The back feels tight

The tightness here is clear to see


Side view of lower half


Too much to consider fixing.

I don’t like it. It is uncomfortable to wear. It is going. I won’t be making another top from this pattern. I like the fabric and found some more when I was looking for a fabric - I thought I had given it away. I may try to make a different top. I'm not sure if the issue is all about fit, though you would think that would be sorted by now after several iterations and all the advice I've had or whether it's a case of this top style simply not suiting me.

Update and photos

I haven’t been sewing for the last fortnight. Today was a lovely warm sunny day, so I tried on the top again and asked David to take some quick photos – he was still working on our pond. I found the top uncomfortable, digging in under the arms and showing my bra. The back felt too tight as I reached forward. Have a look at the photos and see what you think. I start back at sewing bee this coming week and may ask again, for the future, not for this top.

Helen was here a couple of weeks ago, to attend the wedding of a schoolfriend. While here she enjoyed an article in Threads magazine and ordered the Vogue pattern that was being discussed. She approved of the green silk for her dress (and liked the blue silk I had also bought) and suggested she'd love a pair of shorts/culottes like Joanne's - she liked the patterned fabric rejected by Joanne. She still hasn't decided on the style for her tartan skirt. I have a long list of items as you can see!


I've told her that I'm making for me for a bit but the green dress is promised for her birthday in November.


Sunday, 19 August 2018

A monogrammed pocket for Jack

I wrote about how my grandsons loved their machine embroidered pincushions/teddy pillows that they helped embroider. I suggested to Jack that I would embroider a pocket with his initials for his birthday and he was delighted with the idea.


Birthday boy. Jack says he likes big teeshirts


Note that my offer was for a pocket, not a teeshirt! However, after having huge difficulty finding a suitable non-motif tee shirt, I thought I was going to have to make one! I have Kerstin Martensson’s Kwik Sew Sewing for Children and there was a suitable pattern in it. Fortunately, I eventually found some very reasonably priced teeshirts and polo shirts. I had bought the tee in yellow but Jack preferred a teeshirt and in white. Jack is very tall for his age - he’ll be 9 on his birthday but I needed 10-11 size


The tee shirts were cheap enough that I was able to buy a smaller sized spare to cut up for the pockets so they would match. I had looked at some possible monograms on my embroidery software and gave Jack a choice. He chose the one I have done in the colours I showed it in.


My original design was only 40mm by 40mm approx. including the decorative border. This was very tiny and I felt it would be lost on the pocket. Also the letter T at the end was almost  illegible. I adjusted the software and enlarged my design to approx 60mm by 60mm. That was better. 

I have never sewn a motif on a tee, have never embroidered on stretch fabric at all so I went on a quick learning mission by watching a Craftsy class. The class was very useful. I learned that the hooping is probably the most important thing of all and how to do it properly. 

I wasn’t sure what size a pocket should be, so used the template in the Kwik Sew book. I prepared to have a practice. I mentioned I had previously washed and tumble dried the teeshirts. I used a heavy-ish interfacing on the back. This would be a cut-away type, slightly secured by spray on adhesive. I couldn’t find my adhesive anywhere though I certainly have some so made do with a fusible interfacing that had been discarded as it didn’t stick properly. On top of the embroidery, I had a layer of water soluble Solvy. I understand that this provides support to the letters and makes them more distinct. This was important because of the shape of the bar on the T. 

I ended up cutting a piece of fabric from the tee shirt rather than try to embroider whole, which of course I would have had to do if I was embroidering directly onto the tee rather than a pocket. The whole stitching process went without a hitch and I think the embroidery looks pretty good.


The first issue was that using the Kwik sew template added rather too much space at the bottom of  my design and I felt that it was going to be unbalanced. So when I cut the pocket out, I corrected this by adding above the design what the pointed shape added on below. I also decided to have a narrower top border so my stitching line would be over the original box I had stitched around the design in a running stitch, which I removed. I'm not sure I needed to do that but I wanted to make sure the fabric didn't move white it was being embroidered. 

I cut the pocket out, sewed the top border and turned in the hems. I struggled a bit with sewing the sides. I ended up with a line of stitching halfway across the seam allowance - not good. I decided to leave it and ask advice at sewing club. In the meantime I dissolved away the rest of the Solvy - it was easy and quick. At sewing club, I was advised to edge stitch the pocket to the tee, rather than use a wider topstitch. When I mentioned the difficulty I'd had in stitching in the first place, I was advised to use a stabiliser behind. They recommended a particular one which unfortunately they didn't have - and neither do I. However, I decided to use the same semi sticky stabiliser and tear away afterwards. 


I measured out where the pocket should go, placed the pocket using a stick of spot fabric glue designed for this purpose (but the glue had deteriorated and didn't work well), had the interfacing behind and stitched on without difficulty. However, the pocket was lopsided. It had moved. I was forced to unpick. I remeasured, tacked in place and edge stitched once more. That was better. 

I had a little difficulty removing the stabiliser. I should have done the reinforcing stitching in the corners before I removed it because I had problems with that. 

Overall I'm reasonably happy with the result. The teeshirt needed washed again  to remove the pencil mark and the yellow of the glue (it's supposed to dry clear but it didn't; I should have tried it out on a sample. You live and you learn.)  I assumed the tee would come out of the machine in satisfactory condition!!  Obviously, if not then it's not fit for purpose! Well, it came out of the machine fine and I hung it to dry (indoors as we’re having some rain at present). I then ironed it, packed it and posted it off, in good time.

I found this project more difficult than I expected but learned a lot. The pocket itself was straightforward but attaching it to the tee wasn't. Kerstin Martensson says the pocket should be attached before sewing up the tee - I can see why as it was a little tricky to manipulate. 


More culottes for Joanne - you'd think it'd be easy third time around! (Spoiler - it wasn't/isn't and I need your help!)


Two years ago I made Joanne two pairs of culottes/shorts from a double layer of double georgette. I blogged about them here and here. I have to remind myself that I really did make them and they were successful given what follows!
This is how they should look. Photo from last time around.
Side zip and pocket on left, right pocket and lace inserted between lining and outer fabric around legs.

Joanne asked me to make her another pair as, wearing them a lot as she does, these were wearing out. I'm not sure in what way. But as they've lasted two years of heavy wear I don't think it's a huge issue related to my sewing. At that time I made one pair in a nice double georgette but the other in a much less nice fabric sourced locally. I don’t know which pair is dying. Or maybe it’s both.

I still had the original pattern I made. Joanne had commented that the back was slightly shorter (I had noticed it too - she has sadly inherited her mother's butt!). She then said not to change it as the shorts were perfect but I did add a bit anyway. Don't tell her!

I ordered more of the nice double georgette from Minerva. In black of course. I had bought some patterned fabric but Joanne had no interest in that

I cut out the fabric and then hit a total block. I just couldn't remember how I made them previously. I re-read my notes but no joy. I asked Rory's advice (again). I took notes listing each step - but still couldn't do it! I immediately forgot even though the notes made perfect sense at the time. What was going on?

I re-read my blog posts, the notes I'd made and the link I recommend for the zip in the inseam pocket. I also reminded myself how to do an ordinary in seam pocket. Yet I was still stuck.

What? I hadn’t even got to the tricky bagging out part.

I realised I'd have to overlock the edges as the fabric frays so much. So I did that to all the pieces.

Pockets
Fortunately I still had my previous toile though it's one layer only. It only had one pocket, the zipped one.

In Dan’s sewing club I got initial advice from Rory just before she left about sewing a box for the pocket rather than simply clipping, in view of the fabric fraying so readily - this was as she had recommended last time. Dan helped me during the rest of the evening. She found the toile helpful in helping me.

I started off not too badly. I decided to start with the zipped side. The two sides are different. The unzipped side, the right, is a traditional in seam pocket with the front part attached to the front and the back attached to the back and undersewn before they are sewn together. (Note - see later - it isn’t!!) On the left side, however, both pocket pieces are attached to the front prior to the pocket pieces being sewn together, leaving a seam allowance for the zip.

Unfortunately, I stitched the pocket pieces together wrongly and left zero pocket space! I couldn't see how to do it, but Dan to the rescue with the help of my toile. I had to unpick causing a bit of extra fraying on the pocket edges.

It took a while but when I left at the end of the two-hour sewing bee, I was clear about the way forward! At least, I thought that at the time. One slight problem I have is that Dan and Rory approach things from a different angle and that causes confusion for me.

I haven't put any photos of these steps because a)I did last time and b)I didn't take any!
.
A couple of issues I picked up
  • My marks indicating the wrong side of the fabric had disappeared. I found it extremely difficult to tell one side from the other. Dan helped but also found it extremely tricky.
  • I need to make the pocket of the next version deeper below the level of the pocket opening - I haven't left much space.


Well, I hang my head in shame! I got these all wrong, despite Rory’s drawing. The thing is, because Rory advised the boxed method, I couldn’t find an online tutorial or one in any of my books showing me what to do. To cut a long story short, I wasted a back piece and a front piece and two pocket pieces. In Rory’s sewing bee, she tried to sort out my errors (plural) but was unable to do so in this fabric, particularly with small black stitches and understitches on black! I felt quite upset as I had moved several steps back and realised I wouldn’t be able to finish in time for Joanne's birthday, sadly.

Whereas in the method in tutorials that I’ve seen the front pocket piece gets attached to the front, the back to the back and then both joined and folded to the front (and this is what Dan was advising, not realising that I was doing the boxed method) - this is different as the fabric can’t fold in that direction after a box (part of my problem was trying to make it do so) With this pocket, it’s made in the same way as the left zipper pocket - that is that both front and back are attached to the front. Trouble is, I had also mistakenly boxed and understitched the back pocket...

The left side zipped pocket was much better. I had attached the zip without any difficulty but then realised that the pocket opening was rather baggy and some of the understitching was showing in the surface. I took that side of the zip out, readjusted the pocket pieces and it looks better.

So then I had to re-do the right side pocket (I used the lining pieces as it’s self-lining and I was able use the extra pocket pieces I cut - the pockets are single layer not double as I was originally intending). I added a further layer of interfacing behind the zip as some of it got torn off when I was altering and unpicking the zip (one side of the zip only as I left the other side).

I eventually managed to complete the two pockets and the zip. That took me a long time. I’m not sure whether this fabric is harder to work with than the last (I thought they were the same) but I’ve struggled with the understitching of the pockets - the stitching slips away from where it should be to the centre of the seam or even towards the right side of the skirt part. The first time it happened, I thought I had forgotten to move the needle but then I realised that wasn’t the problem; the fabric is shifty.  I ended up moving the needle further than usual to ensure the understitching was in the correct place.

Next steps
I made up the lining shorts, remembering to have a gap where the lining will eventually be sewn to the zip. Now I had two ‘shorts’, one in lining and one for main, minus the waistband of course.
Here’s where I need your help!!

I attached the guipure lace to the right side of the outer shorts. I then attached lining to shorts at the leg, sewing through the lace, now sandwiched between the layers of fabric. I understitched the lace edge as far as I was able to stop the lining showing. 
I found my magnifying lens essential


Then I tried to turn the shorts through to the right side. I have tried and tried, no joy. I have asked Helen, who is visiting to attend a wedding, and David, no joy. I have practised on two pairs of knickers, now ex-knickers. No joy. I can’t remember how I did it previously.
The shorts are wrong way out. Lace attached between layers.
You can see how I stitched the crotch and the lack of any inseam.

When I try to turn, the lace disappears into the tunnel that is the crotch, but doesn't come out the correct way on the other side - I'm just back to where I started!

Another view

I asked advice on PR  yesterday and have just had a reply so I'll consider the steps for that.

I have to do a bit more thinking about this as I’ve realised that the way I had joined the toile crotch may not have been the same as last time (see photo above). When I’m making trousers/pants, the two sides are made up separately and then the back and front crotch seam are sewn in one continuous seam with one leg inside the other. In this case, I joined the two sides at the front and at the back crotch seams, then I stitched horizontally across the crotch to join back to front on each of the lining and short outside fabric. This is the way the toile was done, for speed probably and Rory had suggested it might make it easier to turn.  Clearly it hasn’t. Is this the reason? Is it impossible to turn given what I have created? I should add that the ‘inseam’ is basically non-existent, so the lace is effectively joined to the sides of the crotch piece.

I’m afraid of damaging the fabric further – there are already a couple of clicks. It would be difficult but certainly not impossible to take out again. I’m prepared to do that, even though the fabric may end up unusable. I have enough fabric to make another pair but until this problem is resolved, there is clearly no point in me doing so!

Can you offer advice, please?

Edited to say - the problem is solved!! David said if I had turned the legs before I sewed the crotch, then I wouldn't have had the problem. That combined with the suggestion from PR to turn through the crotch led me to take out the whole of the back and front crotch seams in the lining - and hey presto! I could indeed turn through. Then I had to re-sew those seams I had taken out - not much of a problem when there's no waistband - and then hand sew the last bit of crotch lining closed. I've had enough of these for now so will think about the waistband, which is the next step, later in the week.

Just needing a press and waistband


Sunday, 12 August 2018

Comments on blog

I have found that I am not getting email notification about comments as I used to. This is a common problem I understand and has been going on since May, I believe.  I've read loads of help pages. I see that a lot of people are now moving away from blogger and I guess I might have to consider that. I have tried to correct this but don't know if I've been successful yet.

In the process of trying to resolve the problem, I looked at parts of the blogger settings that I have never seen before (I don't usually delve into the settings)  and found quite a few comments in my spam that were not spam. As a result, I didn't reply to these although I do reply normally to all comments made - but I have to see them. I also understand that spam comments are only kept for a brief period so it is likely that I have missed many more. 30% of the 'spam' comments were not spam but 70% were correctly identified.

Sorry if I haven't replied to a comment you've made. Please, please don't let this put you off!

Anyway, finger crossed. 🤞

I have received the subscribe to comments notice so, let's see,

Please let me know if there is an issue.

Thanks

Anne

Update:
I received an email notification of a comment from Marianne who is also having this problem. For anyone interested, I have listed the process I wen through below in my response to her comment.

Wednesday, 8 August 2018

Leather Skills Workshop at Centre Front Studio

Leather Skills Workshop

I had previously made a leather pouch with Rory but decided I wanted to do this workshop with her as I didn’t use the proper machine feet the first time around. Last time I had to use baby talc and found some of my stitching was slightly uneven.

The finished pouch, modelled by David


I took my small sewing machine to class. I also took its walking foot. I had bought a roller foot and a leather roller foot and so reckoned I was ready for anything!


Leather roller foot

Roller foot


I took some leather scraps with me but these are upholstery leather and too thick for garments. This class was about using nappa for garment construction.  I left the scraps behind though as they are useful for other things, craft projects.

Only two of us managed to get to class but that’s a nice number when you’re the student. Perhaps not as the tutor(s) – Dan was there to help, too, though fortunately she had other tasks to busy herself with. Centre Front Studio runs a number of  short workshops - recently, one on zips and one on buttonholes. I didn't feel I needed to go to either of those. They were very successful.

We started with various samples of different types of leather. This didn’t actually include vegan leather though one of the girls in the class previously where I made the leather pouch was vegan and used this.


We then looked at seaming methods and tried out samples of each. I found I was able to use my walking foot for top stitching too as my foot didn’t mark the leather. Leah had to change to another foot as hers did mark the leather. The walking foot worked wonderfully well. No slipping of stitches.

Taped seam

Lapped seam with top sttiching

Closed seam with topstitching

Holes visible if you get it wrong!


I used my walking foot and found that my machine behaved impeccably so didn’t need to use either of my fancy new feet. Rory has asked me to take them to a future class so she can have a play as she found the leather roller foot fascinating. I had taken a list of what it was good for with me as found in my Bernina Big Book of Feet

Every foot you've heard of and then many more!


I was amazed at the difference in feel to a seam which had been glued. I was also fascinated by the fell seam which was so supple. I had difficulty with the channel seam and the taped seam – clearly these need more practice.

We were reminded not to glue AND topstitch


Rory warned us NOT to press seams in leather. She said that some people say you can do it but even if the leather looks okay at the time, it has reduced its life span and made it drier. She showed us a project she had made with just a little heat at the edges to show how powerful heat can be:

Isn't it lovely?


My resource workbook with samples


Workshop Project


We made a pouch, somewhat bigger than our previous one but similar in design. Rory had a sample with a channel seam  which looked lovely but Leah and I both elected not to do this. We’re cowards! However, we both wanted to practice  an easier version before trying anything fancier.

Rory modified that pattern to allow us to insert the zip flat and of course this made it easier. We subtracted and added the appropriate amounts to a paper pattern before cutting into the leather – in this case, pig leather. I didn't take photos of inserting the zip.

Rory showed us how to mark the right side of the leather to allow us to sew the zip on accurately. I elected to use double sided tape to keep the zip in place. This worked well BUT the needle was covered with gunge and glue. I cleaned it off and decided I didn’t want to use this in future unless, as Rory said, it was as a last resort. She favours taping the reverse side with masking tape. Leah and I had both had problems removing masking tape we had stitched over earlier on, before realising that we shouldn’t stitch over it, its just to hold in place.

Our zips were the correct length (we chose the easy option again!). I couldn’t of course use my walking foot. Rory suggested my leather roller wheel but I have a Teflon zipper foot and this worked perfectly.

We chose top stitched open seams for the base. Things were going smoothly until Rory realised she’d made an error in the pattern.  In practical terms, this meant that when we were creating the gussets in each corner that the seam allowance had to be 2.5 cms rather than 1 cm – in turn, this meant that our pouches were tall and skinny with a slight waisted effect, compared to the original.  I don't have photos of the gusset creation- too stressful!

I didn't use topstitiching thread or doubled ordinary thread - I should certainly have done so as this would mean that the stitching would show more clearly.

This had kept us back a bit so Rory stitched up the lining for the cases. I can’t remember what she called it (duo lining?) but she used curtain lining with a padded reverse as she said that meant we didn’t have to use additional padded materials. I sewed the lining in, by hand, at home, catching all around the zipper tape.


In class, the last thing we did was to make the tassel out of a strip of leather, cut into fronds and rolled up, with a thong in the centre. My thong is probably a bit long!!


The pattern can be made in leather, or of course in fabric, with various different versions. I do like Rory’s version with the channel (reverse taped) seam. Rory corrected the error that had led to our earlier problems and so I have a pattern I can use for further versions should I choose to pursue that

I like my pouch. I especially like the lining! Our previous pouch wasn’t lined. I found the class useful. I do want to use some of the leather scraps I have at home. They are all thicker than what we were havingin class. My machine may handle them – I need to experiment. David has a vintage Singer which certainly should handle them but he is expecting to hand sew. The class didn’t cover techniques for thicker leathers – hole punching, thinning seams etc

Leah wants to make various versions as gifts for her friends. I think I’ll stick to garment sewing, though I might make my grandson a tablet cover from the science fabric I have left over from his shirt. That won’t be in leather though I suppose the outside could be leather and the inside the science fabric, couldn’t it?

Monday, 6 August 2018

Another top but still no TNT


Self drafted top

At the end of May I posted that I wasn’t happy with this top but couldn’t quite put my finger on the issues. Link here to that post.

Last week I decided to wear the top as it would be cooler than many of my other tops. However, I realised that it wasn’t lying properly as there was a ridge just above the armholes. I concluded that the front bodice width was too great and that the top was hanging on that, meaning too that the bust darts weren’t in the right place, that is slightly too high (worsened by me wearing a cooler summer bra with less support). I decided that taking a bit off the front armscye would work to sort this out and make it into a wearable top. In retrospect it may also have been telling me that I needed a further FBA.

I unpicked the bias strips at the appropriate part front from side seam up to roughly neckline level.  I hoped simply to trim the bodice and re-attach the bias strip. However, when I mentioned this to Rory, she advised taking off the whole of the bias strip as that would be easier in the long run - she said she’d always regretted trying to make do in this way. In any case, the new armscye was going to be bigger, though I wasn't sure by how much.

So at home, I unpicked both bias armhole strips. I had originally trimmed the seam allowances, so this made it a bit more difficult. I drew a curve on each bodice at the armhole marking where I wanted the bodice cut back. I cut a modest amount and found that wasn’t enough so cut a bit more. At the widest point, I cut about 1.3 cms - the original seam allowance was 1 cm.

I found the original bias strip was too short. Luckily, I found a small scrap of the fabric, big enough for the bias strips (and for two more should it come to it!). I cut the bias strips - then realised that I should have made them a little wider. However, I decided to make do. I folded and lightly pressed the wrong sides together so that I had a central pressed line.


I like hand tacking - I find it soothing and feel it saves time in the long run. I attached the right side of the bias strip to the right side of the top leaving the side seam area free. I then wrestled with getting the bias strip joined in the right place - not because of lack of space - I took the strip off more than once - no, because I have real problems envisioning how the pieces attach. Even when I thought I had this down pat, I managed - twice!! - to sew the joining seam in the wrong direction!

Eventually, however, I managed to attach the bias strip using a scant ¼” seam allowance. I hadn’t worked out at that point that this meant I only had a scant ¼” available to turn under on the reverse side! When I realised, I decided so be it as I didn’t want to make the binding showing any narrower. It’s already narrower than the neckline seam but that’s okay as both armholes match.
The hardest part was definitely joining the two bias ends.

Anyway, I stitched on the machine at ¼”. I did have some difficulty with a too acutely cut part - see later. I pressed the seam allowance towards the strip and folded the strip to the wrong side on the fold line. I found that there is a bit of irregularity to the band - you might notice but I’m sure 99% of people I run into won’t! I pressed again. I then first pinned the seam allowance down then folded under that narrow border and pinned. I then tacked. I tacked in the ditch so that the stitching wouldn’t get in the way of my top stitching.

I top stitched using my edge foot at a slightly narrower width than I did on the neckline hoping that all the seam edges would be caught inside. I was going to stitch in the ditch with my machine too but decided against that.

My top stitching went okay. I had to hand stitch a couple of loose bits of seam allowance, peaking out, on the reverse side.

Final top 


I pressed and tried on. I’m still not happy with the top - I still feel it pulling at that area under my arm. I do have a fat pad there so that is presumably the culprit. I will wear though - I have no intention of dismantling again.

I'm pointing to where it feels tight


There are two other issues. One relates to the cutting away of the armscye - I cut too acutely at one side and as a result, the bias strip was very difficult to put on - there is an absolutely minimal part of the bodice caught in - perhaps too little. Time will tell.

The other issue was already in existence. I don’t like the way my vents lie at the side. I think I have too much fabric around my hips and would need to remove some. I also think that my weight gain means that I need a bit more bust space as I see that the top front falls away from my body.

The vent isn't lying too badly here but you can see the gap at the bottom of the bodice between it and my body suggesting to me that I need an FBA. You can also see a stress line (?) from under my arm horizontally to the dart point


The overlap at the left side vent is obvious here


I’m wearing the top as I type. It will be possible to wear it though it is far from comfortable at that front armscye area. I can ignore the other problems for the moment.

What did I learn?
  • Different fabrics behave in different ways so the fit will be different
  • Some fabrics are harder to handle than others.
  • I need to mark alterations on the pattern so that the sides will be even and the shape acceptable.
  • Making the armscye bigger means that more bias binding is required
  • It’s easier in the long run to take off a bias strip and redo.
  • This top still isn’t a TNT despite several changes (perhaps too many changes as one of them was to add on a seam allowance around the whole of the armhole. My original (which fits much better!) had no seam allowance. You will see from the photo below that I also filled in the front armhole curve and the extra bit filled in is almost exactly what I removed. I did need this at the back but not at the front. I had also added hip width at vent level which clearly wasn’t required.
You can see where I added seam allowances - plus a bit more to fill in the curve.
That bit more is almost exactly what I cut off. I've marked it in blue


Question to myself (and you)

Is it worth trying to continue with this pattern?

Next step

I’ll get Rory or Dan to critique in the next sewing bee I attend.

How Do You Read Blogs?

It's a while since I've posted a blog,  lots of reasons. I'm thinking of starting again. However,  I used to read the blogs I fo...